In this blog, I will be covering step-by-step process to implement Push-Notification in Oracle JavaScript Extension Toolkit (JET) hybrid application. To complete the entire Push-notification ecosystem, the notification will be sent from Oracle Mobile Cloud services (MCS) to Firebase Cloud Messaging (FCM) as the notification server, and these notifications will be received by our JET hybrid app.
Note: Google Cloud Message (GCM) will be upgraded to Firebase Cloud Messaging (FCM) soon, so this blog is applicable to both GCM and FCM
Key Concepts
Below tables summarizes the key components involved in implementing for Push Notification:
| Component | Details |
| GCM/FCM server | GCM/FCM will be involved in sending messages between Oracle MCS and the client app. |
| Oracle MCS | Oracle MCS sends data to the client application via the GCM/FCM server. |
| Client Application (JET Hybrid app) | A JET Hybrid application that communicates with Oracle MCS |
Push Notification Life-cycle Flow
Below diagram shows the life-cycle flow for implementing Push Notification:
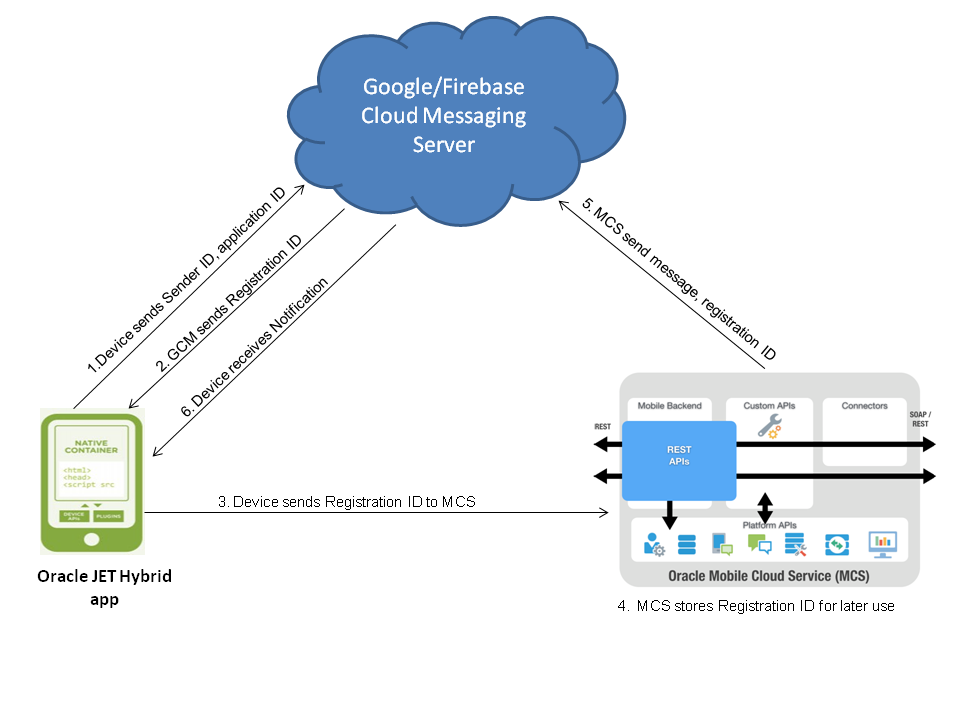
Below are the main steps involved:
- First android device sends Sender ID, application ID to GCM/FCM for registration
- Upon successful registration, GCM/FCM server issues Registration ID to android device
- After receiving registration id, android device will send this registration id to Oracle MCS
- Oracle MCS will store registration id for later use
- Whenever push notification is required, it will be sent via Oracle MCS to GCM/FCM , it will send message and registration ID
- GCM/FCM server will deliver that message to mobile device.
Below table summarizes key terms used:
| Credentials | Details |
| Sender ID | This is the “Project Number” in Google Developer Console. The sender ID is used in the registration process by the application with GCM/FCM |
| Application ID |
The JET hybrid client application that is registering to receive messages. Application ID will be the Package name (from application manifest) incase of hybrid app running on android device
|
| Registration ID | The registration ID issued by GCM/FCM server to the client application that allows it to receive messages, i.e. notifications |
Component 1: Cloud Messaging Server: FCM/GCM
Firebase Cloud Messaging (FCM) is the new version of GCM, so demonstrating FCM instead of GCM.
The first step is to enable Notification from Firebase network, below are the details:
- Go to https://console.firebase.google.com/ and Create a New Project
- Provide Project Name and Country/Region
- Click on "Add APP" and select Android version
- Add Firebase to your app, enter Package Name, please note that the package name should match exactly with your hybrid application name
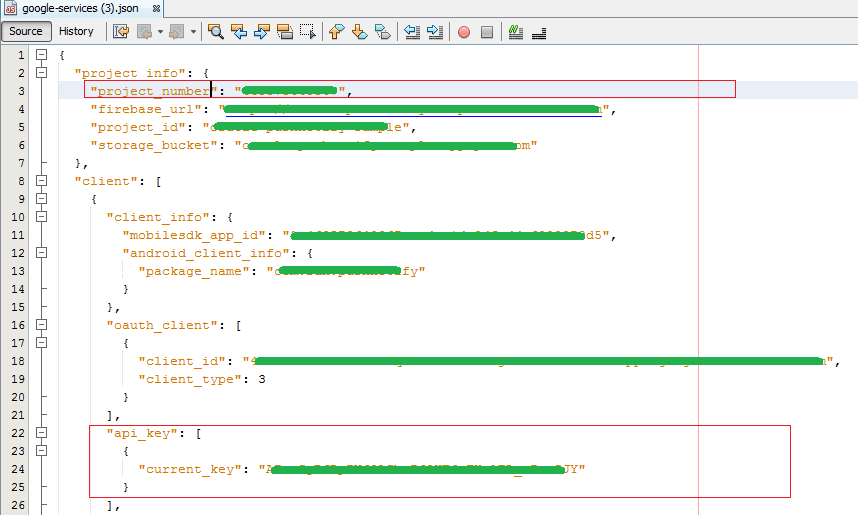
- Click on Add App, a google-services.json file will be downloaded on your system
- Please take note of “project_number” and “api_key” values, these values will be used in Oracle MCS and in client app
Component 2: Our Application Server: Oracle MCS
The next step is to register the client application in Oracle MCS:
- Click menu icon in the upper left corner of the page and select Applications > Mobile Backends.
- Select the mobile backend you want to use and click Open.
- In the left navigation bar, click Clients.
- In the Client Applications part of the page, identify the client application, and click Register Client.
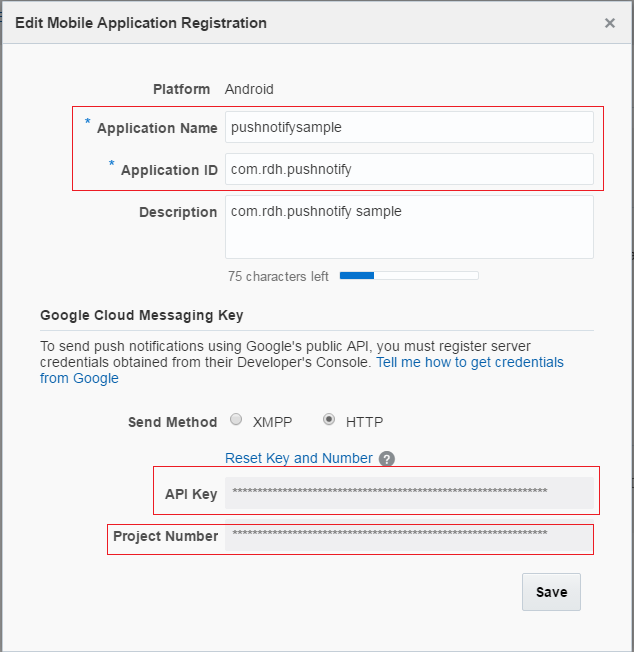
- In the dialog, select the platform and fill in the information needed, based on your platform.
- For Android, you insert the Google API Key in the API Key field.
- Make a note of the value of the Application Key that is shown in the dialog when you create the client. You'll need to add this key to the configuration file
Component 3: Client Application
Before starting the client application, we need to configure our system for setting up the pre-requisites for developing for Android device, below are the same:
Android Settings in your machine
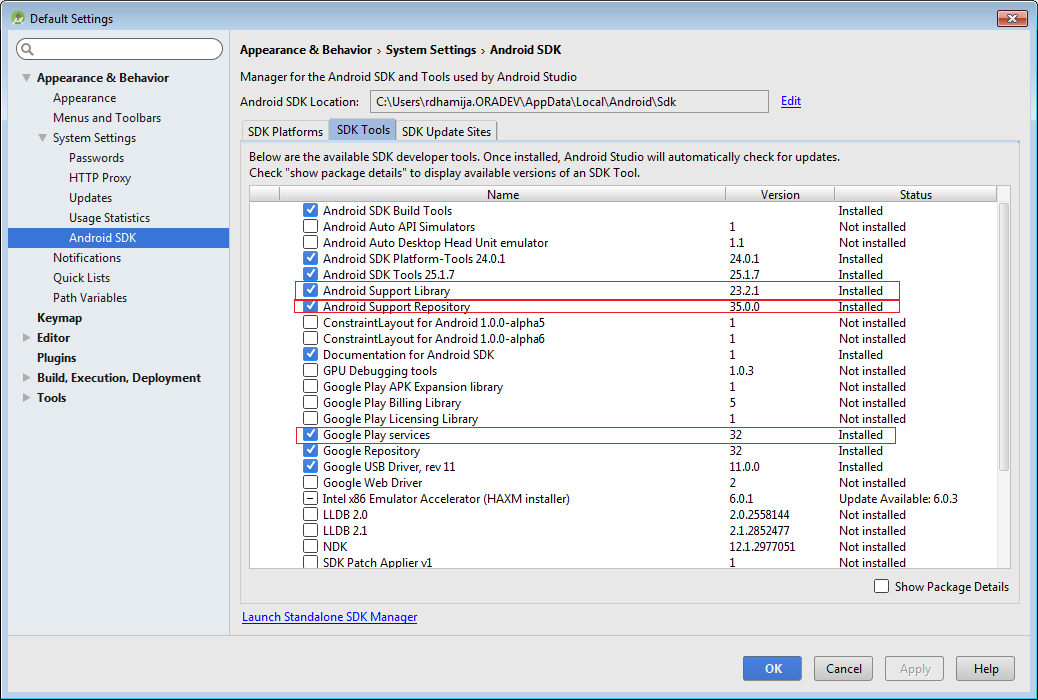
Please ensure following items are updated on your system:
- Android SDK 23 version or above (latest version is preferred)
- Upgrade Android SDK Tools for following to their latest version available:
- Android Support Library version
- Local Maven repository for Support Libraries (Android Support Repository)
- Google Play Services version
Developing client-side Oracle JET Hybrid application
We will start implementing from scratch to implement receiving push notification in oracle jet hybrid application. You may please refer to Troubleshooting while developing your First JET based Hybrid Application blog incase of initial issues faced during development/configuration issues.
Project Setup using Yeoman
Yeoman generator for Oracle JET lets you quickly set up a project for use as a Web application or mobile-hybrid application for Android and iOS. Use following command to generate hybrid application for Android:
yo oraclejet:hybrid pushnotifysample --appId=com.rdh.pushnotify --appName="pushnotifysample" --template=navBar --platforms=android
The navBar template based native hybrid application code will be placed in “pushnotifysample” folder.
Cordova-plugin-push
- In command prompt, go to pushnotifysample\hybrid folder
- Now, add cordova-plugin-push plugin.This plugin offers support to receive and handle native push notifications with a single unified API, and with no dependency on any other plugin’s. Here is the link: https://github.com/phonegap/phonegap-plugin-push
cordova plugin add phonegap-plugin-push --variable SENDER_ID=" XXXXXXXX"
Where the XXXXXXX in SENDER_ID="XXXXXXX" maps to the project number in the Firebase developer console
Adding Oracle MCS Cordova SDK
In order to communicate with Oracle MCS, following steps are required:
- Download the Cordova SDK from Oracle MCS. Extract the same on your local machine. It will contain Javascript based Cordova SDK , configuration files and documentation
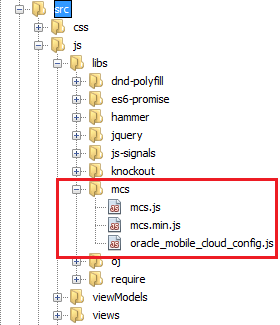
- Add Oracle MCS Cordova SDK to your application, Copy mcs.js, mcs.min.js and oracle_mobile_cloud_config.js into the directory where you keep your JavaScript libraries.
For example, in this implementation, I have kept these files in mcs folder added in js/libs folder as shown in below image:
2. Fill in your mobile backend details in oracle_mobile_cloud_config.js.
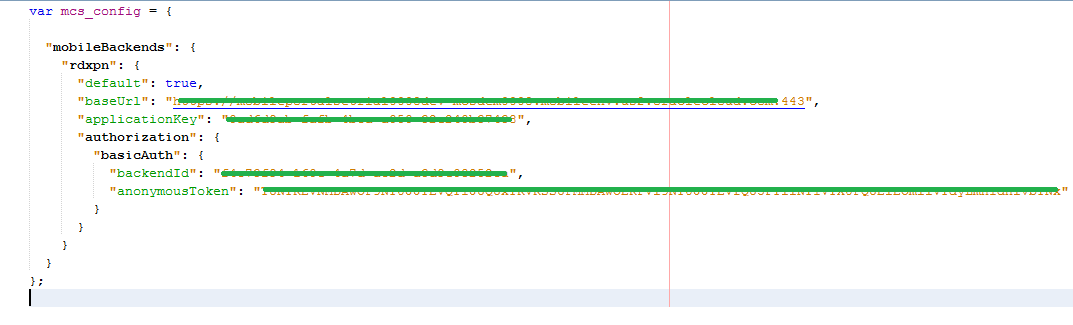
For more details, please See Configuring SDK Properties for Cordova.
After adding the physical files, update the paths mapping for mcs and mcs_cloud_config in main.js file under requirejs.config section:
 paths:

           //injector:mainReleasePaths

                        {

                            'knockout': 'libs/knockout/knockout-3.4.0.debug',

                            'jquery': 'libs/jquery/jquery-2.1.3',

                            'jqueryui-amd': 'libs/jquery/jqueryui-amd-1.11.4',

                            'promise': 'libs/es6-promise/promise-1.0.0',

                            'hammerjs': 'libs/hammer/hammer-2.0.4',

                            'ojdnd': 'libs/dnd-polyfill/dnd-polyfill-1.0.0',

                            'ojs': 'libs/oj/v2.0.2/debug',

                            'ojL10n': 'libs/oj/v2.0.2/ojL10n',

                            'ojtranslations': 'libs/oj/v2.0.2/resources',

                            'text': 'libs/require/text',

                            'signals': 'libs/js-signals/signals',

                            'mcs': 'libs/mcs/mcs',

                            'mcsconf': 'libs/mcs/oracle\_mobile\_cloud\_config'

                        }

                //endinjector
Implementation Steps
Add the additional modules: mcs and mcsconf to get loaded in dashboard.js file:
define(['ojs/ojcore', 'knockout', 'jquery', 'mcs', 'mcsconf'],
Below are the four main steps of push notification implementation, they need to be called only once in the application life cycle.
Step 1. Load Mobile Back end’s Configuration into the application:
function initializeMCS() {
mcs.MobileBackendManager.platform = new mcs.CordovaPlatform();

mcs.MobileBackendManager.setConfig(mcs\_config);

mcsBackend = mcs.MobileBackendManager.getMobileBackend("BACKEND\_NAME\_AS\_MENTIONED\_IN\_CONF\_FILE");

if (mcsBackend != null) {

    mcsBackend.setAuthenticationType("basicAuth");

}
}
Step 2. Authenticate and Log In Using the SDK
           function login(mcsBackend, username, password) {

                mcsBackend.Authorization.authenticate(username, password, success, failed);

                function success(response, data) {

                    alert("Login Success!");

                    registerDeviceForMCSPush(mcsBackend);

                }

                function failed(response, data) {

                    alert("Login failed!");

                }

            }
Step 3. Below code initializes, registers the device and is ready to receive notification or error from GCM/FCM
function registerDeviceForMCSPush(mcsBackend) {
    var defer = $.Deferred();

    if (typeof PushNotification !== 'undefined') {

        try {

            var push = PushNotification.init({

                "android": {

                    // TODO replace Google Project Number here

                    senderID: "XXXXXXXXX"

                }

            });

            push.on('registration', function (data) {

                var regId = data.registrationId;

                deviceHandshakeforCordova(mcsBackend, regId);

            });

            push.on('notification', function (data) {

                alert("Push Notification from Oracle MCS: " + data.message);

            });

            push.on('error', function (e) {

                alert("Push Notification Error=" + e.message);

            });

        } catch (ex) {

            alert("Error registering device with MCS" + ex);

            defer.reject();

        }

    } else {

        alert("PushNotification NOT Defined!");

        defer.reject();

    }

    return $.when(defer);
}
Step 4. Device Handshake, here the application sends Registration Id to Oracle MCS
function deviceHandshakeforCordova(mcsBackend, registrationID)
{
var appId = "your\_package\_name\_here";

var appVersion = "1.0";

mcsBackend.Notifications.registerForNotifications(registrationID, appId, appVersion,

        function (statusCode, headers, data) {

            var success\_msg = "sucess:statusCode=" + statusCode + ",data=" + data + "headers=" + headers;

            console.log(success\_msg);

        },

        function (statusCode, data) {

            var failure\_msg = "failure:statusCode=" + statusCode + ",data=" + data;

            console.log(failure\_msg);

        });
}
Build and Run the application on Android emulator/device
In your command prompt, please change directory to project folder, e.g. pushnotifysample in this case and run the following command:
- Build the application using following command
grunt build --platform=android
- Once build is success, then run the application using following command, assuming android emulator is already up and running:
grunt serve --platform=android --disableLiveReload=true
Test Push notification
At this point of time the client app is ready to receive push notifications from GCM/FCM
Sending notification from MCS console
To test the application, we can send a notification from MCS console
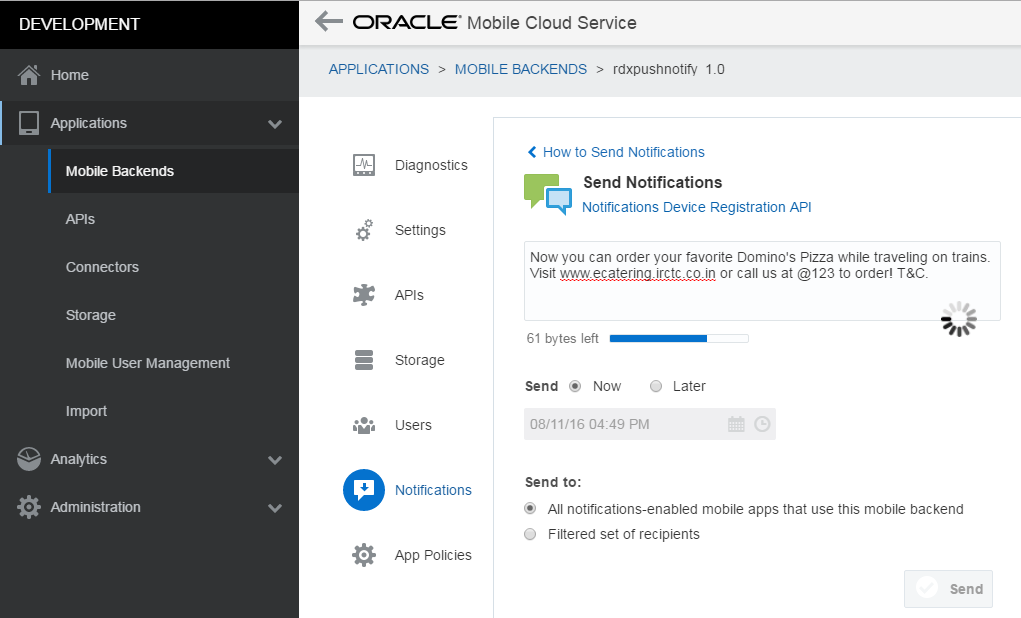
The message would be sent to FCM, which in turn will send to our registered application. If the application is in background, it will receive the notification in the notification area, on tapping the notification, it will land you to your app for further action

Troubleshooting section
Issue 1: ERROR: During build process, encounter following error:
Could not resolve com.google.android.gms:play-services-gcm:9.0.2+
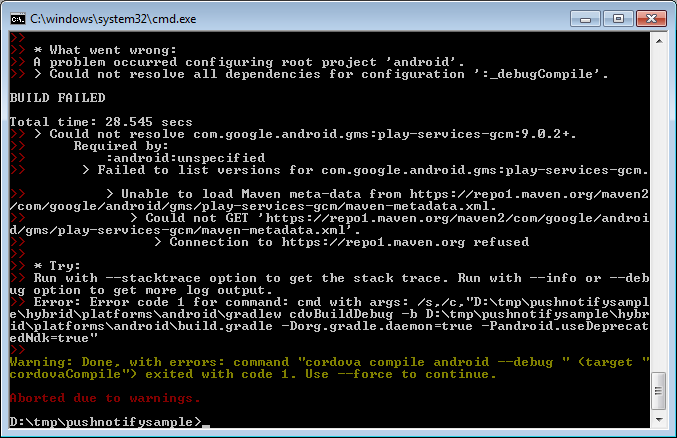
Possible Solution:
Please update following to the latest:
- Android Support Library
- Local Maven repository for Support Libraries (formerly Android Support Repository)
- Google Play Services
Issue 2: Client Application throws 400 Bad Request after logging is success
Failed to load resource: the server responded with a status of 400 (Bad Request)
Possible Solution:
Please confirm that you are sending correct registrationID, appId and appVersion to mcsBackend.Notifications.registerForNotifications function.Example :
Registration ID: "AxdkfjfDfkfkfkfjfFdjfjjf=",
appId: "com.yourcompany.project"
appVersion: "1.0"
***EDIT on 18-Aug-2016, Change log: Added Issue 3***
Issue 3: During building the application, I get "No platforms added to this project" error.
Error log on console:
D:\jetapps\jetdemo>grunt build --platform=android
Running "build" task
Running "clean:www" (clean) task
>> 0 paths cleaned.
Running "copy:wwwDev" (copy) task
Created 212 directories, copied 1274 files
Running "copy:merges" (copy) task
Created 8 directories, copied 37 files
Running "includeCordovaJs" task
Running "shell:cordovaPrepare" (shell) task
>> Error: No platforms added to this project. Please use `cordova platform add <platform>`.
>>
Warning: Done, with errors: command "cordova prepare android" (target "cordovaPrepare") exited with
code 1. Use --force to continue.
Aborted due to warnings.
Possible Solution:
Probably it's path problem, you didn't add android SDK path in your environment variable. Please download latest android SDK and give path in environment variable and try again
In-case of Windows: Go to System Properties -> Environment Variable : Add ANDROID_HOME as variable and path should be path to your Android SDK, For example path is C:\Users\rdh\AppData\Local\Android\Sdk
**The views expressed in this post are my own and do not necessarily reflect the views of Oracle.