By Oracle ACE Director Wilfred van der Deijl and Oracle ACE Richard Orlichs
Continued from Part 2
4.3 Creating the Custom Rule
Close your second JDeveloper that has been started up and return to your original JDeveloper instance. We'll now start building the actual rule, you can delete the previous 2 methods, these were just here to show the working of the Analyzer class.
We start by creating a Rule in the Analyzer (i.e., we create a rule in the PageDefAnalyzer class). This Rule will be thrown if a violation is found.
Make sure you import the correct Rule (oracle.jdeveloper.audit.analyzer.Rule):

Now, we'll use an annotation to tell the framework which rule in the Extension.xml we mean by this Rule.

The annotation we use for this is the @ExtensionResource. We identify it by taking the ID from the audit-hook in the extension.xml, concatenated with the ID from the rule-definition in the extension.xml.
At this stage, we've set up the Java Rule to throw, but we have no code yet to actually throw the rule.
We will create two methods to do this.
The first method is an enter method on the document, to check if we're actually in a pageDefinition file. This is necessary for two reasons. From a performance point of view, we do not want to fire our rule set on every XML Document in the application, but only on pageDef files. Further, our rule is valid only for pageDef files, so there is no need to check for violation on other files.
The second method is an exit method on an attribute, which will enforce the rule's condition and throw the rule if a violation is found.
First, we create the enter method in the PageDefAnalyzer class:
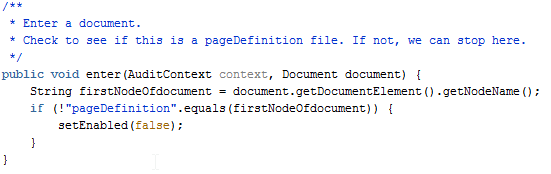
The AuditContext parameter will not be used, but it's still necessary to have the correct signature for the method. Make sure you import the correct Document from the org.w3c.dom package; it will be used to check if the name of the first node is pageDefinition. If we are not in a pageDefinition file, we set Enabled to “false,” which means the file we're currently looking at will be skipped and the Analyzer will move on to the next file.
Remember: we have set the default value for enabled to “true” in the extension.xml.
Next, we create the exit method:
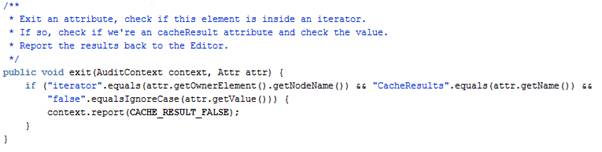
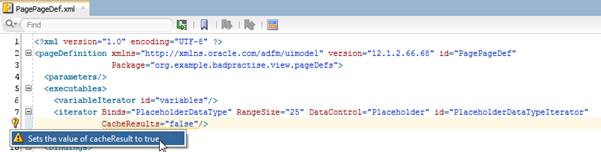
The attribute also comes from the org.w3c.dom package. In this method, we check if we're actually in an iterator element and if the current attribute is cacheResults, with the value set to “false.”
From the pageDef file in the BadPractise application, you can see that the iterator element we created looks like this (it will deliberately violate the rule to show it works):

If all these conditions are met, we report the Rule to the AuditContext. This is a method provided by the AuditContext to report a violation to the framework.
We'll check what happened after these code changes.
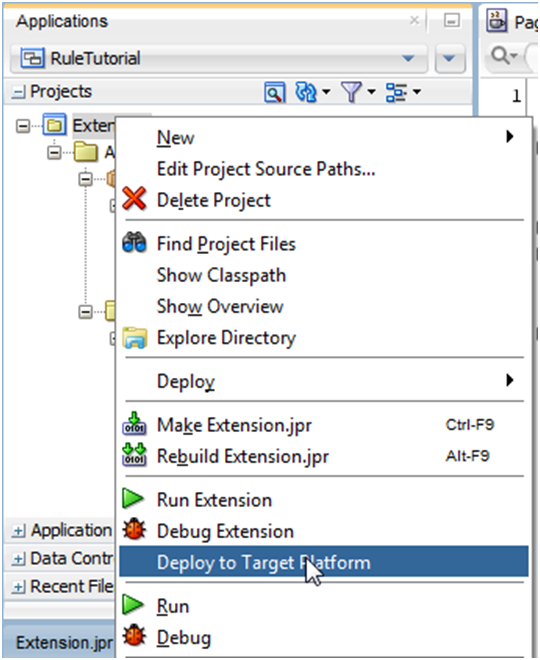
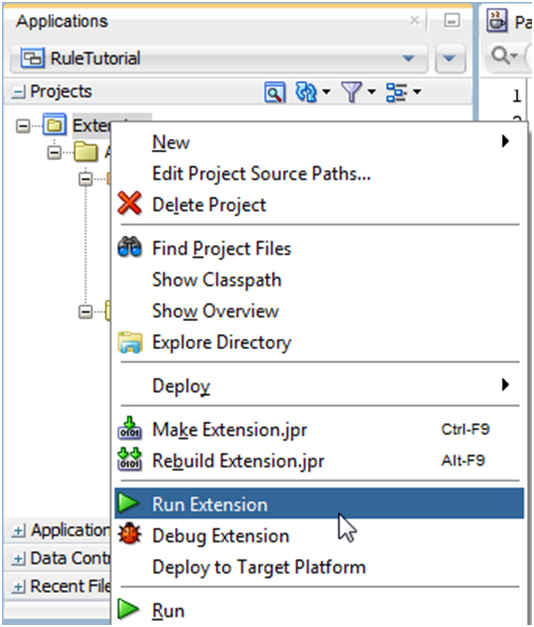
On your Extension project, select Deploy to Target Platform:
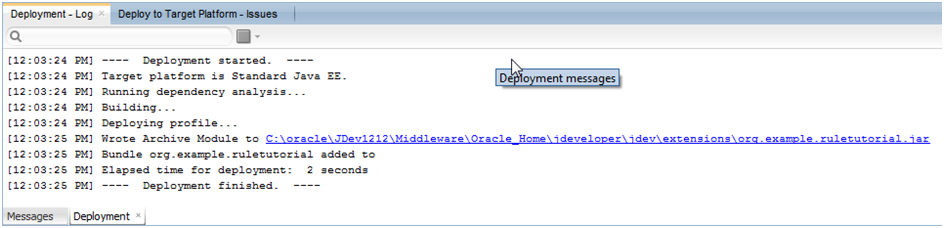
In your log window you should again see a successful deployment to your JDeveloper folder on your machine:
Right click your Extension project again. This time, select Run Extension:
If you navigate to your created PageDefinition in the BadPractise application, you'll see the following:

If you move over, you see that the rule has been thrown. We haven't set any messages in the Resource bundle yet; we'll come to that in a minute, but first we'll navigate to the audit profiles in JDeveloper.
In the running Extension JDeveloper, open Tools > Preferences:
In Preferences, navigate to the Audits tab and click Manage Profiles:
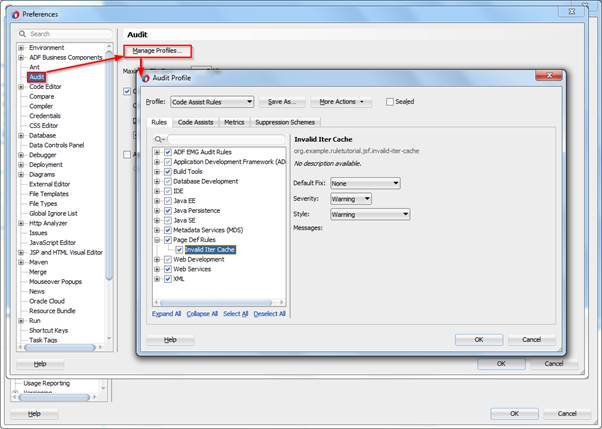
Notice that a profile is created, but we see a “No description available” message and there is no information recorded under “Messages.”
Close your Preferences and your JDeveloper, and come back to your original JDeveloper.
4.4 Using the Resource Bundle
In JDeveloper open the Res.properties:
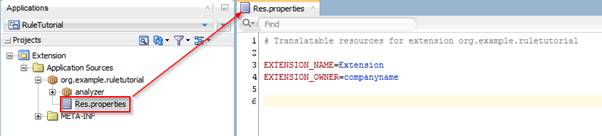
This is the file where you can create resource keys and assign values (labels) to those keys.
Add the following lines:
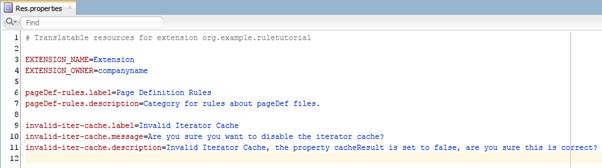
Notice that the category key has a label and a description, and that the rule has a label, message and description.
Now, let's run the application again to see what the result looks like.
First, deploy to your target platform and then choose Run Extension in the project menu.
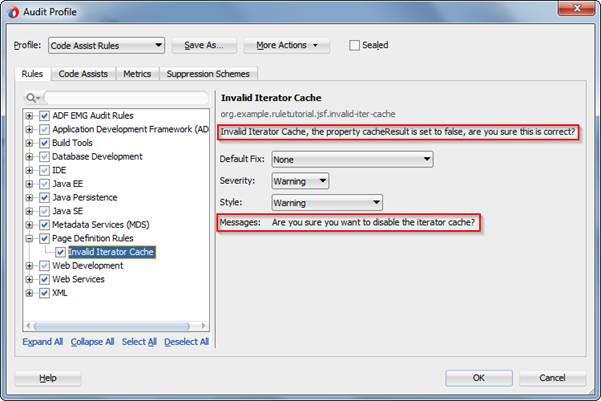
Go back to Tools > Preferences, select the Audit tab and click Manage Profiles again. The message and description are now displayed:
Open the pageDef again:

Notice that the message we defined in the bundle (“Are you sure you want to disable the iterator cache?”) is displayed here. There is also an option to click “more,” which also displays the description.
This is how you can set your labels, messages and description with help of the resource bundle.
5. Creating a Custom Fix
The main focus of this tutorial is to show you how to create rules. However, writing a fix is a nice addition, so this section will briefly explain how to write one.
A fix is shown in the left sidebar in JDeveloper—you'll see a light bulb; you can select a fix for the violation if you want to.
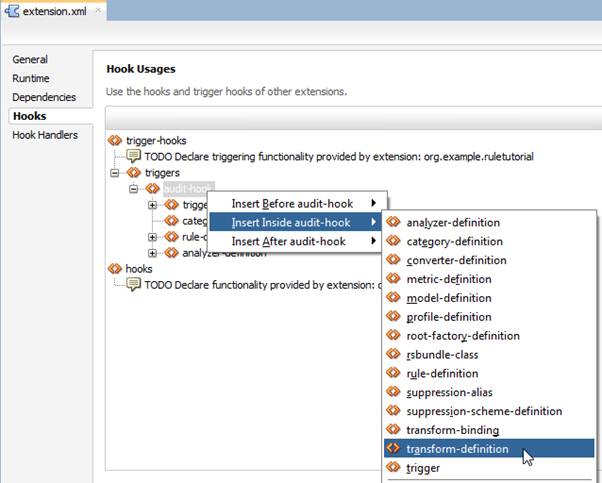
There are a few steps involved in creating this fix. TWe use a so-called “source code transform.” The transform class has an apply method in which we transform the source code. To start, open the extension.xml again. On the Hooks tab, select audit-hook, right click, and choose Insert Inside > transform-definition:
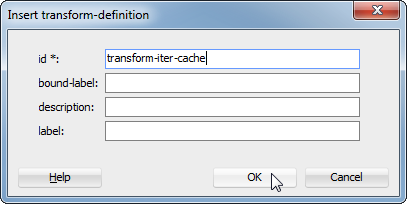
In the popup, fill in the ID field with “transform-iter-cache” and click OK:
Select the added transform-definition and insert inside a transform-class:
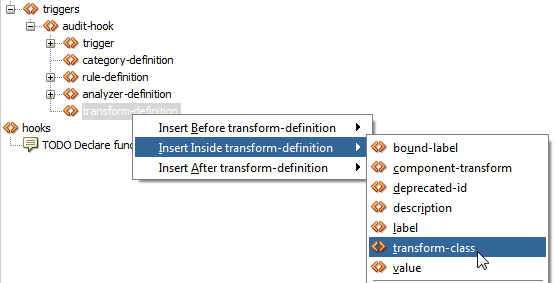
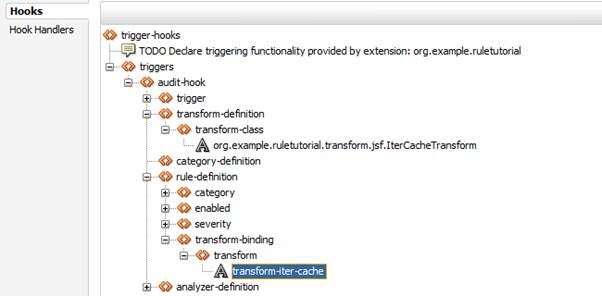
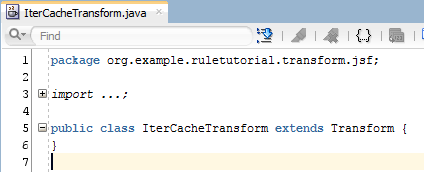
As with the analyzer class in the previous section, the transform class cannot be added through the Overview. Navigate to the Source of the extension.xml and add org.example.ruletutorial.transform.jsf.IterCacheTransform as a class:

We'll create this class later.
Now navigate back to the Overview, select the rule-definition in the audit-hook, then select Insert Inside and transform-binding:

In the popup, enter the defined ID “transform-iter-cache” in the transform field and click OK:

Your audit-hook in the extension.xml should now look like this:
At this point, we've added a transform definition and defined the transform class it will use (the class itself will be defined next), and we created a binding in the rule to the transform definition.
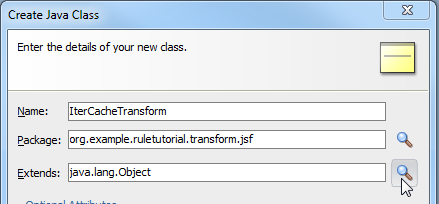
Now, we're going to create the Java Class that we require to do the actual transform:

Fill in the correct name and package—as you did in the extension.xml—and select the Search button on the right side of the Extends property:
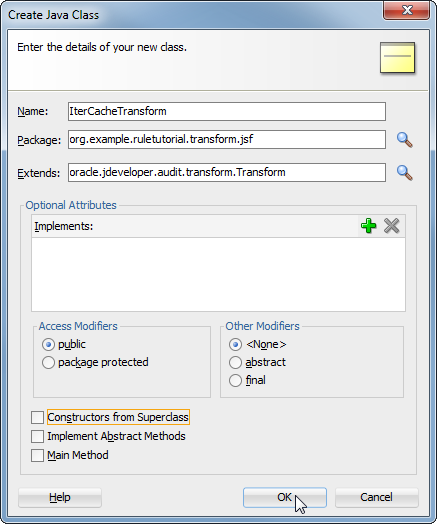
In the Class Browser, search for oracle.jdeveloper.audit.transform.Transform, and click OK:

Uncheck the three boxes at the bottom of the Create Java Class wizard and click OK:
The result will be an empty Java class:
In this class there are two things we want to achieve. First, we need to create a default constructor that calls the super. If you click on the Transform class and navigate to the super, you'll see the following protected constructor:
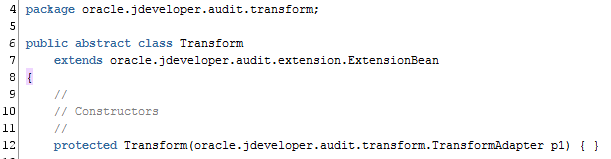
This means that we have to add TransformAdapter as a parameter to the super.
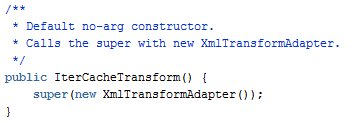
Since our goal is to apply a fix to an XML document, we will add the XmlTransformAdapter from the oracle.jdeveloper.audit.xml package as parameter to the super call.
Create the following constructor:
Next, we will create an apply method to apply the change. Since we want to fix a violation on an attribute (remember that we reported the violation in an exit method from an attribute), the apply method also need to accept an attribute as argument:
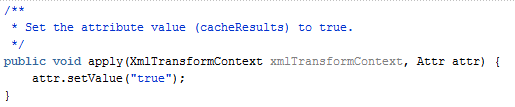
The apply method also has to accept an XmlTransformContext from the oracle.jdeveloper.audit.xml package, but we will not be using this parameter.
As you see in the code above, we can set the value of this attribute to “true,” which is the desired value for the cacheResults attribute in the iterator element.
Before we run this extension, we want to add two entries to the Res.properties. This is the resource bundle used by the framework to get labels and descriptions to show to the user.
Open the Res.properties and add the following lines:

As for the Rule, you can define a label and a description for the transform as well,; this also happens based on the ID of the transform definition in the extension.xml.
After you've done this, deploy the extension project to the target platform and then select Run Extension. Once the JDeveloper has been started, again navigate to the PageDefinition file:
If you place your cursor on the warning from CacheResults=false, you will see the light bulb showing up in the side bar. Click this light bulb, and you'll see the label defined in the bundle.
Now click the fix to see what happens in the pageDef:
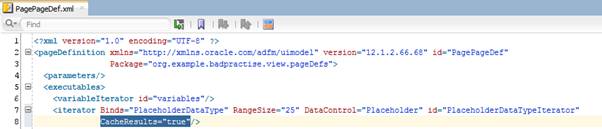
As you can see, the property CacheResults will be set to “true” in the iterator element.
And those are the basics about creating a fix and transforming source code to a correct value.
6. Creating a Java Rule
Now that we've successfully implemented a custom rule and fix on an XML document, it is time to move on and create a Java rule that we can enforce on our application's source code.
We will create a simple Java rule that checks if the code contains a statement with System.exit, which is an undesirable call in a Java EE program as it causes the Java EE container (typically, WebLogic Server (WLS) for ADF applications) to stop. If this is the case, we'll report an error back to the user.
We will start again from the extension.xml. First, we need to create a new rule-definition for this rule, edit the extension.xml and add a new rule-definition on the same level as the previous rule-definition:
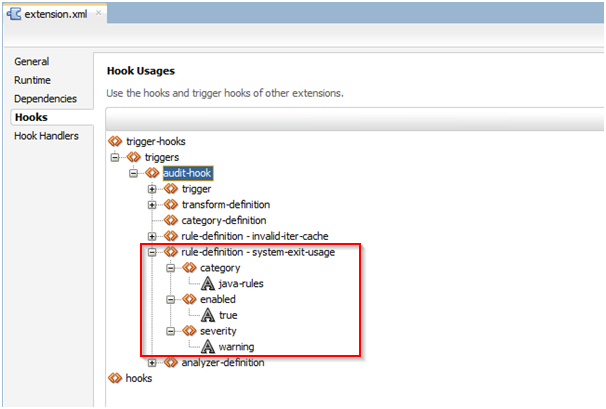
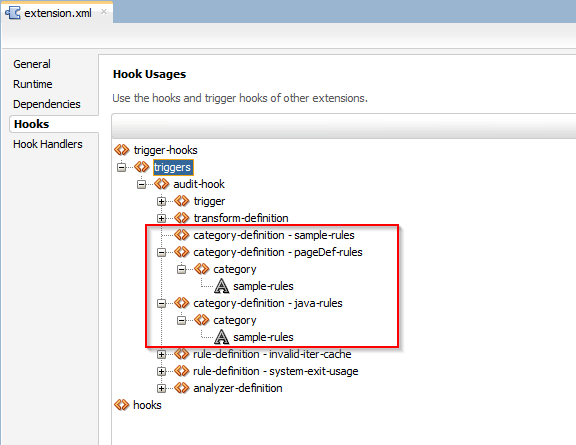
In this rule-definition we introduced a new category, which we still have to define. The nice thing is that categories can be bundled together in a parent element.
Create a set up similar to this:
Don't forget to update your Res.properties with the new keys you added to the extension.xml. When you have updated your resource bundle, deploy the application to the Target Platform and then Run the Extension.
When JDeveloper is started, go to Tools > Preferences and then to the Profiles submenu under Audit:
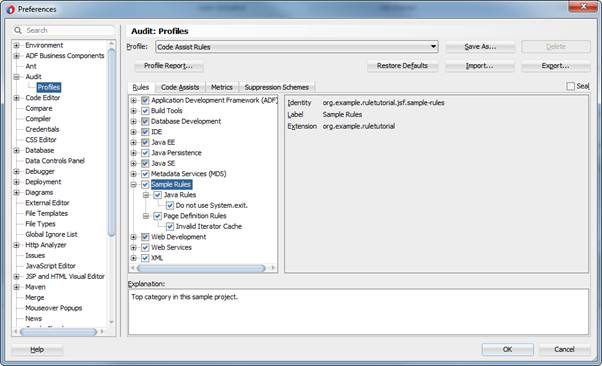
Here you see the subcategories are under the parent Sample Rules. You can easily build a menu structure by just adding parent categories as an element under the categories in the extension.xml.
Next we need to adjust the extension.xml a bit more. Close the Preferences and the running JDeveloper, and return to your extension.xml file.
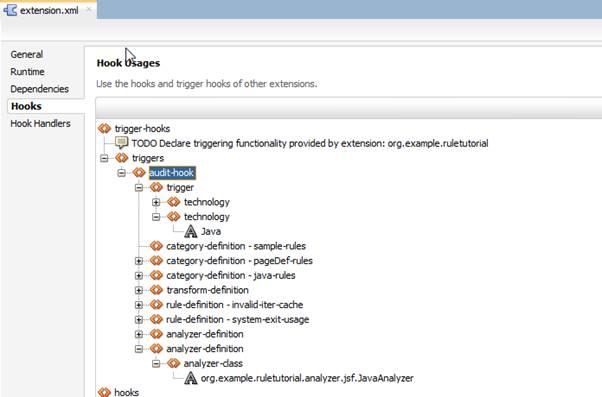
In the extension.xml, add a technology for Java and add an analyzer class for a JavaAnalyzer. We will create a different analyzer class to separate the responsibilities and to be able to stop the naalyzer if necessary (e.g., when we hit a file we do not need to audit).
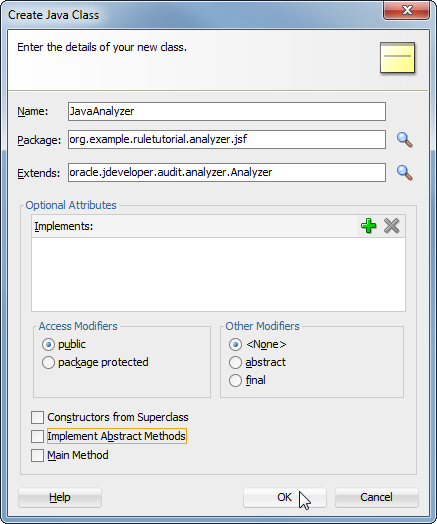
We also need to create the JavaAnalyzer:
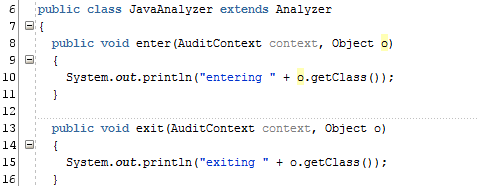
Just as we did for the XML analyzer, start with two methods, to check how a Java Analyzer works:
Let's deploy these changes again and run the extension to check how the rule is processed so we get a better understanding of how the rule is applied at audit time.
Once JDeveloper is started, open the BadPractise.jws again. In the ViewController project, create a new Java class:
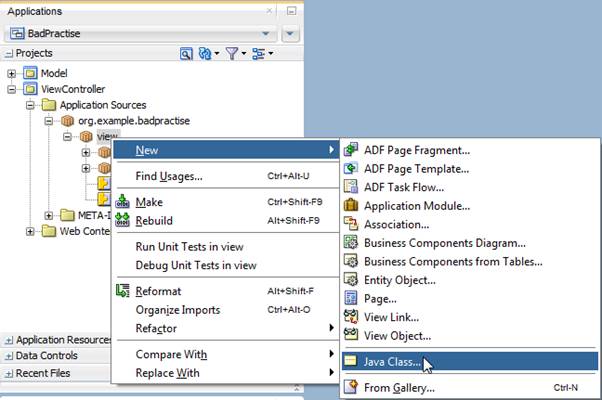
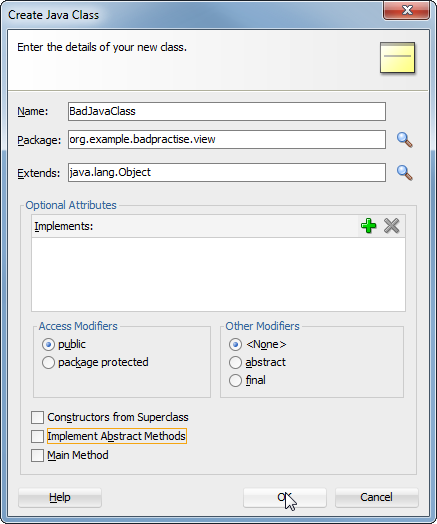
Give the class a name and create it:
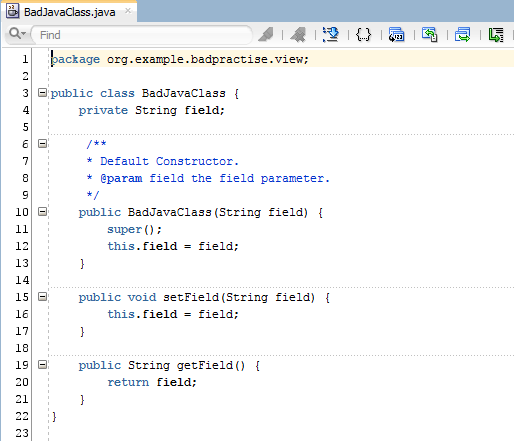
Enter some sample code in the Java class:
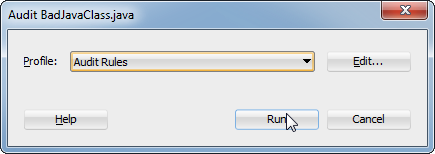
Next, select the Audit option from the Build menu:
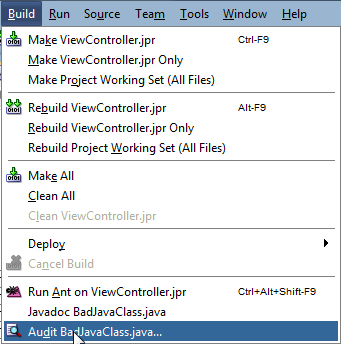
Accept the suggested Audit Rules and click Run:
Return to your JDeveloper from where you ran the extension, and check the log file. Just as we saw with the XML file, you'll see how the Analyzer traverses the Java code:
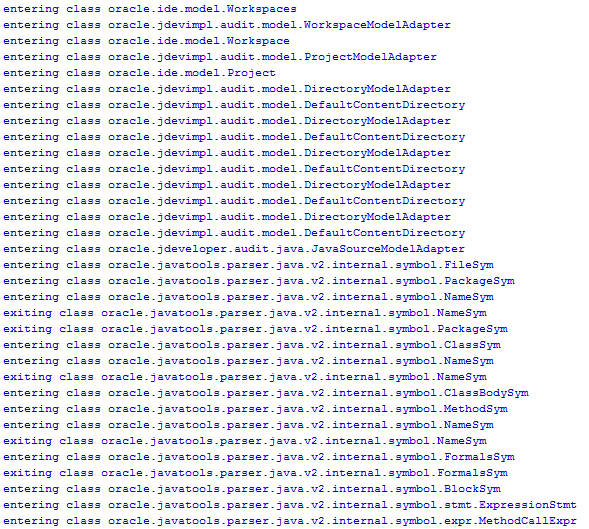
In this case, we want to build a rule to audit a Java statement, specifically looking for System.exit(). So we want to use the oracle.javatools.parser.java.v2.internal.symbol.stmt.ExpressionStmt class.
In JDeveloper, open the ExpressionStmt class:
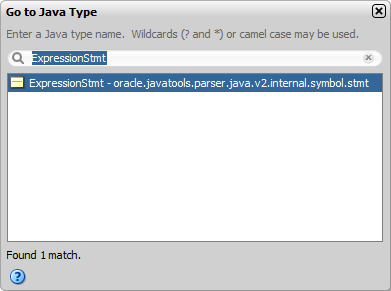
Notice how this implements the interface SourceExpressionStatement:

Since we want to program Java code against the interface, adjust the exit method in your JavaAnalyzer to react to this interface. Don't forget to create a rule, just as in the PageDefAnalyzer, and use an annotation to point to the rule in the extension.xml:
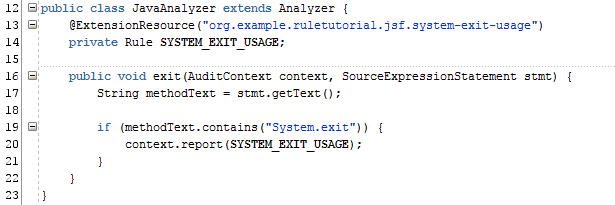
In the exit method of the JavaAnalyzer class, we get the text from the statement and check if it has the System.exit call in it. If so, we report the rule to the context, just as we did in the PageDefAnalyzer.
Deploy this code to the TargetPlatform, run the extension, and open the Java file again.
In the constructor, add the line we're checking for after the call to the super():
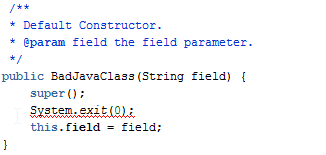
Notice how the Analyzer picks this up and throws an error. Now, check out one more cool feature from JDeveloper at design time.
Go to Tools > Preferences again and look up the Java Rule.
Change the Severity and Style from Error to Warning and click OK:
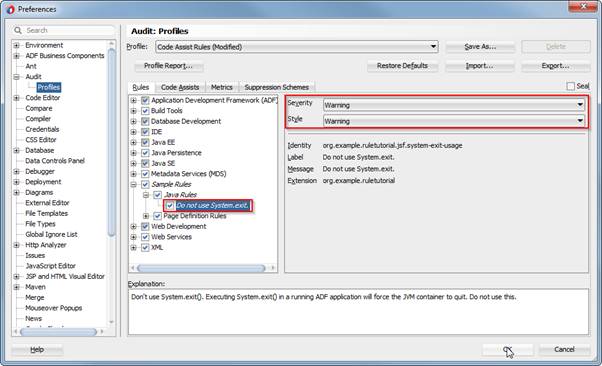
Notice how the thrown error changes into a thrown warning.
Although you set the default in the Extension.xml, the end user can decide to change this severity if they like:
/**
* Default Constructor.
*@param field the filed parameter.
*/
public BadJavaClass9String field) {
super();
System.exit(0);
this.field = field
}
>>Continue to Part 4>>
About the Authors
Oracle ACE Director Wilfred van der Deijl has been working with Oracle's development tools and database ever since getting his degree in Computer Science in 1995. An active member of the Oracle community, Wilfred is a blogger, author, Oracle customer advisory board member, and a frequent presenter at international conferences, including ODTUG and Oracle OpenWorld.
Oracle ACE Richard Olrichs is an Oracle Developer at MN, a technology company based in the Netherlands. Richard has extensive expertise in Oracle Fusion Middleware with deep specialization in the Oracle Application Development Framework. Richard initiated an open source project creating an ADF EMG Audit Rules extension for both JDeveloper 11g and JDeveloper12c, and was also one of the initiators of ADF EMG XML DataControl, an open source project for both JDeveloper ADF 11g and JDeveloper ADF 12c. Richard is has spoken at TECH13, Tech 14, and Oracle Open World 2014.