by Ginny Henningsen and @"Glynn Foster-Oracle"
Step-by-step instructions for how to install Oracle Database 12_c_ on Oracle Solaris 11 in a non-global Oracle Solaris Zone, which provides several advantages: database isolation, simplified resource control, and the ability to reduce licensing costs.
Published February 2015
Deploying Oracle Database 12_c_ on Oracle Solaris 11
When installing Oracle Database 12_c_ for production applications, solution architects strive for the highest levels of performance, scalability, availability, and manageability. That's why Oracle takes a comprehensive approach—integrating, optimizing, and extensively testing Oracle Database with Oracle Solaris and Oracle's SPARC servers—because doing that optimizes demanding production database deployments.
Oracle strategically invests in Oracle Solaris for database use, enhancing and enriching the operating system to deliver leading-edge performance for both online transaction processing (OLTP) and decision support system (DSS) workloads. Oracle conducts extensive integration testing and performance analysis to engineer optimizations in Oracle Solaris 11 that enable exceptional database performance and scalability. For example, joint engineering teams focus on enhancements that improve service levels, such as shared memory resizing without downtime or fast initialization to make databases available quickly. The white paper "Oracle Solaris 11—The Optimal Platform for Deploying Oracle Database" gives many specifics about how Oracle Solaris has been optimized for Oracle Database workloads.
Oracle Solaris includes built-in features that can directly benefit database deployments: Oracle Solaris Zones for no-cost virtualization, Predictive Self Healing for continuous availability, DTrace for application observability, ZFS for next-generation volume and file system management, and fine-grained user and process rights for enhanced security. The Oracle Solaris 11.2 release adds new capabilities (such as Kernel Zones and Unified Archives) and integrates a full OpenStack distribution (see www.oracle.com/solaris).
Deploying Oracle Database on Oracle Solaris 11 has clear advantages for production database applications. This article will show just how easy it is to install Oracle Database on the Oracle Solaris 11.2 release. Specifically it gives five major steps for installing a single Oracle Database 12_c_ instance in a non-global Oracle Solaris Zone, a lightweight built-in virtual environment that encapsulates the database instance. Generally the procedures used here reflect best practices for database installation.
Deploying Oracle Database in an Oracle Solaris Zone
While you can install Oracle Database in either a global or non-global Oracle Solaris Zone, in this article, we'll install the database in a non-global zone. Using a non-global zone for database deployment offers these distinct advantages:
- Isolation. Oracle Solaris Zones isolate database instances with respect to fault, operation, network, and security management, and for resource allocation control. Zones create totally sandboxed environments for running Oracle Database instances. Database processes that execute in one zone have no access to database processes running in another zone. This capability simplifies database consolidation, allowing multiple instances and versions to coexist safely on a single physical machine.
- Independently managed and autonomous environments. Because Oracle Solaris Zones are discrete and independent environments, a non-global zone can be booted, patched, and shut down independently. A failure or reboot of one zone has no impact on other zones (unless, of course, a failure is due to a shared component). A zone reboot is faster than a full server reboot (seconds versus minutes), so a database in a rebooted zone is available more quickly.
- Distinctive identity. If a database instance requires a separate identity (for example, an independent host name and IP address), a zone is a uniquely identifiable virtual environment that can have virtual network interfaces defined. Administrators can also apply networking resource controls to zones, aligning network bandwidth consumption with service level targets.
- Easy database instance migration. Oracle Solaris Zones simplify database instance migration from one virtual environment to another. When a database needs more CPU power, for example, it's possible to add CPUs to an Oracle Solaris Zone and reboot the zone. If a database needs more compute capacity than what's available in the physical server, the zone can be migrated to a zone on a larger server.
- Hard partitioning. Assigning a resource pool or capping CPU cores can configure Oracle Solaris Zones as hard partitions for Oracle Database licensing purposes. This can potentially lower database licensing costs. The following steps give an example of how to implement hard partitioning in conjunction with zones.
Step 1: Install Oracle Solaris 11 on a Server
The first step is to install the Oracle Solaris 11 operating system on a server. Images for Oracle Solaris 11 are freely available for download from the Oracle Technology Network. Consult the installation documentation for detailed directions. The installation can use any of the Oracle Solaris server package groups, such as solaris-minimal-server and solaris-small-server, because we will resolve software package dependencies in a later step. (The solaris-minimal-server package is often installed for database deployments because it creates a minimized configuration.)
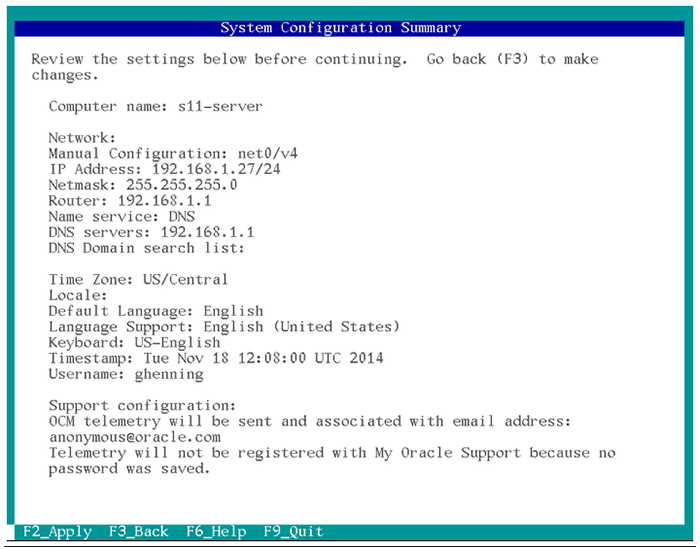
During installation there is a system configuration process that's required to set up host parameters—the host name, language, time zone, networking (IP address, netmask, router, name service, and so on), and the default accounts and passwords. Before you start this configuration process, you might need to consult your system or network administrator to obtain a host name and network information for the server (and the zone that you'll install subsequently). The summary screen in Figure 1 shows the configuration settings for the global zone of the Oracle Solaris 11 server we'll call s11-server.
**
**
Figure 1. System Configuration Summary screen
When the Oracle Solaris installation is complete, log in as the user that was configured during the installation process and assume the privileged role of root. Then create a directory that we'll use when configuring the non-global zone in the next step:
|
root@s11-server:~# mkdir /u01
|
Step 2: Configure a Non-global Oracle Solaris Zone
Configuring a non-global zone on the new Oracle Solaris 11 server is relatively easy—we'll set up configuration parameters for the zone, install it, and then boot it to obtain a fully functional virtual server in which we'll install the database. (Note that we could install the database in the global zone, but we want to take advantage of the isolation and capping advantages of using a non-global zone virtual environment.)
There are a few zone configuration requirements to consider:
-
Make sure there's at least 6.4 GB of physical disk space for the zone's file system.
-
Obtain an IP address and a host name for the non-global zone in which the database will be installed. Again, you might need to consult a system or network administrator to obtain these.
-
Determine the quantity of virtual CPUs (vCPUs) to be reserved for the zone. Oracle recognizes capped Oracle Solaris Zones as licensable entities called hard partitions. There are several ways to implement CPU hard partitioning to comply with Oracle Database licensing policies (see the paper "Hard Partitioning With Oracle Solaris Zones"), including the following:
- Using the capped-cpu property for the zone configuration command (zonecfg)
- Using the dedicated-cpu property for zonecfg
- Using a resource pool with assigned hardware threads (vCPUs) and assigning the pool to a zone (as in the example here)
On a SPARC server, it's recommended to configure a processor set, associate the processor set with a resource pool, and assign vCPUs to the processor set:
|
# poolcfg -c 'create pset dbPset_set(uint pset.min=8;uint pset.max=8)'
# poolcfg -c 'create pool dbPool'
# poolcfg -c 'associate pool dbPool(pset dbPset)'
# poolcfg -c 'transfer to pset dbPset(cpu 0;cpu 1; cpu 2; cpu 3; cpu 4; cpu 5; cpu 6; cpu 7)'
# pooladm -c
|
From a performance standpoint, allocating a full core to each database instance helps to optimize database performance because it gives database processes exclusive access to the pipelines, cache, and other resources within an individual core. Small workloads can use a single core, if practical, while you can assign multiple cores to larger workloads. (The number of cores will depend on your specific requirements.) When we configure the zone, we assign the resource pool to the zone.
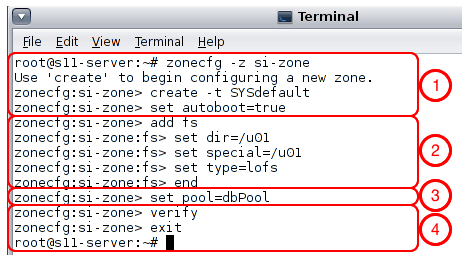
We start by executing zonecfg with the name of the zone we want to create: si-zone, as shown in Figure 2. This is the non-global zone in which we'll install the database.
**
**
Figure 2. Running the zonecfg command to create the zone
A few zonecfg configuration settings bear special mention (the numbers below refer to the areas labeled in Figure 2):
- The
create subcommand initializes the configuration, and the autoboot setting means that the zone will be booted automatically upon a restart of the physical server. The type of zone created is a non-kernel zone that uses the default template SYSdefault. Oracle Solaris 11.2 introduced Kernel Zones, which can be created with the template SYSsolaris-kz. Kernel Zones can run a separate kernel and operating system from the global zone, allowing you to migrate legacy applications and databases more easily to Oracle Solaris 11.2. In this example, we configure a non-kernel zone for Oracle Database 12_c_ installation.
- Adding a file system named
/u01 to the zone configuration allows the zone to access a shared Oracle Database distribution. When deploying multiple instances of Oracle Database that are of the same release, using a shared release area is a best practice—database patches and updates can be applied to a single distribution location. Each non-global zone that runs the same database version can then mount that shared release area. In our example, zonecfg mounts the directory /u01 in the global zone as /u01 in the zone si-zone. If your configuration doesn't require the sharing of an Oracle Database distribution across zones, you can simply place the distribution in a regular directory rather than in a shared location.
- The resource pool and its processor set are assigned to the zone. In the example, we assign the resource pool
dbPool to the zone.
- The last steps verify and commit the configuration settings.
After the zone is configured, it can be installed:
|
# zoneadm -z si-zone install
|
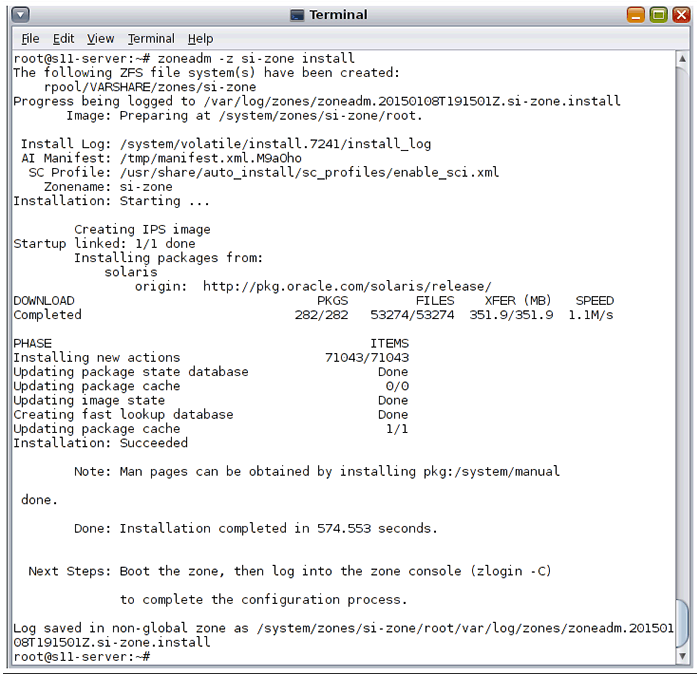
The zone installation process takes a few minutes, and ongoing updates about its progress are displayed. A summary screen shows when the installation is complete and includes a pointer to the installation log file:
**
**
Figure 3. Summary screen indicating the zone installation is complete
Now we can boot the installed non-global zone and log in to complete the system configuration for this virtual environment:
|
# zoneadm -z si-zone boot
# zlogin -C si-zone
|
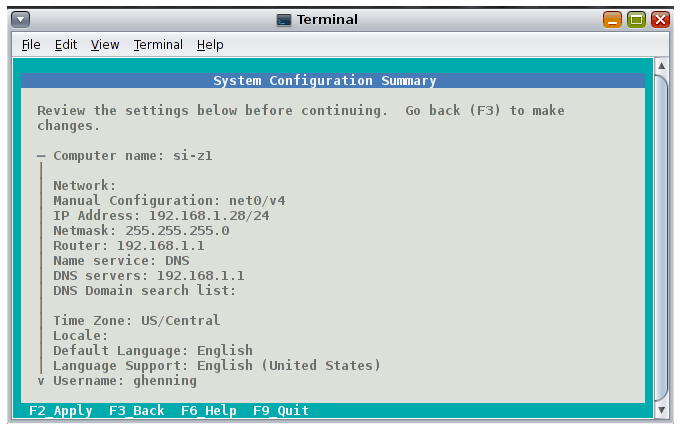
We'll immediately get a system configuration screen similar to what we saw when we installed Oracle Solaris in the global zone (Figure 1). We again complete the system configuration screens beginning with the server name—we'll call it si-z1 (the zone name is si-zone while the server name is si-z1). In the rest of the system configuration screens, we can configure the network details—the IP address, subnet mask, name service, and so on—manually or we can allow the networking configuration to occur automatically. Again, if you are unsure of what network settings to use, consult your system or network administrator. Review the configuration summary before applying the settings:
**
**
Figure 4. System Configuration Summary screen for the non-global zone si-zone
After the system is configured, you'll see a login prompt. Log in as the user and then assume the root role.
Step 3: Set Up the Environment for Oracle Database
At this point, we've successfully configured the non-global zone as the virtual server si-z1. To prepare the environment for the Oracle Database installation, we need to perform some additional steps to meet all of the installation prerequisites.
First, we need to set up the user oracle as the software owner and assign it to two groups: the Oracle inventory group oinstall and the DBA admin group dba. To do this, we enter the following:
|
root@si-z1:~# useradd -m oracle
80 blocks
root@si-z1:~# groupadd oinstall
root@si-z1:~# groupadd dba
root@si-z1:~# usermod -g oinstall -G dba oracle
|
In Oracle Solaris 11, project facilities can be used to label and control related workloads. Kernel resource parameters can be assigned to a project definition—all processes and tasks then created within the project inherit these controls. (This method is in contrast to making changes to the /etc/system file, which was the typical method of modifying kernel parameters in earlier operating system releases.)
Most Oracle Solaris 11 kernel parameter defaults are acceptable for database installation. However, a few parameters (process.max-file-descriptor and project.max-shm-memory) must be adjusted. To do this, create a project called user.oracle and specify the kernel parameter modifications:
|
root@si-z1:~# projadd user.oracle
root@si-z1:~# projmod -U oracle -sK "process.max-file-descriptor=(basic,65536,deny)" \
user.oracle
root@si-z1:~# projmod -U oracle -sK "project.max-shm-memory=(priv,8589934592,deny)" \
user.oracle
|
See the section "Configuring Kernel Parameters on Oracle Solaris" in the Oracle Database Quick Installation Guide for Oracle Solaris on SPARC for information on how to view and change kernel settings. (Note: if these adjustments are not made, the installation creates a fixup script to adjust the parameters accordingly. You can run the script and then reboot the zone if the kernel parameters require modification.)
Oracle Database has a number of software dependencies. To meet these dependencies quickly and easily, the Oracle Solaris 11.2 release features a new package group called oracle-rdbms-server-12-1-preinstall. This package makes sure that that all necessary software packages required for an installation of Oracle Database 12_c_ are present on the system, regardless of the server package group (solaris-minimal-server, solaris-small-server, and so on) that was first used to install the operating system. Installing this package group reduces the possibility of errors, helping to achieve fast and successful installations.
|
root@si-z1:~# pkg install oracle-rdbms-server-12-1-preinstall
Packages to install: 19
Services to change: 2
Create boot environment: No
Create backup boot environment: No
DOWNLOAD PKGS FILES XFER (MB) SPEED
Completed 19/19 349/349 7.5/7.5 1.0M/s
PHASE ITEMS
Installing new actions 897/897
Updating package state database Done
Updating package cache 0/0
Updating image state Done
Creating fast lookup database Done
Updating package cache 1/1
|
Next, let's make sure that the oracle user has the appropriate privileges to access the shared distribution area /u01.
|
root@si-z1:~# chown -R oracle:dba /u01
|
Finally, let's set the password of the oracle user.
|
root@si-z1:~# passwd oracle
|
Step 4: Install the Oracle Database Software
Oracle Database Enterprise Edition for Oracle Solaris systems can be downloaded from the Oracle Technology Network website. For our test deployment, let's download the two distribution files for the Oracle Database 12_c_ release on Oracle Solaris.
For simplicity, copy the files to where we want them—in our case, to the /u01 shared release area on the non-global zone si-z1. To install the database, we first log in to the server si-z1 as the user oracle (the Oracle Database installation owner):
|
root@si-z1:~# su - oracle
Oracle Corporation SunOS 5.11 11.2 June 2014
oracle@si-z1:~$
|
After downloading the files, we need to compare their checksums against the checksum values listed on the Oracle site to make sure the files are legitimate:
|
oracle@si-z1:~$ cd /u01
oracle@si-z1:/u01$ cksum s*.zip
2498552912 1641887504 solaris.x64_12102_database_1of2.zip
3051116543 1031152976 solaris.x64_12102_database_2of2.zip
oracle@si-z1:/u01$
|
The checksums match, so we're ready to unzip the files. Unpacking the file archives as the user oracle, of course, causes the files to have the appropriate ownership. After the unzip operation is complete, the Oracle Database software distribution exists in the /u01/database directory:
|
oracle@si-z1:/u01$ unzip '*.zip'
oracle@si-z1:/u01$ cd database
oracle@si-z1:/u01/database$ ls
install rpm sshsetup welcome.html
response runInstaller stage
oracle@si-z1:/u01/database$
|
To install the database, we'll use the script runInstaller to launch the Oracle Universal Installer. There are two ways to run the Oracle Universal Installer: in a silent noninteractive mode or in an interactive graphical mode. The silent noninteractive mode uses a response file that contains responses for the prompts that you'd otherwise supply interactively. For non-graphical database installations, you can edit the response file template (db_install.rsp) provided in the response subdirectory (see "Installing and Configuring Oracle Database Using Response Files").
For our installation, we'll use the interactive graphical mode, which runs the Oracle Universal Installer as an X-Windows application. This mode requires an X-Windows System Server to display the installation screens. The X-Windows server for our display was installed via the solaris-desktop package on the global zone host (s11-server). The oracle-rdbms-server-12-1-preinstall package group should install the X-Windows server if it isn't already installed on the system.
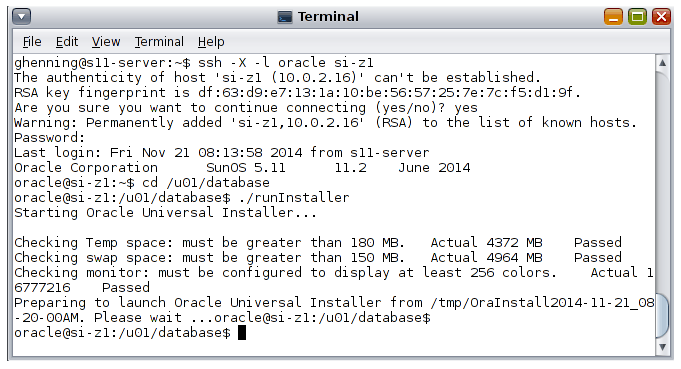
On the global zone host (s11-server), we need to use ssh to connect to si-z1 (the non-global zone host) and run the Oracle Universal Installer as the user oracle, as shown in Figure 5:
**
**
Figure 5. Starting the Oracle Universal Installer
If the Oracle Universal Installer reports a problem during its monitor check, the non-global zone might be having problems accessing the X-Windows System Server. In such a case, you can instead perform the installation using a response file and the silent, nongraphical mode of runInstaller.
If the graphical mode launches successfully, an Oracle Database 12_c_ window pops up as the Oracle Universal Installer starts.
Figure 6. Oracle Database 12_c_ window
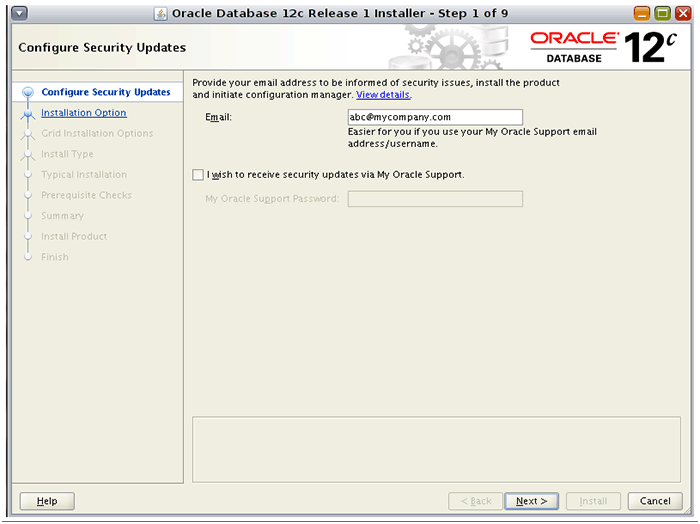
In the first installation screen, we can choose to enter an e-mail address (for example, the address for a My Oracle Support account) with which to receive notifications about critical security issues and updates.
**
**
Figure 7. First screen of the Oracle Universal Installer
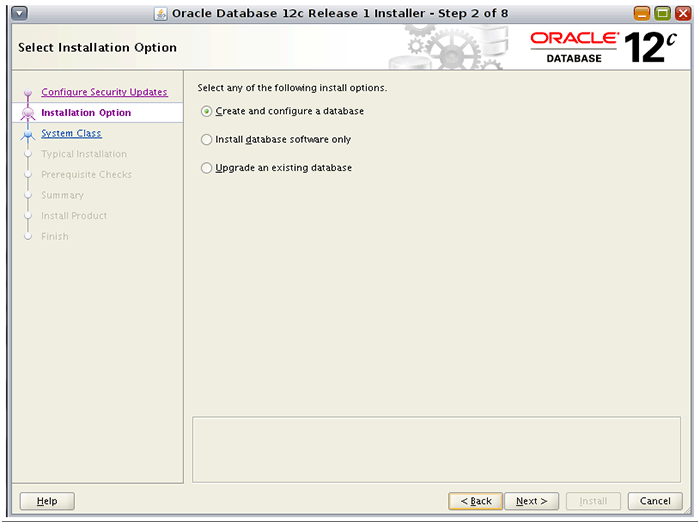
On the Select Installation Options screen, we select the option to create and configure a database as well as installing the software.
**
**
Figure 8. Select Installation Options screen
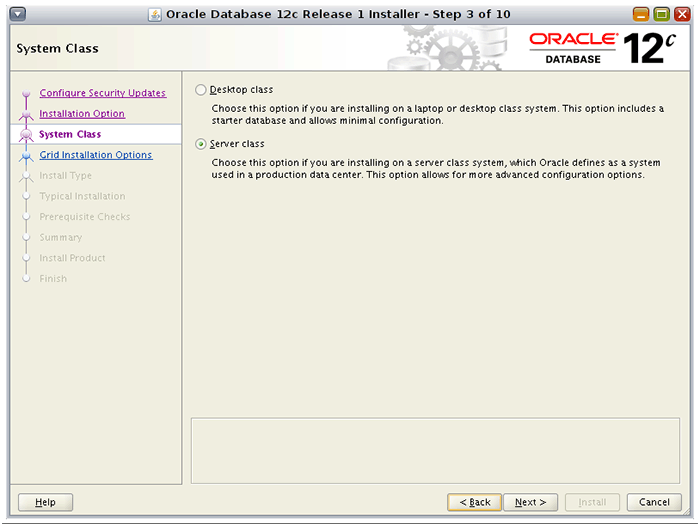
Next, we'll select the appropriate system class for the installation: desktop or server. We can select Desktop class for installation on a laptop or other desktop system, or Server class for a typical installation on a server class machine in the data center. Selecting Server class provides options to create a more advanced deployment environment.
**
**
Figure 9. System Class screen
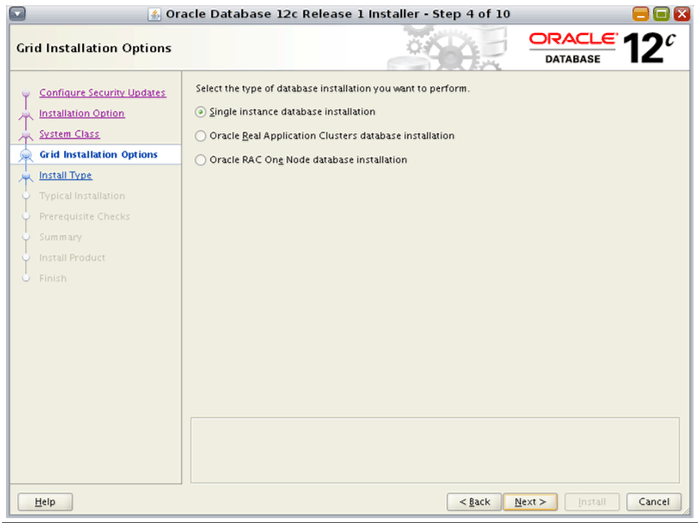
Since we selected Server class, we're presented with the choice of database installation options: single instance, Oracle Real Application Clusters (RAC), or Oracle RAC One Node. We'll select single instance for the purpose of this installation example.
**
**
Figure 10. Grid Installation Options screen
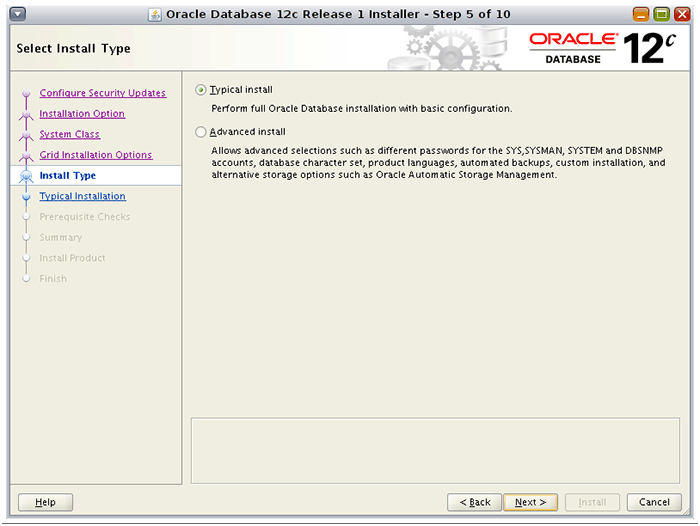
The next screen allows you to choose between Typical install (a basic database configuration) or Advanced install (to customize the installation, for example, by setting character sets, product language, storage options, and so on).
**
**
Figure 11. Select Install Type screen
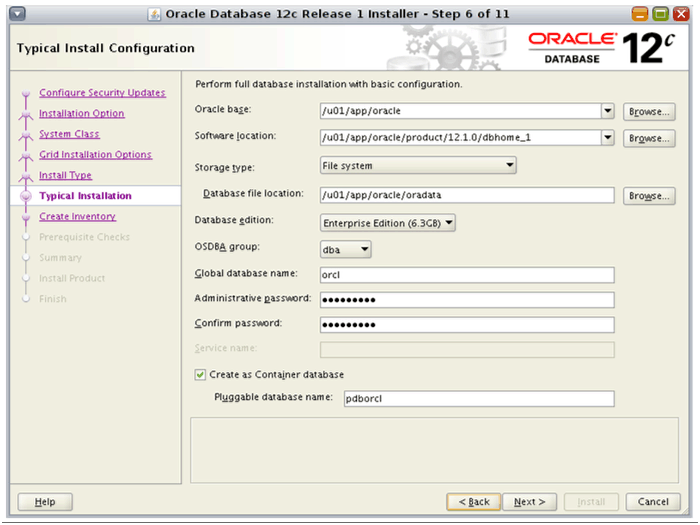
Next, we'll define software directories (specifying the shared release area, if appropriate) and the database edition to install. We'll also set the global database name, the database administrative group name, and the administrative password. Since we're installing Oracle Database 12_c_, we'll also select the checkbox to take advantage of Oracle Multitenant by creating multiple pluggable databases (PDBs) within a container database (CDB).
**
**
Figure 12. Typical Installation Configuration
Oracle Multitenant is a new option for Oracle Database 12c that enables efficient database consolidation. It provides the isolation of a single database while allowing multiple PDBs to share the system global area (SGA) and background processes of the same CDB, reducing resource requirements significantly. If you want the Oracle Universal Installer to create a PDB when it creates the CDB, specify the PDB name in the Pluggable database name field.
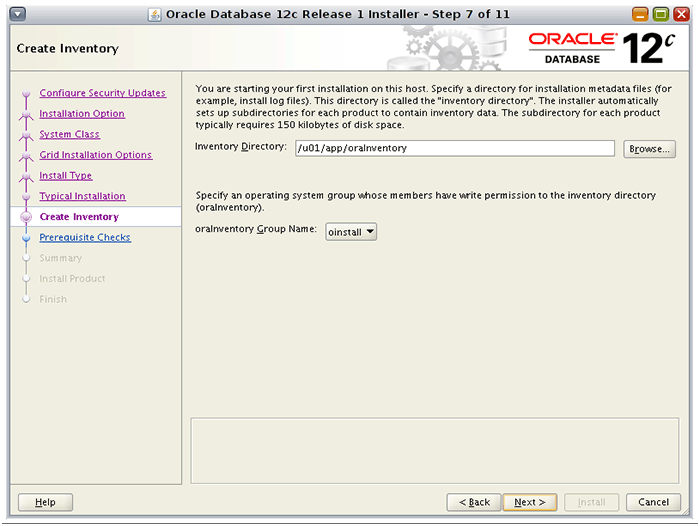
On the next screen, we'll define the inventory directory. This screen is displayed if this is the first time you are installing Oracle software on a system.
**
**
Figure 13. Create Inventory screen
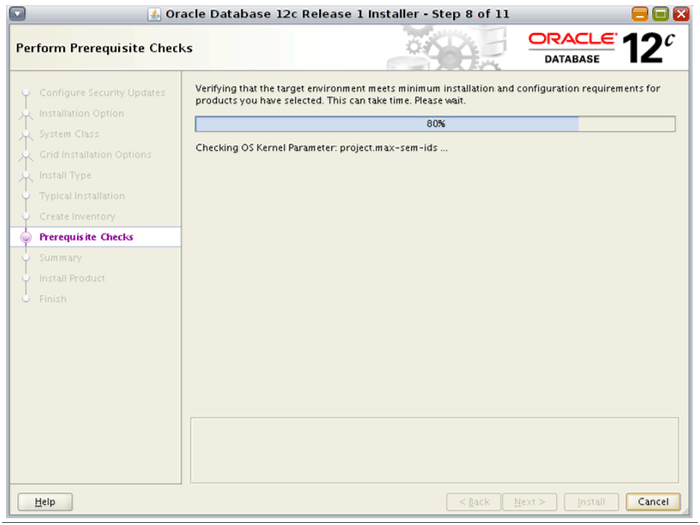
The Oracle Universal Installer then performs prerequisite checks.
**
**
Figure 14. Perform Prerequisite Checks screen
Then a summary of the installation appears.
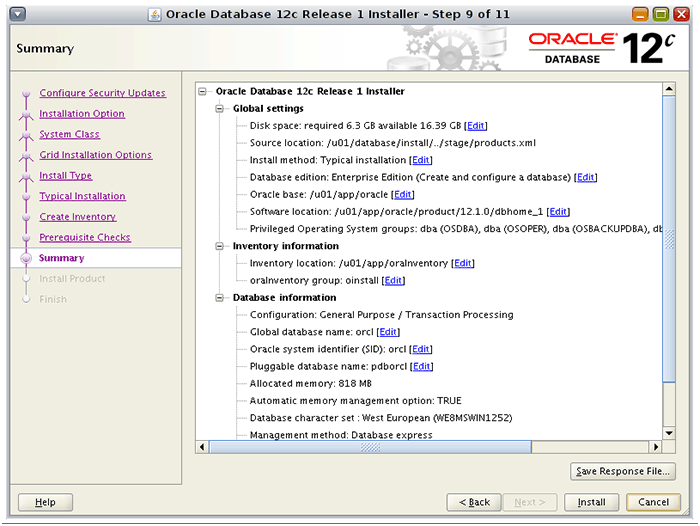
Figure 15. Summary screen
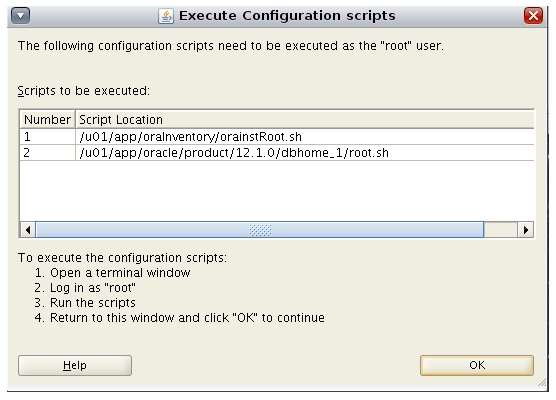
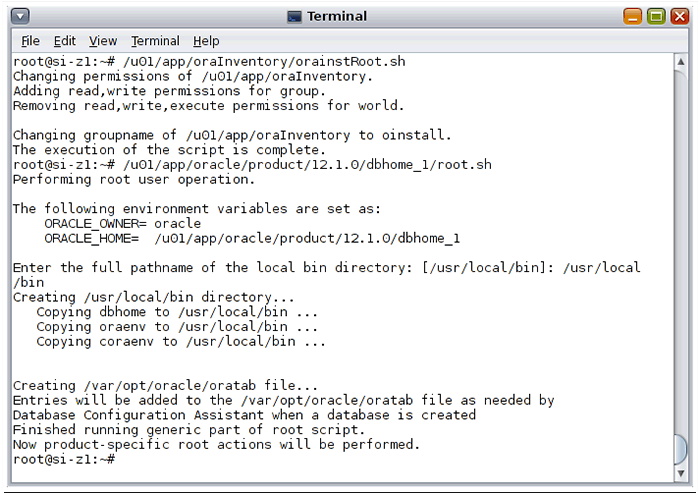
We'll click Install to begin the installation. The installer reports progress for the various installation steps. Midway through the installation, a dialog box instructs us to run the provided root scripts: orainstRoot.sh (which changes permissions on oraInventory) and $ORACLE_HOME/root.sh (which copies the provided scripts to the specified bin directory).
**
**
Figure 16. Dialog box asking us to run the scripts
**
**
Figure 17. Running the scripts
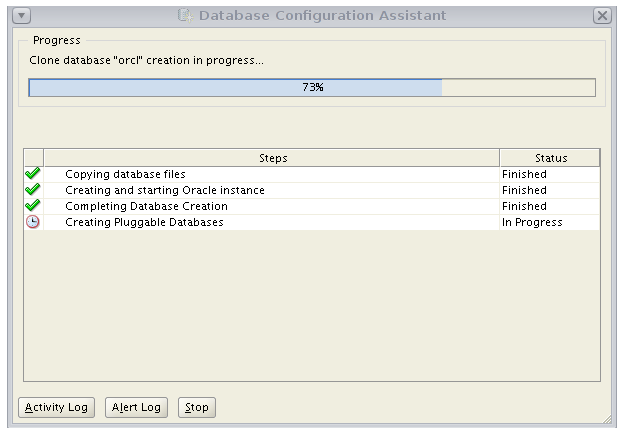
After we've run the root scripts, we'll click OK to continue the installation. The Database Configuration Assistant pops up and reports the status of the database creation.
**
**
Figure 18. Database Configuration Assistant
When database creation is complete, the Database Configuration Assistant prompts us to do password management. Passwords for all Oracle system administration accounts (except SYS, SYSTEM, and DBSNMP) are locked at this point in the installation. Before you can use a locked account, you must unlock it and reset its password. Click the Password Management button to unlock the user names you will need. Also, enter and confirm passwords for the privileged database accounts SYS, SYSTEM, and DBSNMP. Because we've also created the database as a CDB, the Oracle Universal Installer also asks for a PDBADMIN password.
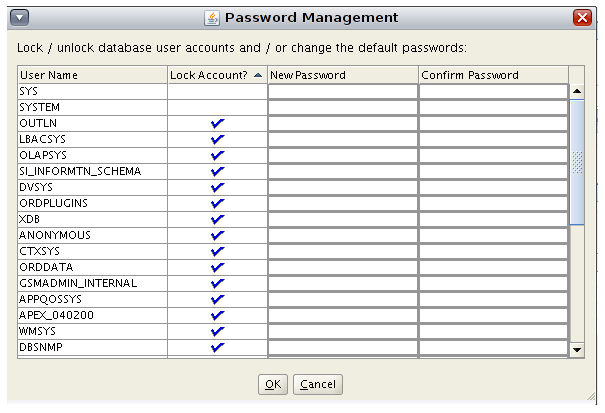
Figure 19. Password Management screen
After setting passwords as needed, click OK to continue. When the installation and database configuration processes are complete, the installer displays a summary of the completed steps in the Install Product screen.
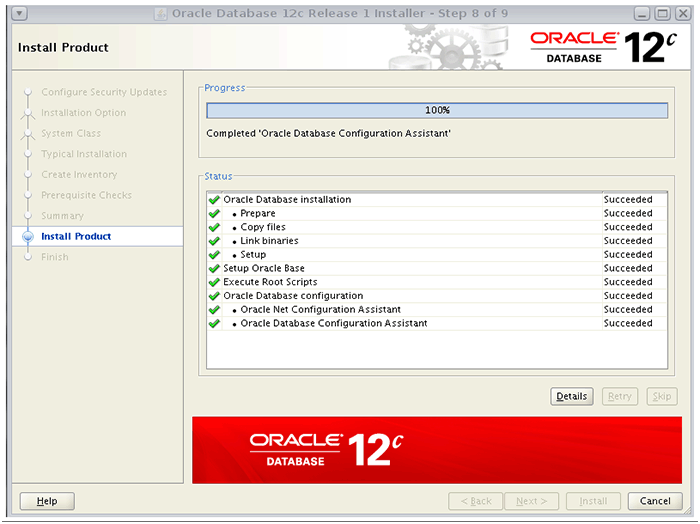
Figure 20. Install Product screen listing the completed steps
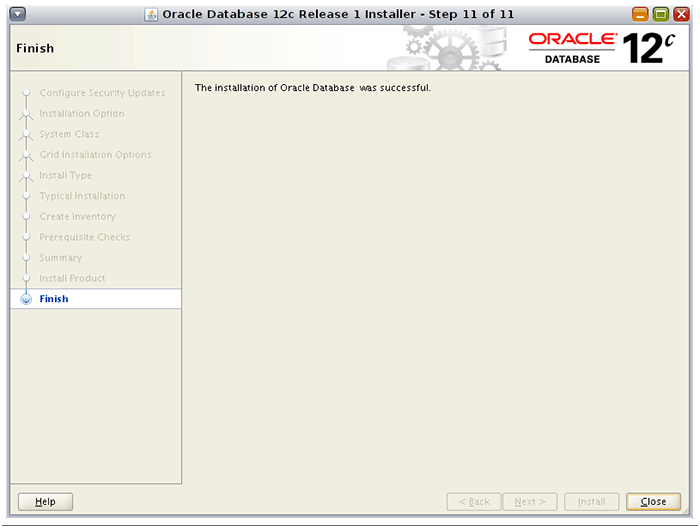
Figure 21. Finish screen indicating the installation was successful
Step 5: Validate the Oracle Database Installation
Before we validate the installation, we need to set some environment variables. Run the oraenv script to set environment variables (including $ORACLE_HOME):
|
oracle@si-z1:~$ export PATH=$PATH:/usr/local/bin:$ORACLE_HOME/bin
oracle@si-z1:~$ . oraenv
ORACLE_SID = [ghenning] ? orcl
ORACLE_BASE environment variable is not being set since this
information is not available for the current user ID.
You can set ORACLE_BASE manually if it is required.
Resetting ORACLE_BASE to its previous value or ORACLE_HOME
The Oracle base has been set to /u01/app/oracle/product/12.1.0/dbhome_1
|
We're now ready to validate the installation.
|
oracle@si-z1:~$ dbstart $ORACLE_HOME
oracle@si-z1:~$ sqlplus /nolog
SQL*Plus: Release 12.1.0.2.0 Production on Thu Nov 20 10:40:22 2014
Copyright (c) 1982, 2014, Oracle. All rights reserved.
SQL> connect / as sysdba
Connected.
SQL> connect orcl as sysdba;
Enter password:
Connected.
SQL> create table members(
2 first_name varchar2(25) not null,
3 last_name varchar2(25) not null);
Table created.
SQL> describe members;
Name Null? Type
FIRST_NAME NOT NULL VARCHAR2(25)
LAST_NAME NOT NULL VARCHAR2(25)
SQL> exit
Disconnected from Oracle Database 12c Enterprise Edition Release 12.1.0.2.0 - 64bit Production
With the Partitioning, OLAP, Advanced Analytics and Real Application Testing options
oracle@si-z1:~$
|
Because we can successfully connect to the database instance and run some simple SQL commands, it looks like our installation was a success! After completing an Oracle Database installation, Oracle recommends that you apply database patches and perform the set of tasks described in "Oracle Database Postinstallation Tasks." In addition, you might want to tune Oracle Database, as described in several optimization papers (see the Query Optimization page).
What's Next?
This article describes a basic single-instance Oracle Database installation on Oracle Solaris 11.2 using a non-global zone to achieve isolation and resource capping. We can use the single-instance database as is, or there are a number of possible ways in which we could extend this installation example. Here are some ideas for you to explore on your own:
- Create another PDB within the CDB we just created. The Oracle Database Configuration Assistant can create an additional PDB database after the initial database installation. (See "Creating a Database" in "Oracle Database Postinstallation Tasks.")
- Create a second non-global zone to host another database instance. If you'll use the same database software release, you can mount the shared release area that we created in our example. You can repeat the procedure to create and install the zone, mount the file system
/u01, and install the database. An alternative to creating and installing the zone manually would be to clone the existing zone—a process that is faster than creating the zone from scratch. When you clone a zone, the installation has already been completed although some additional zone configuration is required. For more information, see "How to Clone a Zone" in the Oracle Solaris documentation.
- Rather than using single-instance database, you might want to set up Oracle RAC across multiple Oracle Solaris nodes or set up Oracle RAC One Node. More information about converting single-instance databases is available in the documentation (see the Oracle Real Application Clusters Administration and Deployment Guide).
See Also
To learn more, visit the following web resources:
Also see the following white papers and technical articles:
About the Authors
Glynn Foster is a principal product manager for Oracle Solaris. He is responsible for a number of technology areas including OpenStack, the Oracle Solaris Image Packaging System, installation, and configuration management.
Ginny Henningsen has worked for the last 17 years as a freelance writer developing technical collateral and documentation for high-tech companies. Prior to that, Ginny worked for Sun Microsystems, Inc. as a Systems Engineer in King of Prussia, PA and Milwaukee, WI. Ginny has a BA from Carnegie-Mellon University and a MSCS from Villanova University.
| Revision 1.0, 02/23/2015 |
Follow us:
Blog | Facebook | Twitter | YouTube