by Hans-Juergen Denecke, Pierre Reynes, and Xirui Yang
This article is the first half of Part 2 of a multipart series that describes how to set up a highly available configuration to run SAP applications on Oracle MiniCluster. This article supplies step-by-step procedures to install the SAP software components and configure SAPCTL to manage clustered resources.
| Table of Contents
 | |
| |
|

Oracle Optimized Solutions provide tested and proven best practices for how to run software products on Oracle systems. Learn more.
|
|
Introduction
This article is the first half of Part 2 of a multipart series that provides best practices and recommendations for setting up SAP applications on Oracle MiniCluster in a high availability (HA) configuration. (The second half of Part 2 is here.)
To compile and test the step-by-step procedures and recommendations provided in these articles, Oracle engineers and SAP experts constructed a sample deployment using an Oracle MiniCluster S7-2 system. "Part 1: Configuring Oracle MiniCluster for SAP" outlines the steps necessary to set up the Oracle MiniCluster, while Part 2 describes how to install and configure SAP ERP 6.0 EHP8 using Oracle Database 12c and Oracle Real Application Clusters (Oracle RAC) on two nodes in an HA environment (Figure 1).
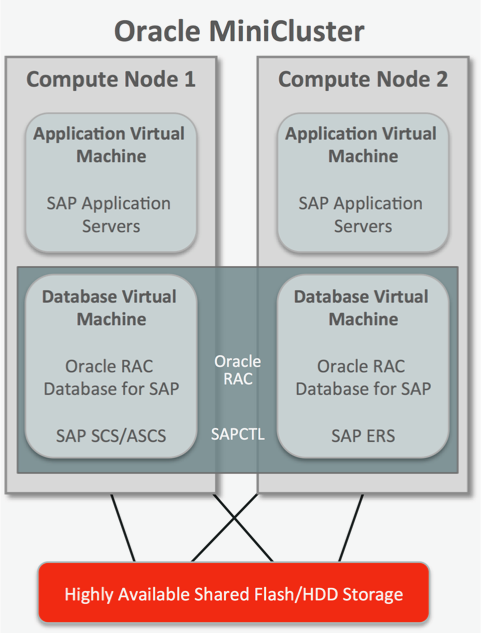
Figure 1. A sample SAP ERP installation on Oracle MiniCluster with Oracle RAC.
About Oracle MiniCluster
An infrastructure that supports SAP applications must offer outstanding data protection mechanisms and excellent reliability. To this end, Oracle MiniCluster is ideal for SAP deployments, especially for SAP applications that process security-sensitive data such as applications managing patient medical records, processing financial transactions, performing mission-critical enterprise resource planning, or handling secure communications and other security-related services.
Oracle MiniCluster S7-2 is a preintegrated system that includes compute, storage, virtualization, operating system, and management components. Its simplicity, out-of-the-box performance, proven reliability, and small form factor make it an excellent choice for deployments in remote offices and smaller corporate locations or for agile software development (DevOps) environments.
Tools provided with Oracle MiniCluster automate the deployment of Oracle Database and Oracle RAC software components, setting up virtual machines (VMs), making it easier to manage security and compliance, and deploying system patches. Numerous security controls are built in, which helps to simplify secure configurations to meet DISA-STIG, PCI-DSS, and other security benchmarks.
The first article in this series describes how to use these tools to configure the hardware along with database and application VMs prior to SAP software installation. This article focuses on the subsequent steps needed to install and configure the SAP software components, Oracle Database, and the Oracle Clusterware and SAPCTL software that manages the SAP Standalone Central Services (ASCS) and Enqueue Replication Service (ERS) in the database virtual machines.
SAP Installation Considerations
Before deploying SAP on Oracle MiniCluster, it is important to review the following software support information:
- Supported SAP products on Oracle MiniCluster. All SAP products that are supported on Oracle Solaris 11 for SPARC are supported on Oracle MiniCluster. SAP products must be delivered with SAP Kernel Release 7.21 EXT and higher, or with SAP NetWeaver 7.0 and higher. Additional related information can be found in SAP Notes 2384855 and 2136441 (access to SAP Notes requires logon and authentication to the SAP Marketplace). The SAP Product Availability Matrix (PAM) is the recommended source for product support information.
- Supported Oracle Database software on Oracle MiniCluster. Oracle RAC and single-instance Oracle Database 12c environments are supported with SAP applications on Oracle MiniCluster. (Note that Oracle RAC One Node is not supported with SAP.) SAP Note 2384855, "Oracle MiniCluster for SAP," is updated on a regular basis to reflect any changes with respect to running SAP applications on Oracle MiniCluster.
- Clustering solution for SAP HA on Oracle MiniCluster. SAPCTL is the recommended tool to deploy highly available SAP systems on Oracle MiniCluster. SAPCTL is developed for the Oracle Clusterware framework, and it can take care of the (A)SCS and ERS of the SAP system in an HA environment. SAPCTL provides an easy-to-use user interface, scripts, and dependencies for Oracle Clusterware and SAP HA components. It consolidates the functionality of the Oracle command-line tools by enabling you to easily manage the SAP ASCS for ABAP and Java, the SAP ERS for ABAP and Java, and the additional virtual IP addresses used by the SAP Instances.
Once SAP is installed, you can use SAPCTL to construct an HA configuration that uses Oracle Clusterware. In an Oracle RAC environment, Oracle Clusterware monitors Oracle RAC components (such as instances and services). If a failure occurs, Oracle Clusterware automatically attempts to fail over the failed component to another cluster node and/or redirects operations to a surviving component. Consult SAP Note 1496927 for additional guidance on downloading and using SAPCTL to implement ASCS and ERS as highly available services.
Overview of the SAP Installation Process
An SAP ERP ABAP deployment requires the following installation and configuration procedures on Oracle MiniCluster.
Steps documented in the first half of this article:
1. Download SAP and Oracle Database software.
2. Install the latest SAP bundle patch for Oracle Grid Infrastructure 12c.
3. Configure logical hosts and shared storage.
4. Prepare database instances on the database nodes.
5. Install the ABAP ASCS instance.
6. Install the ERS instance.
Steps documented in the second half of this article:
7. Create the SAP database instance.
8. Install the Primary Application Server (PAS).
9. Perform post-installation steps.
10. Perform final HA configuration steps.
The rest of this article describes these procedures, providing step-by-step instructions and recommendations.
Download SAP and Oracle Database Software
Step 1. Download the SAP Software Provisioning Manager.
Download the SAP Software Provisioning Manager (sapinst) by logging in to the SAP Support Portal and navigating to the SAP Software Downloads site (https://support.sap.com/swdc). In the section "Types of Software," click Access downloads under Installations & Upgrades. Then navigate to the software as follows:
Select By Alphabetical Index (A-Z) -> N -> SAP NetWeaver -> SAP NetWeaver 7.5 -> Software Provisioning Mgr 1.0 -> from the drop-down menu, and then select Solaris on SPARC 64bit -> SWPM<release>.SAR.
Step 2. Download the SAP ERP software.
Download the SAP ERP software by clicking Access downloads under Installations & Upgrades. Search for the software as follows:
Select By Alphabetical Index (A-Z) -> E -> SAP ERP -> SAP ERP ENHANCE PACKAGE -> EHP8 FOR SAP ERP 6.0 -> INSTALLATION AND UPGRADE.
From the drop-down menu, set the filter to "ORACLE DATABASE" and download files SAP ERP 6.0 EHP8 Installation Export (1-4), in four separate files.
Step 3. Download the SAP Kernel.
Download the SAP NetWeaver software by clicking Access downloads under Installations & Upgrades. Then navigate to the software as follows:
Select By Alphabetical Index (A-Z) -> E -> SAP ERP -> SAP ERP ENHANCE PACKAGE -> EHP8 FOR SAP ERP 6.0 -> SAP NetWeaver 7.5 -> SAP KERNEL 7.45 64-BIT UNICODE -> INSTALLATION.
From the drop-down menu, set the filter to "SOLARIS" and download the file named "SAP Kernel 7.45 Solaris on SPARC 64bit - NW 7.5."
Note: Advanced (expert) users may also download the up-to-date SAP kernel patch level from Support Packages and Patches. Make sure to download all the required packages including SAPEXE.SAR, SAPEXEDB.SAR, DBATOOLS.SAR, SAPHOSTAGENT.SAR, igsexe.sar, and igshelper.sar, and for a Java system, also download SAPJVM.SAR. Do not mix EXT and non-EXT packages! Download all these files to a new folder, and provide the folder name when the installer asks for the location of these packages.
Step 4. Download the Oracle Database software.
Download the Oracle Database software by clicking Access downloads under Databases. Then navigate to the software as follows:
Select Database and Database Patches -> Oracle -> Oracle 12.1 Software (64-bit) -> INSTALLATION.
From the drop-down lists, set the filter to "SOLARIS" and "ORACLE DATABASE," and download files for "Oracle 12.1 RDBMS Solaris on SPARC 64bit (1-2)" in two separate files, and download the file named "Oracle Client 12.1.0.2."
Install the Latest SAP Bundle Patch for Oracle Grid Infrastructure
Step 1. Download the SAP bundle patch.
At the time that this document was written, the latest SAP bundle patch was release 12.1.0.2.170418. Because Oracle MiniCluster is in the Oracle engineered systems family, it is necessary to apply the SAP bundle patch for Oracle Exadata and Oracle SuperCluster. To download the patch, visit https://support.sap.com/swdc and click Access downloads under Databases. Then navigate to the bundle patch as follows:
Select Database and Database Patches -> Oracle -> Oracle Patch and Software Downloads (12.1.0.2.0)...for Exadata & SuperCluster.
From the drop-down list, set the filter to "SOLARIS ON SPARC 64BIT" and download all available files. Set the filter to "# OS INDEPENDENT" and download the latest OPATCH and MOPATCH packages.
Step 2. Apply the SAP bundle patch.
Open the readme file (README12102P_1702-20012309.HTM) and follow the instructions to patch the Oracle Grid Infrastructure software. With the advent of Oracle MiniCluster software release 1.1.25.4, it is no longer necessary to roll back the standard Database Patch Set Update (PSU); the Oracle MiniCluster software release includes the Oracle Proactive Bundle Patch.
Set the environment variables as shown in Listing 1.
export ORACLE_HOME=/u01/app/12.1.0.2/grid
export PATH=/u01/app/12.1.0.2/grid/bin:/u01/app/12.1.0.2/grid/OPatch:$PATH
export OHGRID=/u01/app/12.1.0.2/grid
export OHRDBMS=/oracle/MCL/121
export IHRDBMS=/u01/app/oracle/product/12.1.0/dbhome_1
export SBPFUSER=/usr/sbin/fuser
Listing 1: Environment variables.
Execute steps 1 to 14 of the readme file (under section 2.2, "Installing the SAP Bundle Patch").
Note: Step 15 and onwards will be executed later in the second half of this article in the section "Post-Installation Steps" after the SAP software installation is completed.
Configure Logical Hosts and Shared Storage on Database VMs
Step 1. Edit the /etc/hosts files on both nodes.
Oracle Clusterware implements the concept of logical (or virtual) host names, which monitor network access availability and, if necessary, can move an IP address, managed as a resource, between nodes. To create an HA SAP configuration, you must define additional IP addresses and host names for logical hosts for the ASCS and ERS instances. In the example installation, we used the logical host names vm1-lh1 and vm1-lh2, adding entries to /etc/hosts on both Oracle MiniCluster nodes. Make sure to add both the simple host names and the fully qualified domain names.
::1 localhost
127.0.0.1 localhost loghost
10.133.82.108 sapdb1-vm1-n1.us.oracle.com sapdb1-vm1-n1
10.133.82.110 sapdb1-vm1-n2.us.oracle.com sapdb1-vm1-n2
10.133.82.109 vm1-n1-vip.us.oracle.com vm1-n1-vip
192.168.10.60 sapdb1-vm1-n1-priv
10.133.82.111 vm1-n2-vip.us.oracle.com vm1-n2-vip
192.168.10.61 sapdb1-vm1-n2-priv
10.133.82.130 vm1-lh1.us.oracle.com vm1-lh1
10.133.82.131 vm1-lh2.us.oracle.com vm1-lh2
10.133.82.115 oos1-app1.us.oracle.com oos1-app1
10.133.82.116 oos1-app2.us.oracle.com oos1-app2
Listing 2: Adding entries for logical hosts to the /etc/hosts files.
Step 2. Create logical hosts for SAP ASCS and ERS.
Create logical hosts for SAP ASCS and ERS in the global zones on both nodes. The IP configuration for these logical hosts will be deleted after the SAP installation because SAPCTL will eventually manage the logical hosts. In the global zone of the first node, enter the following commands:
root@oosmc1-n1:~# zoneadm list -iv
ID NAME STATUS PATH BRAND IP
0 global running / solaris shared
2 acfskz running - solaris-kz excl
21 appvm1-vm1-oosmc1-n1 running /mcpool/appvm1-vm1-oosmc1-n1zroot solaris excl
24 sapdb1-vm1-oosmc1-n1 running /mcpool/sapdb1-vm1-oosmc1-n1zroot solaris excl
- appzonetemplate installed /mcpool/appzonetemplate solaris excl
- dbzonetemplate installed /mcpool/dbzonetemplate solaris excl
root@oosmc1-n1:~# zonecfg -z sapdb1-vm1-oosmc1-n1
zonecfg:sapdb1-vm1-oosmc1-n1> add anet
zonecfg:sapdb1-vm1-oosmc1-n1:anet> set linkname=sap_net2
zonecfg:sapdb1-vm1-oosmc1-n1:anet> set lower-link=net2
zonecfg:sapdb1-vm1-oosmc1-n1:anet> end
zonecfg:sapdb1-vm1-oosmc1-n1> verify
zonecfg:sapdb1-vm1-oosmc1-n1> commit
zonecfg:sapdb1-vm1-oosmc1-n1> exit
Listing 3: Configuring a logical host on node 1.
In the global zone of the second node, repeat the commands in Listing 3 to configure logical hosts.
Step 3. Shut down cluster services and reboot the database VMs.
root@oosmc1-n1:~# zlogin sapdb1-vm1-oosmc1-n1
root@sapdb1-vm1-n1:~# /u01/app/12.1.0.2/grid/bin/crsctl stop cluster -n sapdb1-vm1-n1
root@sapdb1-vm1-n1:~# reboot
Listing 4: Rebooting database VMs on node 1.
Repeat the commands in Listing 4 on the second node.
Step 4. Configure virtual interfaces in the database VMs.
root@sapdb1-vm1-n1:~# dladm show-link
LINK CLASS MTU STATE OVER
sap_net2 vnic 1500 up ?
aggrpvt0 vnic 1500 up ?
net0 vnic 1500 up ?
net2 vnic 1500 up ?
root@sapdb1-vm1-n1:~# ipadm create-ip sap_net2
root@sapdb1-vm1-n1:~# ipadm create-addr -a 10.133.82.130/22 sap_net2
root@sapdb1-vm1-n1:~# ipadm show-addr
ADDROBJ TYPE STATE ADDR
lo0/v4 static ok 127.0.0.1/8
aggrpvt0/v4 static ok 192.168.10.60/24
aggrpvt0/v4a static ok 169.254.26.62/16
ipmppub0/v4 static ok 10.133.82.108/22
ipmppub0/v4a static ok 10.133.82.109/22
ipmppub0/v4b static ok 10.133.82.114/22
sap_net2/v4 static ok 10.133.82.130/22
lo0/v6 static ok ::1/128
aggrpvt0/v6 addrconf ok fe80::8:20ff:fe25:78e9/10
Listing 5: Configuring the virtual network.
Use ipadm commands like those in Listing 5 to configure a virtual interface on the second node.
Step 5. Disable IP filtering in both database VM nodes.
After the installation and setup is completed, IP filtering must be enabled again.
root@sapdb1-vm1-n1:~# svcadm disable svc:/network/ipfilter:default
Listing 6: Disable IP filtering on node 1.
Repeat the command in Listing 6 on the second node.
Configuring Shared SAP File Systems
Shared file systems are created as subfolders under /sharedstore, as shown in Table 1.
Table 1: Shared File Systems
| Subfolder under /sharedstore | Local mount point |
| /software | /software |
| /MCL/oracle | /oracle/MCL |
| /MCL/sapmnt | /sapmnt/MCL |
| /MCL/trans | /usr/sap/trans |
| /MCL/usrsap | /usr/sap/MCL |
Step 1. Create subfolders in /sharedstore.
root@sapdb1-vm1-n2:~# cd /sharedstore/
root@sapdb1-vm1-n2:/sharedstore# mkdir -p MCL/oracle
root@sapdb1-vm1-n2:/sharedstore# mkdir -p MCL/sapmnt
root@sapdb1-vm1-n2:/sharedstore# mkdir -p MCL/trans
root@sapdb1-vm1-n2:/sharedstore# mkdir -p MCL/usrsap
root@sapdb1-vm1-n2:/sharedstore# mkdir software
Listing 7: Creating subfolders.
Step 2. Create local folders.
root@sapdb1-vm1-n2:/~# mkdir -p /sapmnt/MCL
root@sapdb1-vm1-n2:/~# mkdir -p /oracle/MCL
root@sapdb1-vm1-n2:/~# mkdir -p /usr/sap/MCL
root@sapdb1-vm1-n2:/~# mkdir /software
Listing 8: Creating local folders.
Step 3. Add entries in /etc/vfstab specifying file systems and mount points.
10.133.82.104:/sharedstore/sharedstore/MCL/sapmnt - /sapmnt/MCL nfs - yes rw,bg,hard,rsize=1048576,wsize=1048576,proto=tcp
10.133.82.104:/sharedstore/sharedstore/software - /software nfs - yes rw,bg,hard,rsize=1048576,wsize=1048576,proto=tcp
10.133.82.104:/sharedstore/sharedstore/MCL/oracle - /oracle/MCL nfs - yes rw,bg,hard,rsize=1048576,wsize=1048576,proto=tcp
10.133.82.104:/sharedstore/sharedstore/MCL/usrsap - /usr/sap/MCL nfs - yes rw,bg,hard,rsize=1048576,wsize=1048576,proto=tcp
Listing 9: Adding entries to /etc/vfstab files.
Step 4. Mount the shared file systems.
Unmount /sharedstore and delete its entry in /etc/vfstab. Mount the shared file systems and set permissions, as shown in Listing 10.
root@sapdb1-vm1-n2:/~# mountall
root@sapdb1-vm1-n2:/~# chown -R oracle:oinstall /oracle
root@sapdb1-vm1-n2:/~# chmod 755 /oracle
root@sapdb1-vm1-n2:~# df -F nfs -h
Filesystem Size Used Available Capacity Mounted on
10.133.82.104:/commonfs/commonfs/sfw
100G 24G 76G 25% /oracleBits
10.133.82.104:/sharedstore/sharedstore/software
18T 70G 18T 1% /software
10.133.82.104:/sharedstore/sharedstore/MCL/oracle
18T 70G 18T 1% /oracle/MCL
10.133.82.104:/sharedstore/sharedstore/MCL/sapmnt
18T 70G 18T 1% /sapmnt/MCL
10.133.82.104:/sharedstore/sharedstore/MCL/usrsap
18T 70G 18T 1% /usr/sap/MCL
Listing 10: Mounting shared file systems.
Step 5. Create a link for ORACLE_HOME with the user oracle.
oracle@sapdb1-vm1-n2:~$ ln -s /u01/app/oracle/product/12.1.0/dbhome_1 /oracle/MCL/121
Listing 11: Linking ORACLE_HOME.
Configuring Users and Groups
Oracle MiniCluster uses NFSv4 as the default network file sharing protocol. Users and groups that are used system-wide must exist on the NFS file server (in the storage VM) with identical IDs.
Step 1. Create groups sapinst and sapsys in all storage and database VMs.
root@<instance>:~# groupadd -g 700 sapinst
root@<instance>:~# groupadd -g 701 sapsys
Listing 12: Creating groups.
Step 2. Create user mcladm in both storage VMs.
root@oosmc1ss01:~# useradd -c "SAP System Admin" -u 2001 -g sapsys mcladm
Listing 13: Creating mcladm user.
Step 3. Create SAP OS users in both database VMs.
root@sapdb1-vm1-n1:~# useradd -c "SAP System Admin" -u 2001 -s "/bin/tcsh" -g sapsys -G dba,oper,oinstall -m mcladm
80 blocks
root@sapdb1-vm1-n1:~# useradd -c "SAP System" -u 2002 -s "/bin/false" -g sapsys -m sapadm
80 blocks
root@sapdb1-vm1-n1:~# useradd -c "SAP System" -u 2003 -s "/bin/tcsh" -g sapsys -m daaadm
80 blocks
root@sapdb1-vm1-n1:~# useradd -c "SAP Database Admin" -u 2004 -s "/bin/tcsh" -g dba -G oper -m oramcl
80 blocks
Listing 14: Creating SAP OS users.
Prepare Database Instances on Database Nodes
To prepare and install the database instances on the database (DB) nodes, choose the sapinst menu option RAC/ASM/Exadata Database Instance Preparation ABAP - Kernel 7.4x. Database instance preparation steps include
- Installing SAP kernel-independent and database-dependent parts of the SAP kernel
- Installing BR*Tools as a portion of the database-dependent part
- Installing Oracle Database Instant Client
- Creating SAP users and groups (which was done previously in Listing 12 through Listing 14)
- Preparing the environment for running the SAP database on Oracle Automatic Storage Management (Oracle ASM) with Oracle RAC
At the time of the installation of the sample deployment documented in this article, there were two ways to run the SAP Software Provisioning Manager (sapinst), the GUI for installing SAP software components:
- Running
sapinst locally on the database node. For this option, X11Forwarding must be enabled in the file /etc/ssh/sshd_config. After installation, X11Forwarding must be disabled to meet basic security requirements.
- Starting
sapinst with the parameter -nogui on a remote system, and then starting sapinstgui to connect to the session.
A more recent release of the SAP Software Provisioning Manager introduces a browser-based interface to perform software installation steps. For more information, see the SAP NetWeaver on UNIX and Oracle Database installation guide.
For the sample deployment, we used the method of running sapinst locally after creating a local installation directory (Listing 15).
root@sapdb1-vm1-n1:~# mkdir -p /sapinstlog/prep
root@sapdb1-vm1-n1:~# cd /sapinstlog/prep
root@sapdb1-vm1-n1:/sapinstlog/prep# /software/SWPM/sapinst
Listing 15: Creating local installation directory and starting sapinst.
The sapinst GUI displays an initial screen (Figure 2).
Under Generic Options, navigate to the installation option, as follows:
Select Oracle -> Database Tools -> RAC/ASM/Exadata Database Instance Preparation ABAP-Kernel 7.4x.
The SAP kernel version and stack should match the subsequent SAP NetWeaver product selection.

Figure 2. Using the sapinst GUI to navigate to the installation option.
If the default parameter settings are suitable for your requirements, select Typical as the installation parameter mode (Figure 3) and click Next.

Figure 3. Typical mode uses default parameter settings for installation.
Messages indicate whether ownership and permission changes are necessary for the installation directory. Click OK to confirm permission changes.
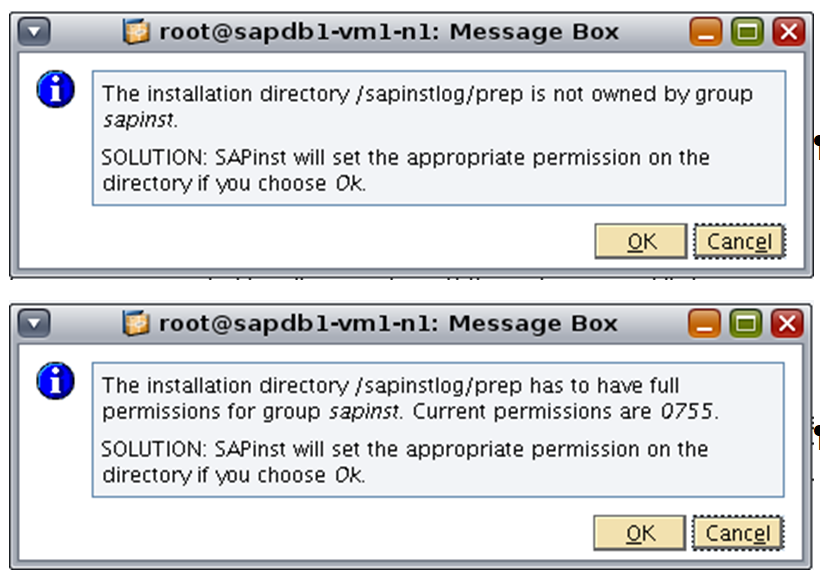
Figure 4. Messages indicate if directory changes are necessary.
Deselect Profiles Available because we are performing a fresh installation that does not use existing parameters from a profile.
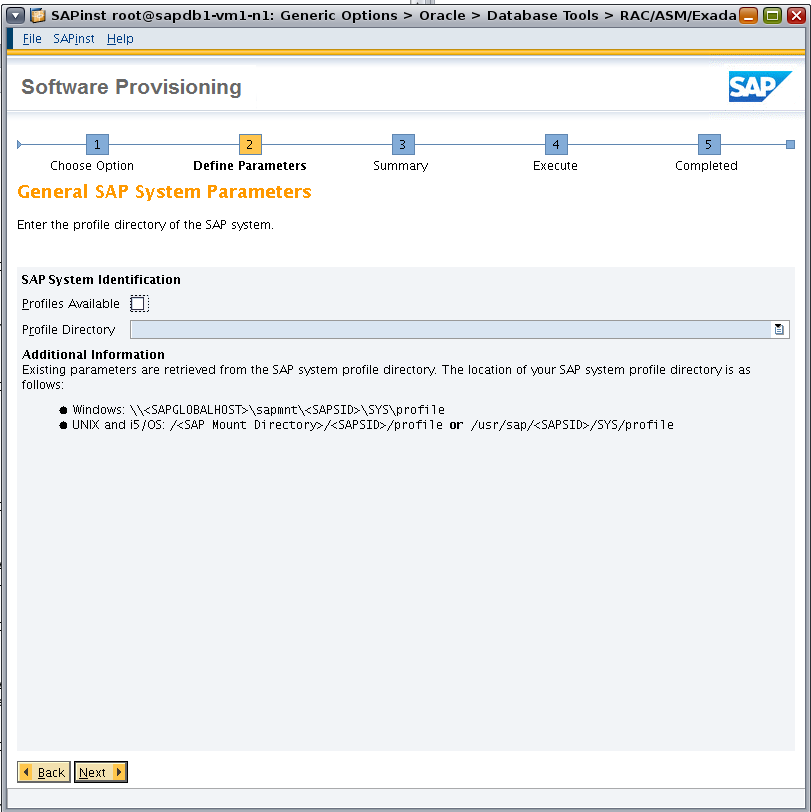
Figure 5. Deselecting "Profiles Available."
Set SAP System ID (SAPSID) to MCL and the mount directory as /sapmnt/MCL (Figure 6).
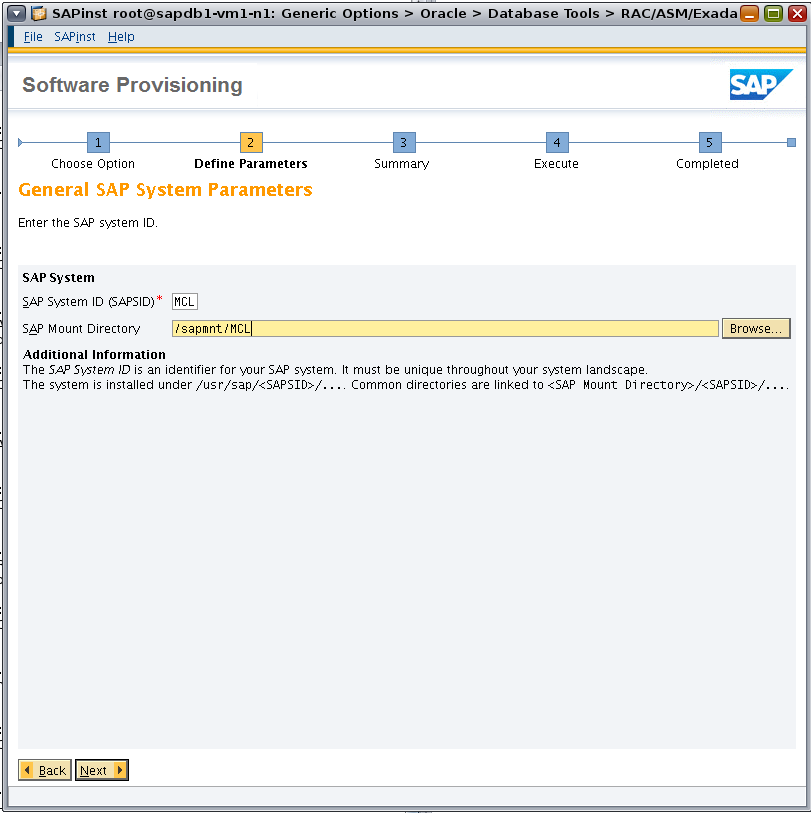
Figure 6. Specifying SAP parameters.
Select the checkbox so that the SAP system will generate the FQDN, and enter the DNS domain name (Figure 7).
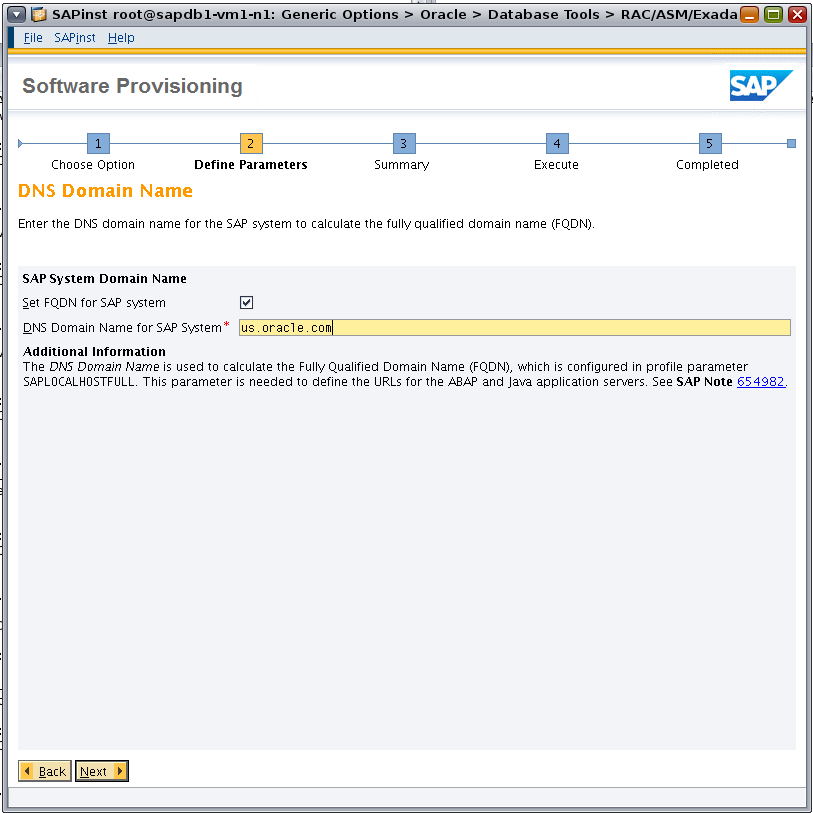
Figure 7. Specifying the DNS domain name.
Set the master password (Figure 8).
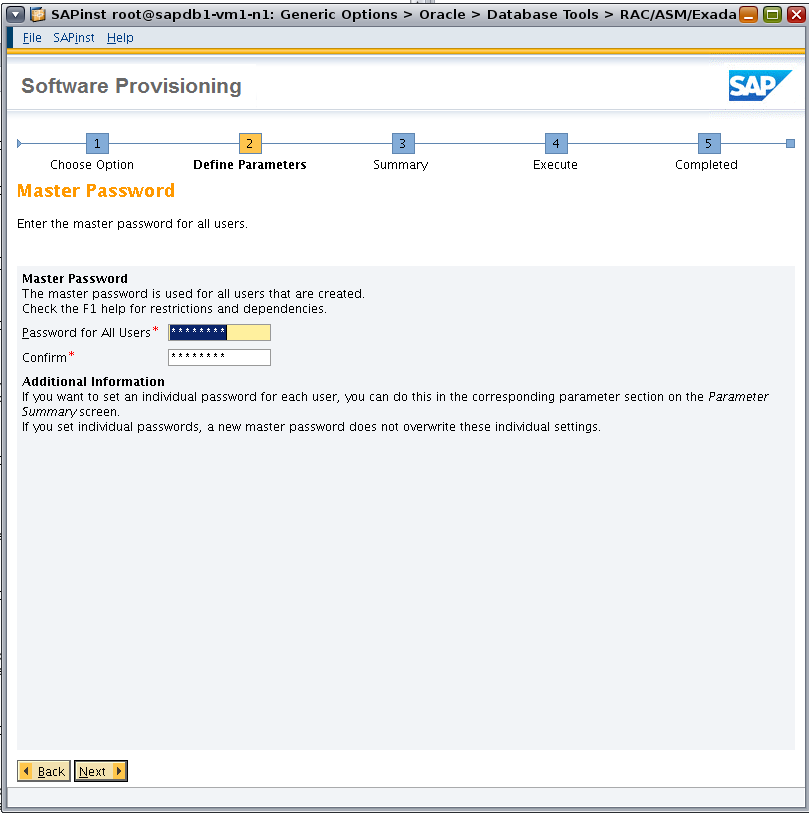
Figure 8. Specifying the master password.
In the example deployment, we used MCL as both the SAPSID and the Database ID (DBSID). To identify the database (Figure 9), first select the RAC on Oracle ASM option, and then select RAC on Engineered Systems from the Type of RAC list. Enter the database host name as well, which is sapdb1-vm1-n1 in the sample deployment.

Figure 9. Specifying database parameters.
Browse to the location of the SAP kernel files (Figure 10).

Figure 10. Locating the SAP kernel files.
Confirm that Database Server Version and Database Client Version are set to 121 (Figure 11).
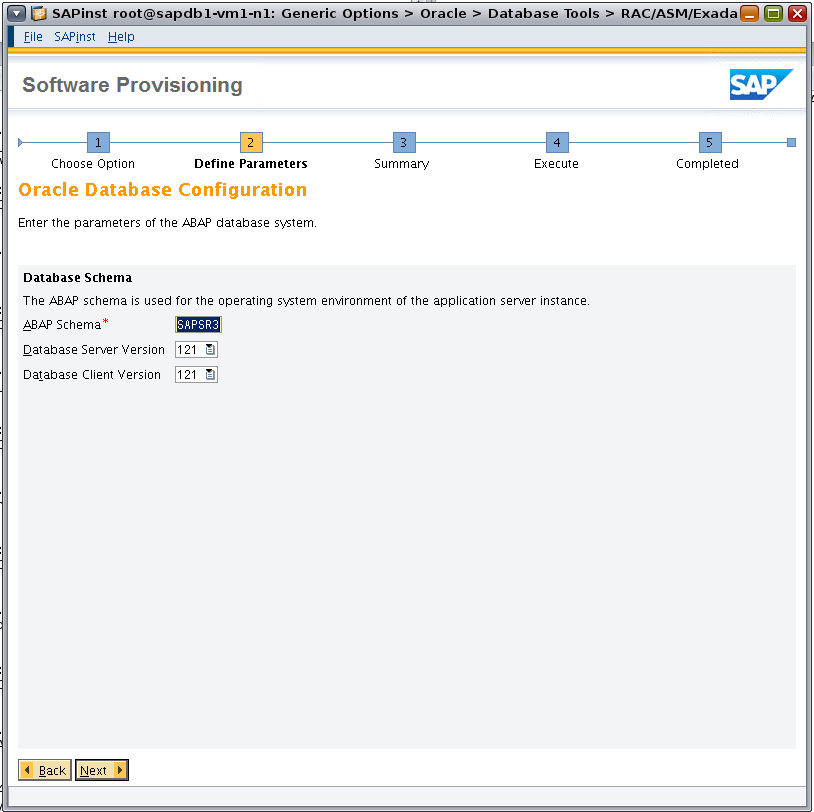
Figure 11. Specifying database parameters for the ABAP system.
On the Oracle Multitenant Database page, set Connect to Pluggable DB to No (Figure 12).
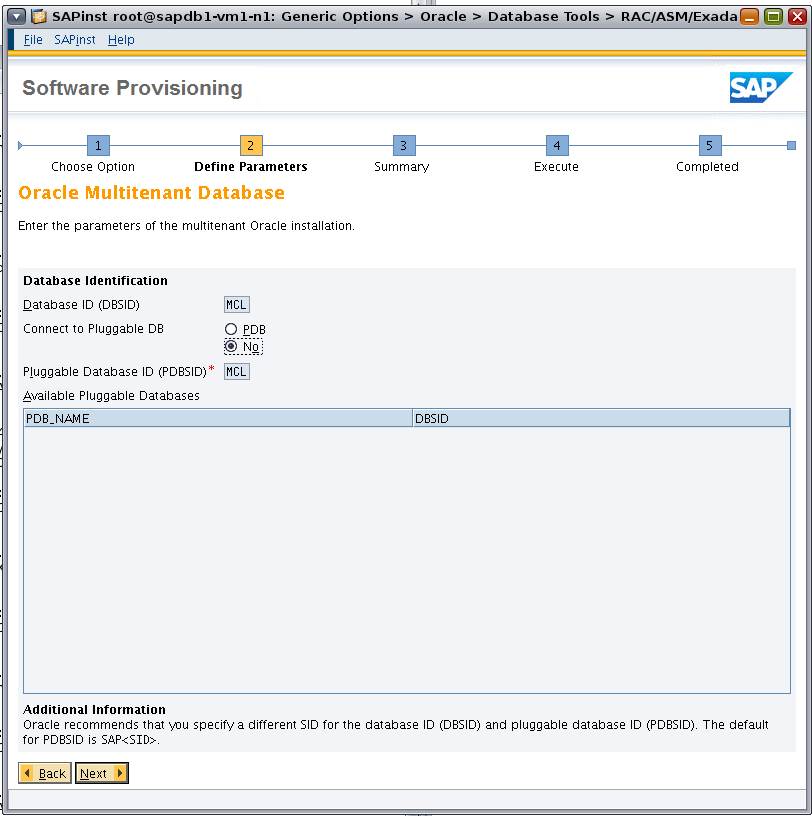
Figure 12. Specifying parameters for Oracle Multitenant.
Accept the defaults for the Oracle Listener Configuration page (Figure 13).
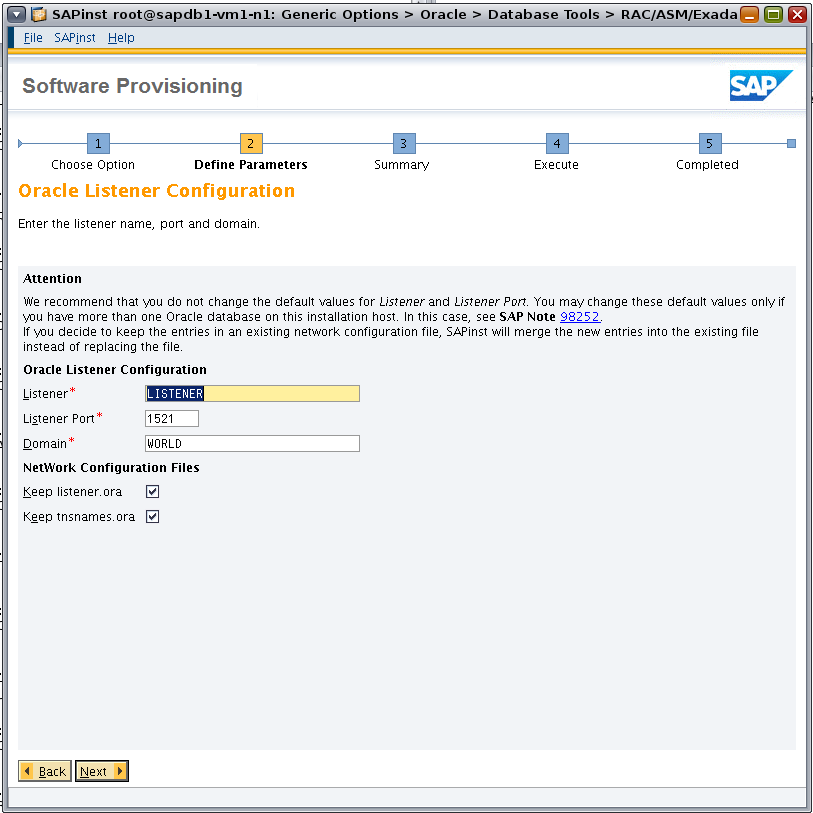
Figure 13. Configuring the Oracle Database listener.
Browse to the location of the Oracle Database Instant Client software packages (Figure 14).
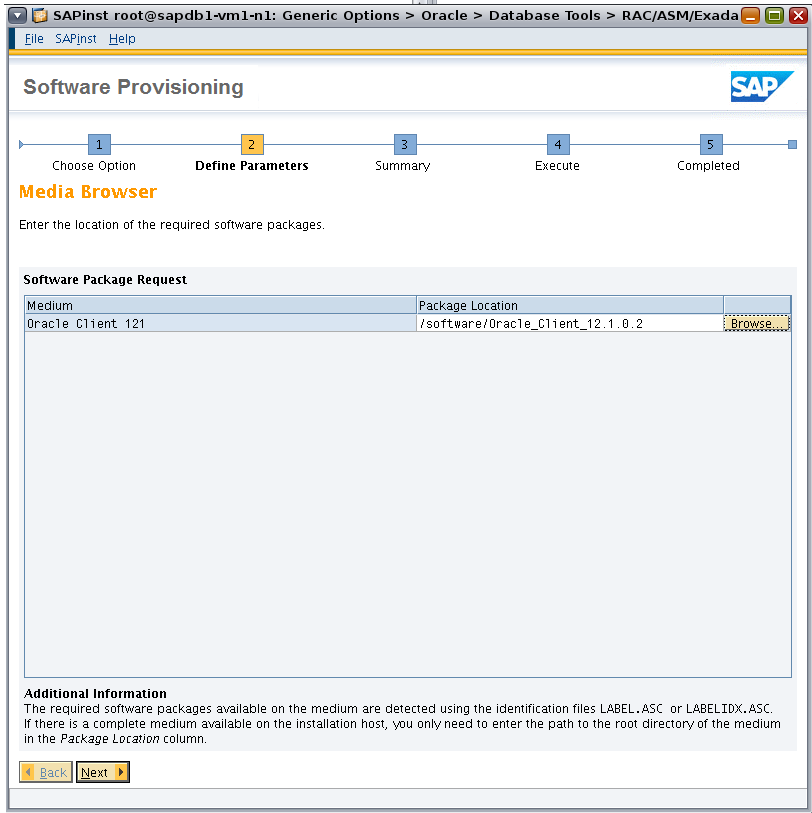
Figure 14. Locating the Oracle Database Instant Client software.
Set the appropriate path for ORACLE_HOME for GRID, and set ORACLE_SID for GRID to +ASM1 (Figure 15).
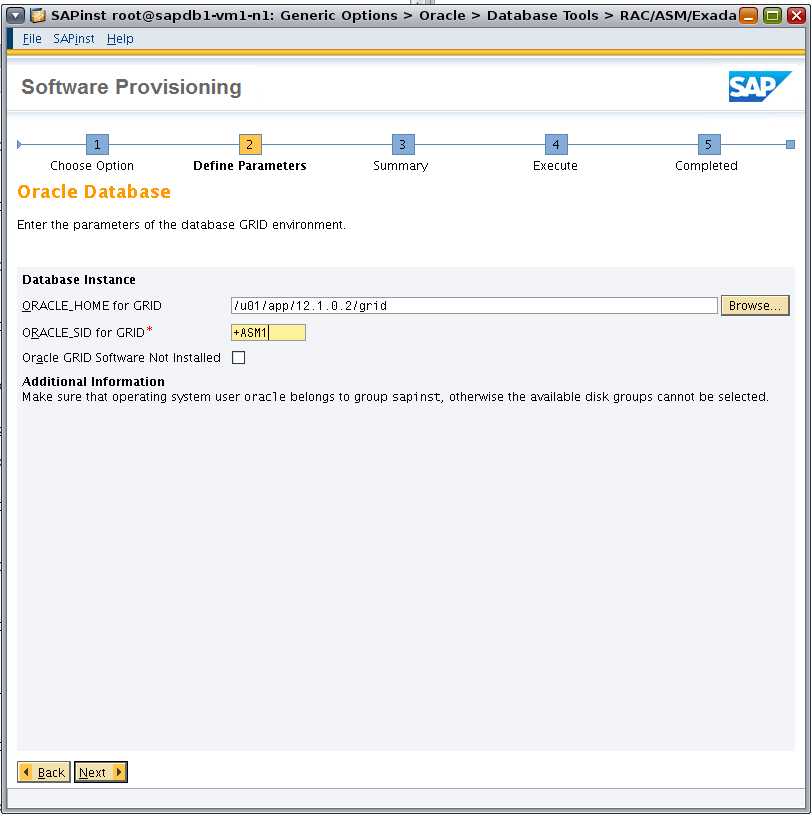
Figure 15. Specifying parameters for the database grid environment.
Enter parameters for Oracle RAC, and set the number of Oracle RAC database instances to 2 (Figure 16).
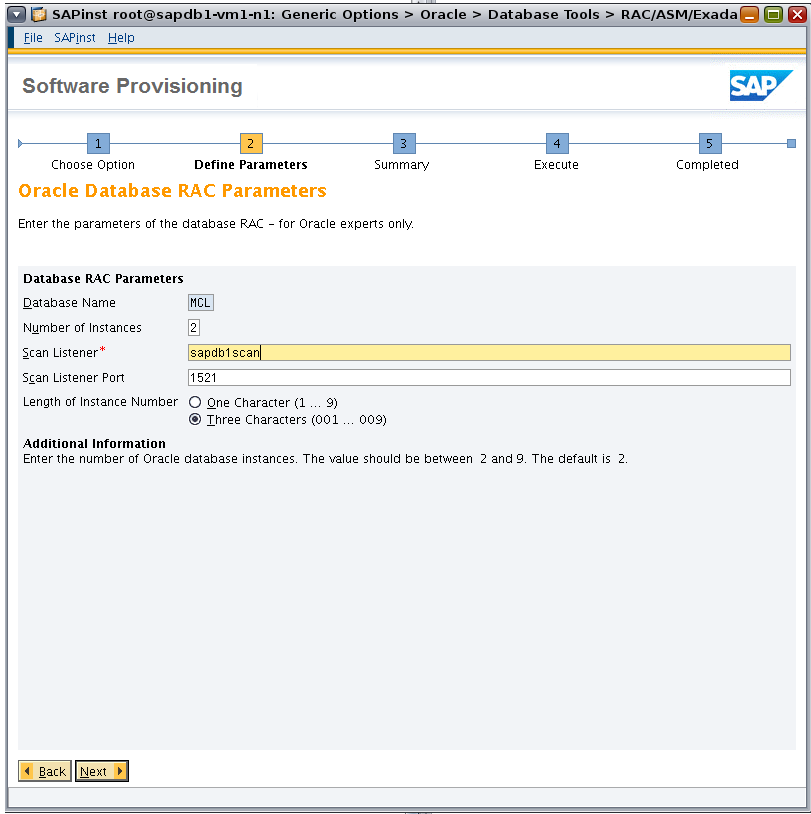
Figure 16. Specifying parameters for Oracle RAC.
Set the host names for the Oracle RAC instances, matching the database VM host names previously set in /etc/hosts (Figure 17).
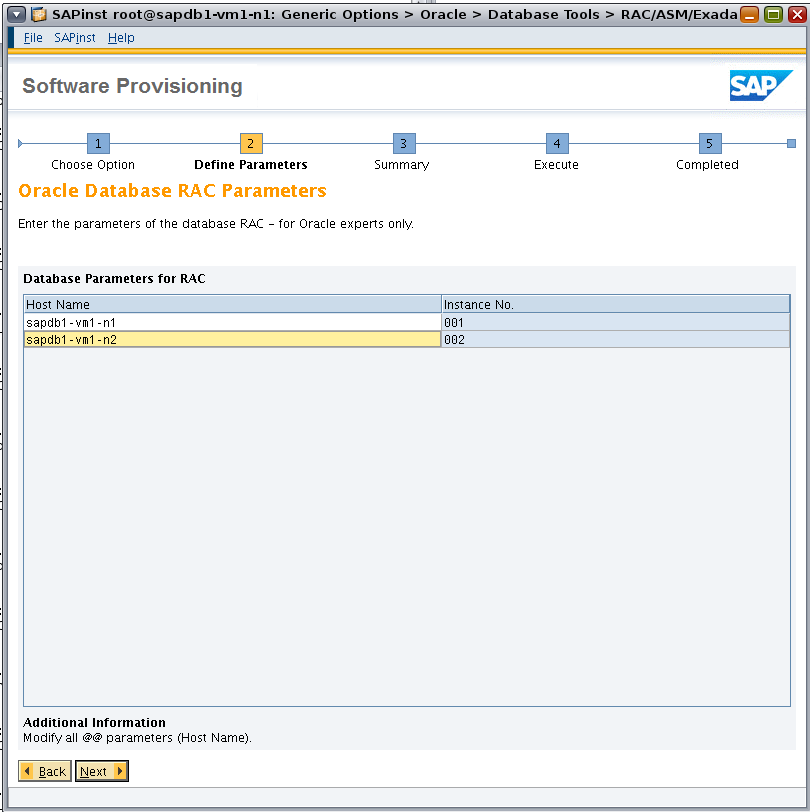
Figure 17. Specifying host names for Oracle RAC nodes.
Review the parameter summary, as shown in Figure 18. (If changes are needed, select Revise.) Check all defined parameters and then click Next to start the installation.
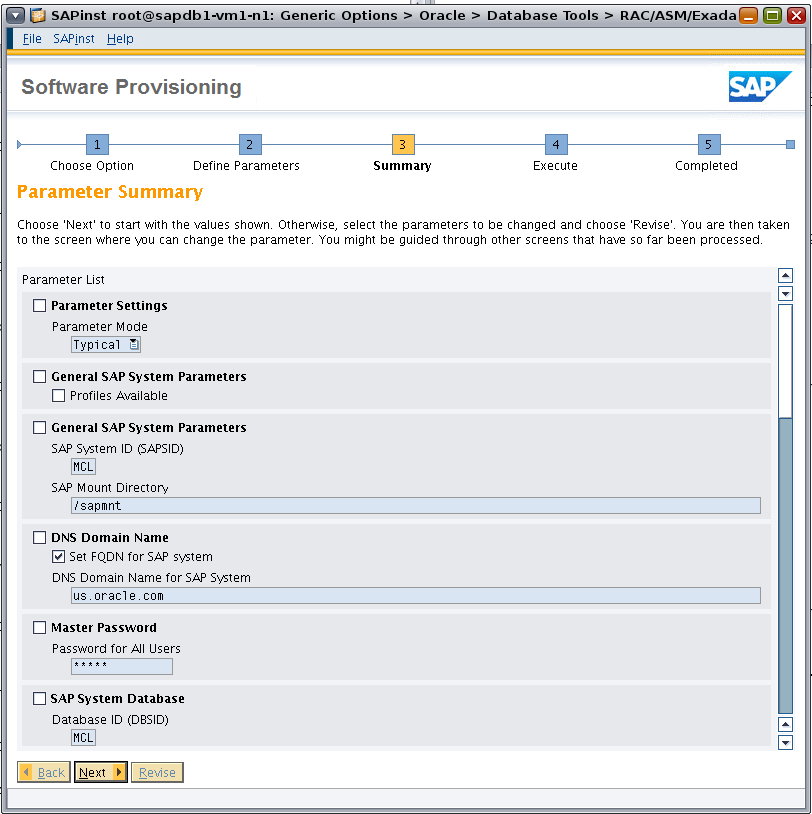
Figure 18. Reviewing the parameter summary.
The SAP Software Provisioning Manager (sapinst) updates the installation status and then displays a message indicating that the installation was successful (Figure 19).
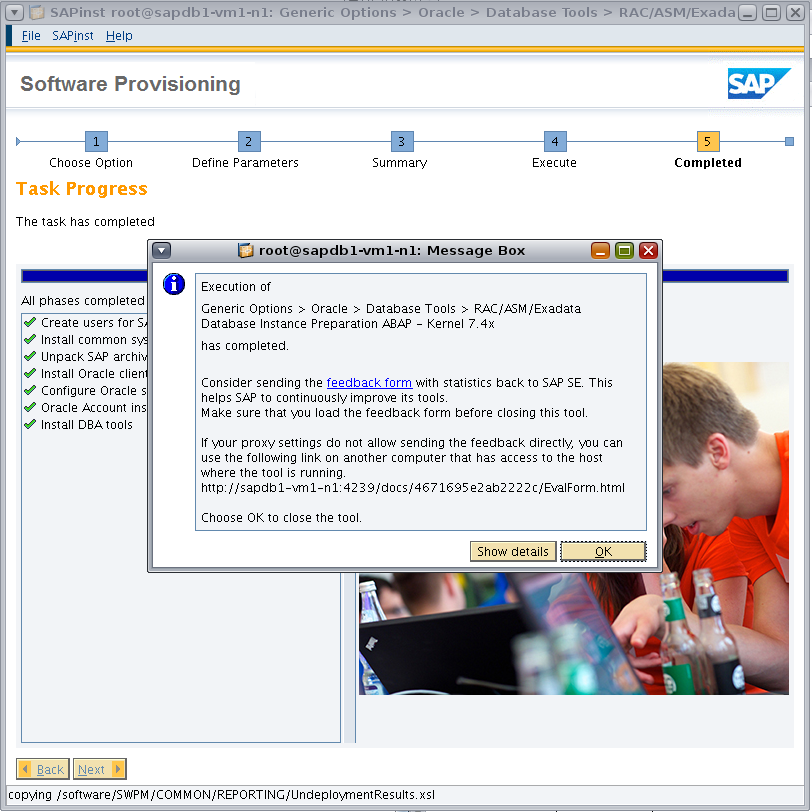
Figure 19. A message indicates if the installation is completed successfully.
Note: Before you continue, repeat the database instance preparation steps for the second database VM, sapdb1-vm1-n2.
Install the ASCS Instance
This procedure installs the ASCS instance on the first database VM using the logical host name. Create a local installation directory and start sapinst, specifying the logical host name using parameter SAPINST_USE_HOSTNAME.
root@sapdb1-vm1-n1:~# cd /sapinstlog/ascs/
root@sapdb1-vm1-n1:/sapinstlog/ascs# /software/SWPM/sapinst SAPINST_USE_HOSTNAME=vm1-lh1
Listing 16: Creating a local installation directory and starting sapinst.
As shown in Figure 20, under SAP Business Suite 7i 2016 and EHP8 for SAP ERP 6.0 ABAP, navigate to the following installation option:
Select Oracle -> SAP Systems -> Application Server ABAP -> High-Availability System -> ASCS Instance.
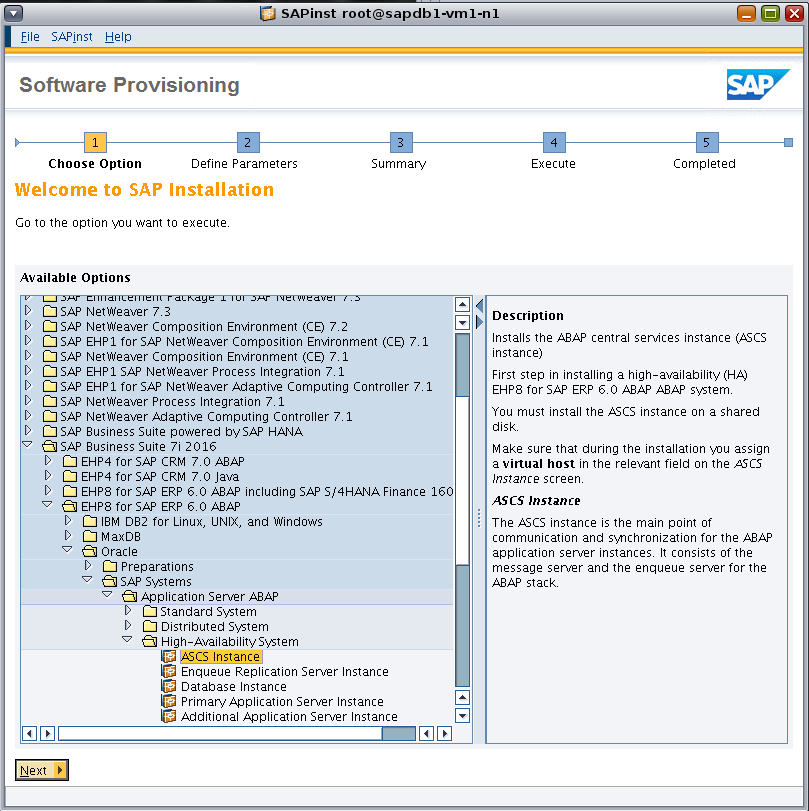
Figure 20. Using the sapinst GUI to navigate to the installation option.
Enter information for SAP System ID (SAPSID) and SAP Mount Directory (Figure 21).

Figure 21. Specifying SAP system parameters.
Select the Set FQDN for SAP system checkbox so that the SAP system will generate the FQDN, and then enter the DNS domain name (Figure 22).
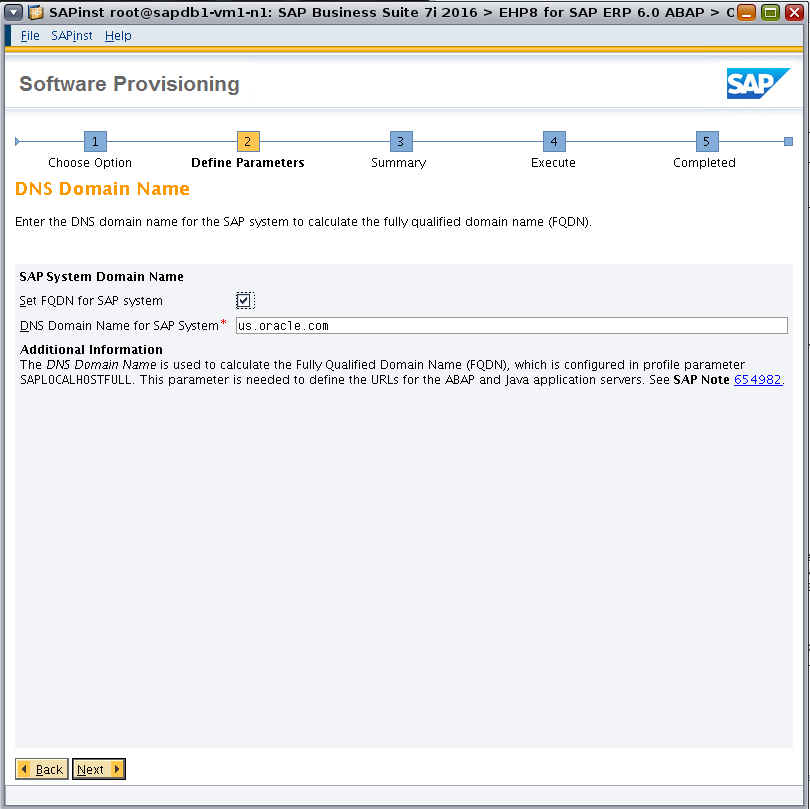
Figure 22. Specifying the DNS domain name.
Set the master password (Figure 23).
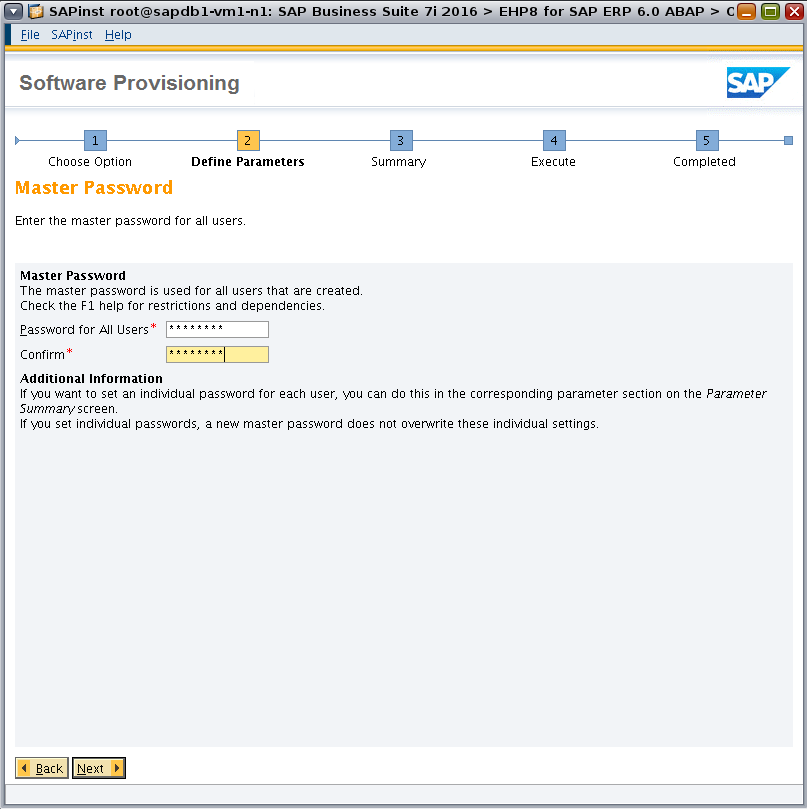
Figure 23. Specifying the master password.
Browse to the location of the software (Figure 24).
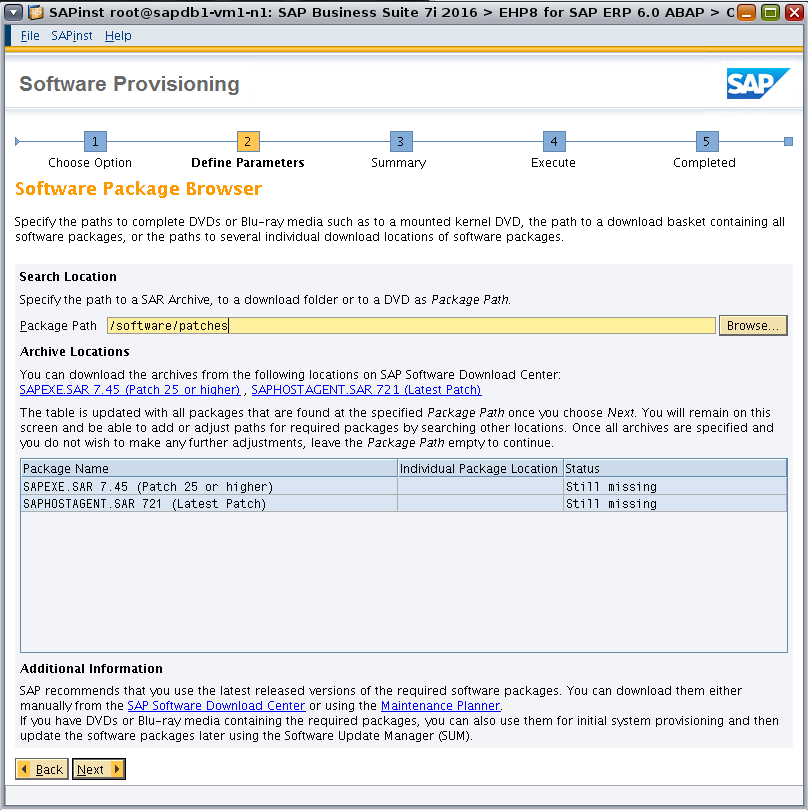
Figure 24. Specifying the software location.
After you specify a path in the Package Path field, click Next to instruct the installer to check the availability of the packages at that location. The status column will be updated with "Available" if the required packages are found, as shown in Figure 25.
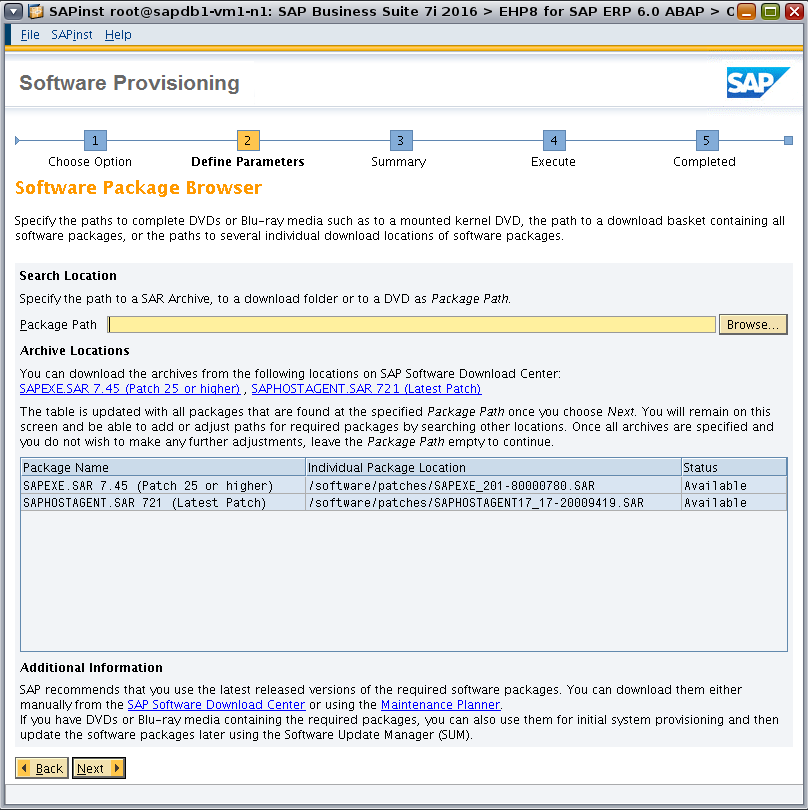
Figure 25. Based on the specified package path, the installer checks package availability.
Once the installer finds all archive packages, continue to the next screen by clicking Next again, leaving the Package Path field empty.
Set ASCS Instance Host Name to the logical host name, in this case vm1-lh1 (Figure 26).

Figure 26. Specifying ASCS instance parameters.
Enter the port numbers to be used by the message servers. We used the default ports (Figure 27).
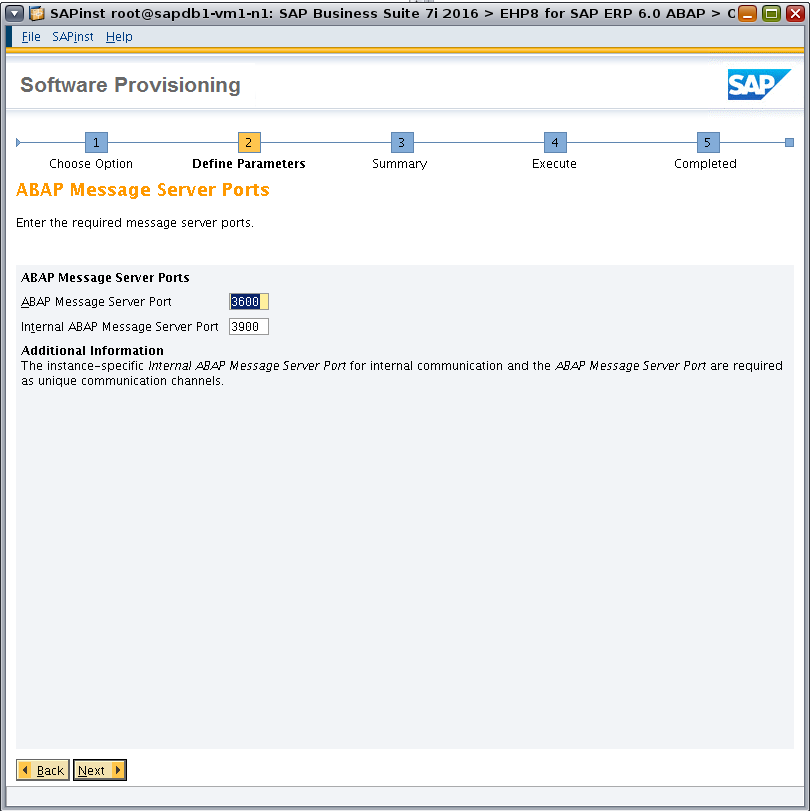
Figure 27. Specifying message server port numbers.
Select the checkbox to install the SAP Web Dispatcher (Figure 28).
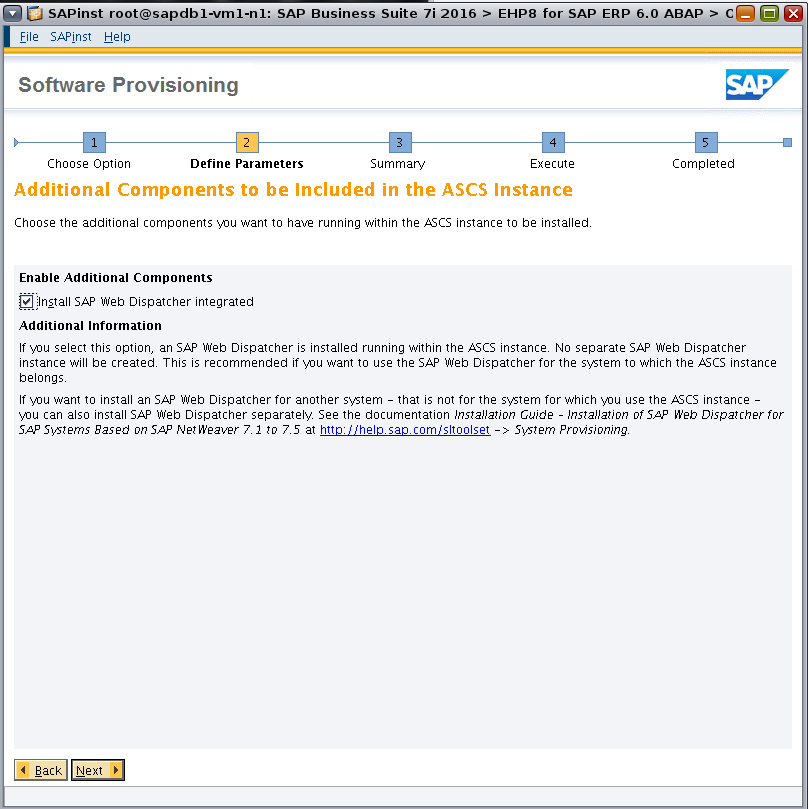
Figure 28. Specifying additional components.
Enter parameters for the SAP Web Dispatcher (Figure 29).
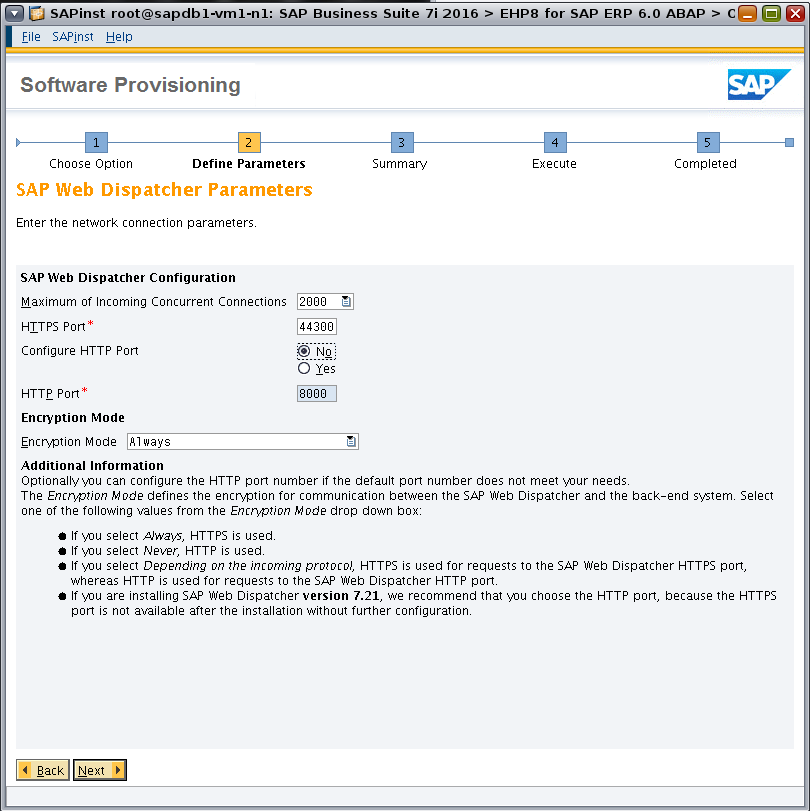
Figure 29. Specifying parameters for the SAP Web Dispatcher.
Specify the password used by the SAP Web Dispatcher (Figure 30).
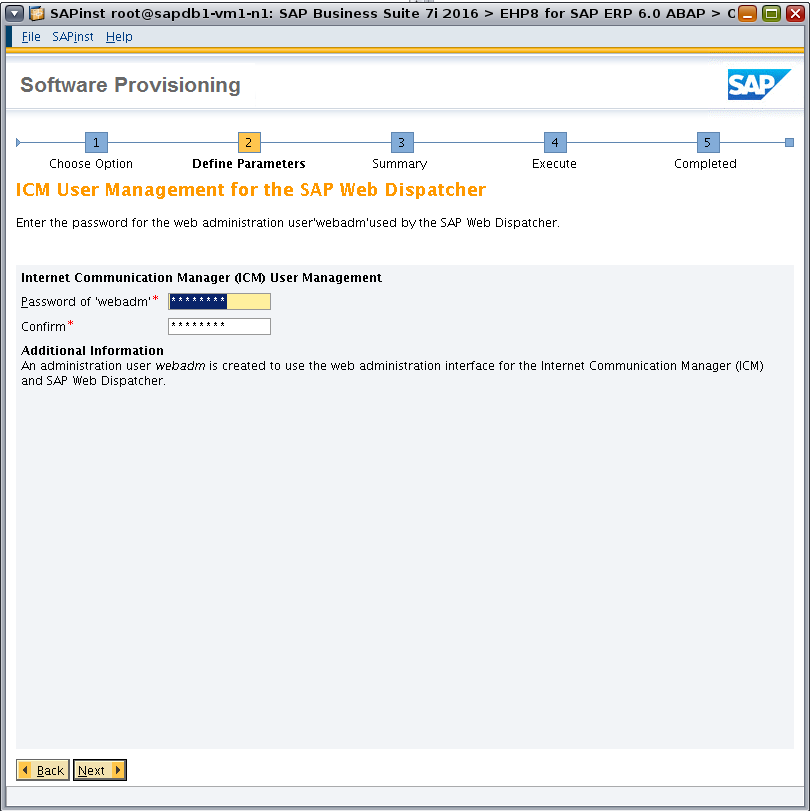
Figure 30. Specifying the password used by the SAP Web Dispatcher.
Review the parameter summary (Figure 31). (If changes are needed, select Revise.) Check all defined parameters and then click Next to start the installation.
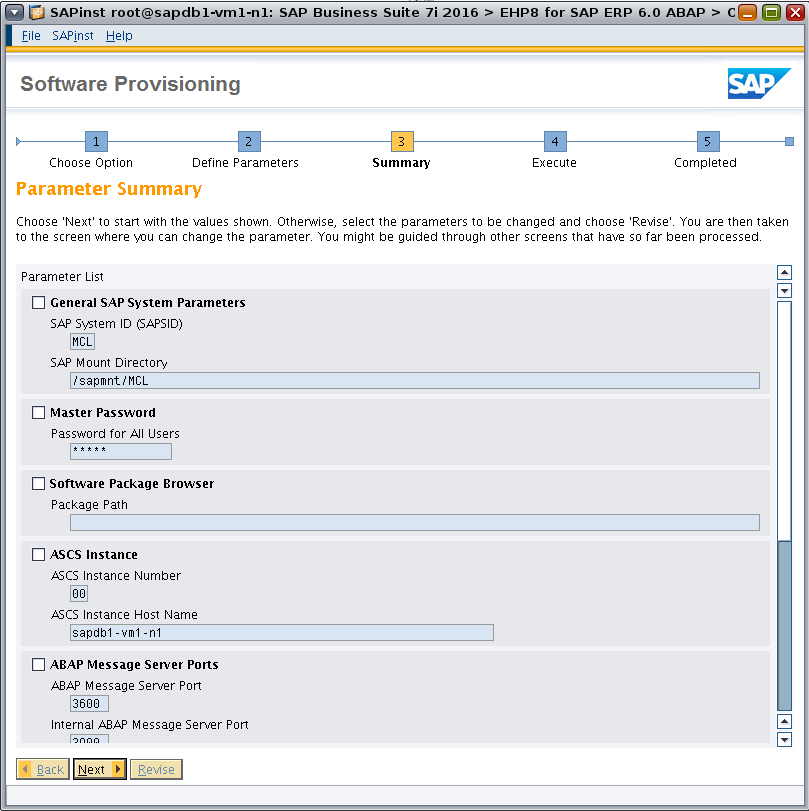
Figure 31. Reviewing the parameter summary.
Install the ERS instance
The following procedure installs the ERS instance on the second database VM using its logical host name, vm1-lh2. To begin, create a local installation directory and start sapinst, specifying the logical host name with SAPINST_USE_HOSTNAME.
root@sapdb1-vm1-n2:/sapmnt/MCL# cd /sapinstlog/
root@sapdb1-vm1-n2:/sapinstlog# mkdir ers
root@sapdb1-vm1-n2:/sapinstlog# cd ers/
root@sapdb1-vm1-n2:/sapinstlog/ers# /software/SWPM/sapinst -nogui SAPINST_USE_HOSTNAME=vm1-lh2
Listing 17: Creating a local installation directory and starting sapinst.
As shown in Figure 32, under SAP Business Suite 7i 2016 and EHP8 for SAP ERP 6.0 ABAP, navigate to the following installation option:
Select Oracle -> SAP Systems -> Application Server ABAP -> High-Availability System -> Enqueue Replication Server Instance.
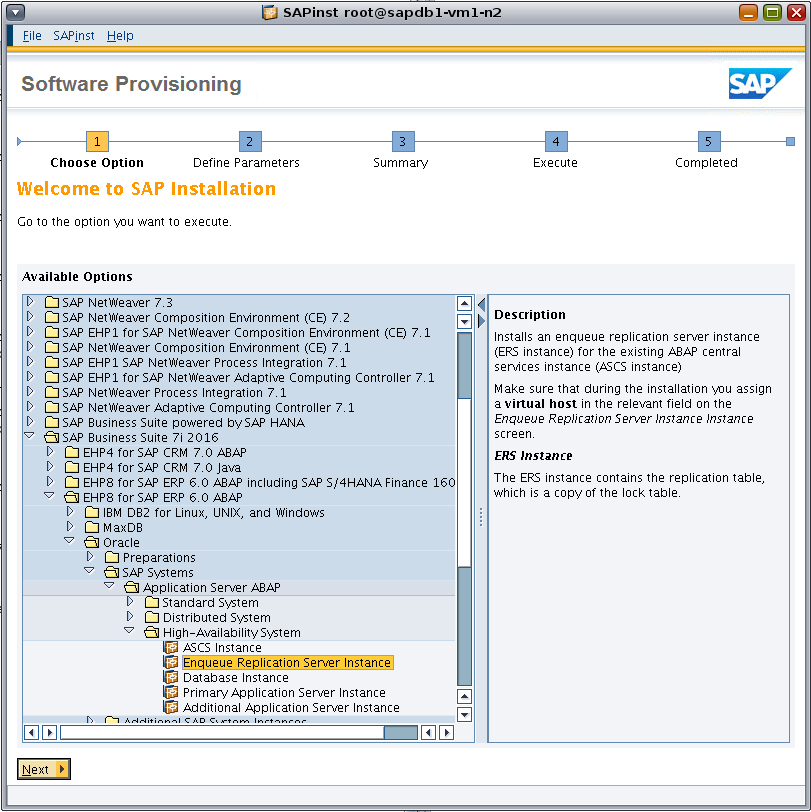
Figure 32. Using the sapinst GUI to install the ERS instance.
A message indicates whether permission changes are necessary for the installation directory (Figure 33). Click OK to confirm the change.
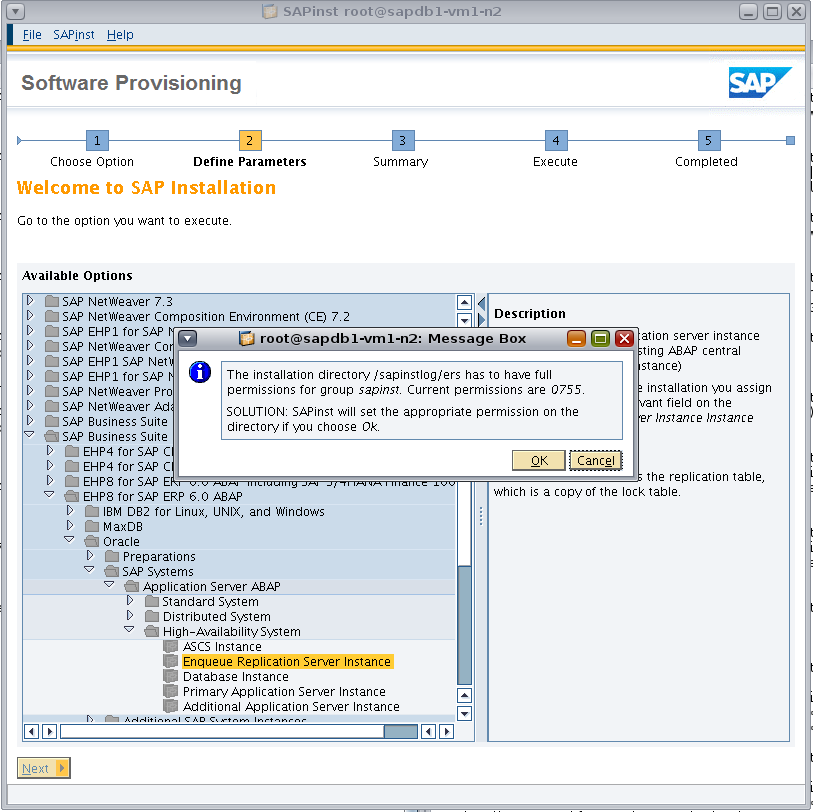
Figure 33. A message indicates if a permission change is necessary.
A message indicates whether an ownership change is necessary for the installation directory (Figure 34). Click OK to confirm the change.
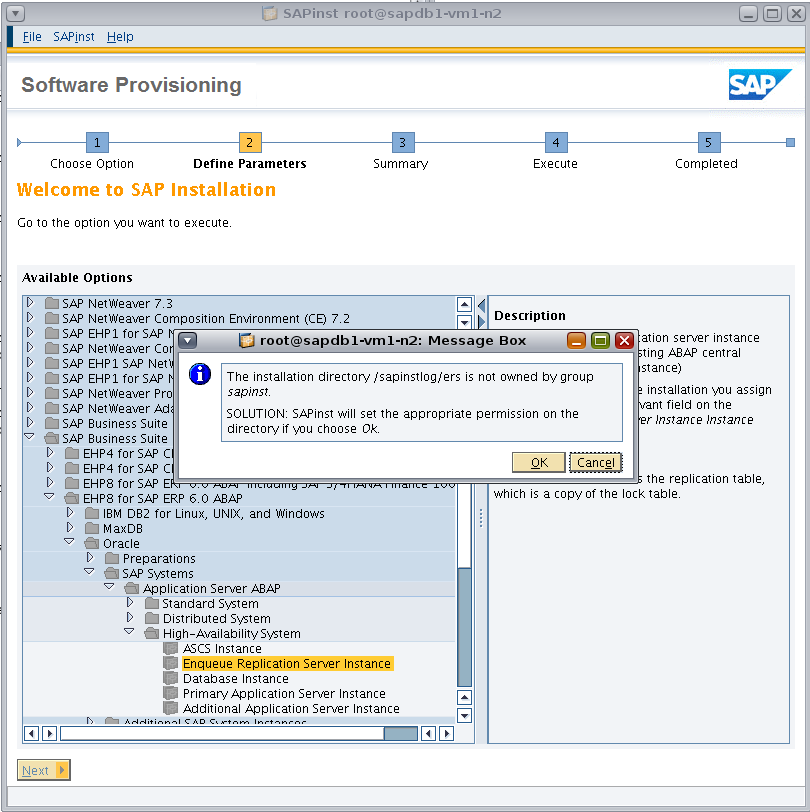
Figure 34. A message indicates whether an ownership change is necessary.
Specify the profile directory for the SAP system (Figure 35).
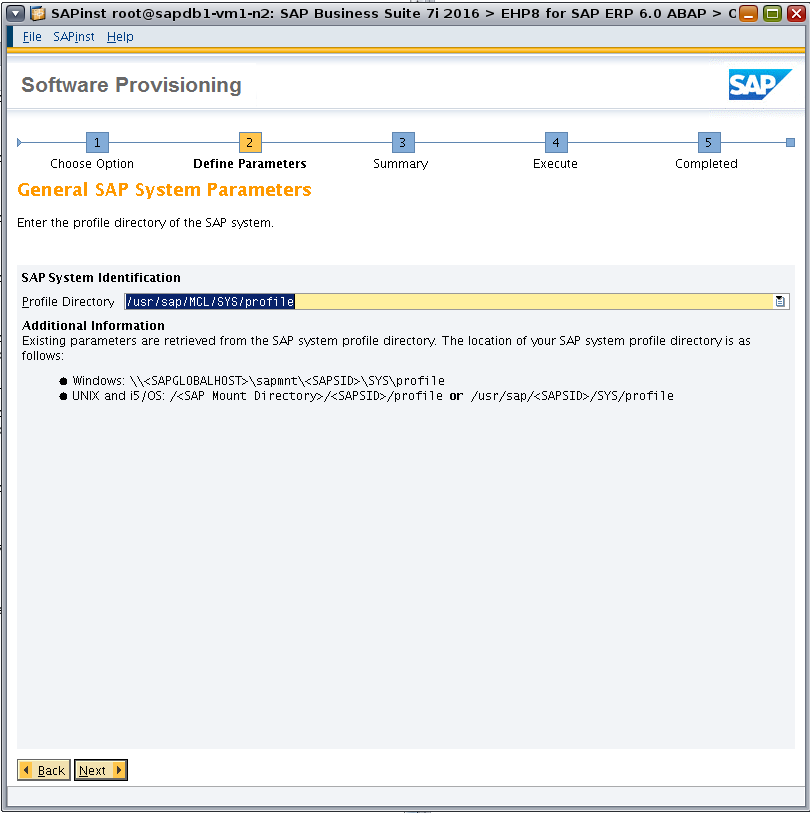
Figure 35. Specifying the SAP profile directory.
Browse to the location of the software archive (Figure 36).

Figure 36. Specifying the software location.
Specify the ASCS instance for which you want to install an ERS instance (Figure 37).
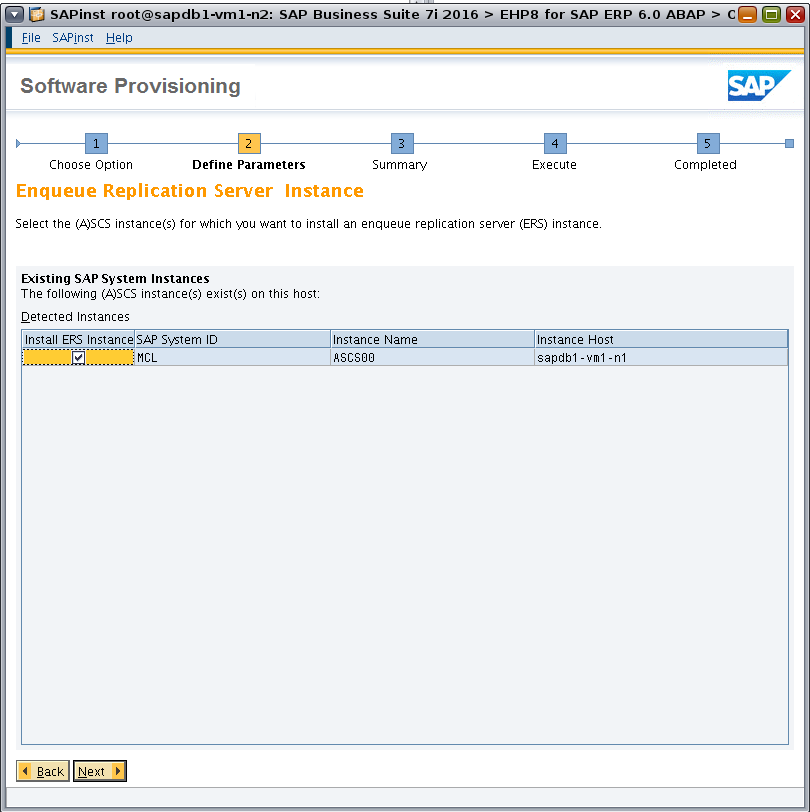
Figure 37. Specifying the ASCS instance for the corresponding ERS instance.
Specify parameters for the ERS instance (Figure 38).
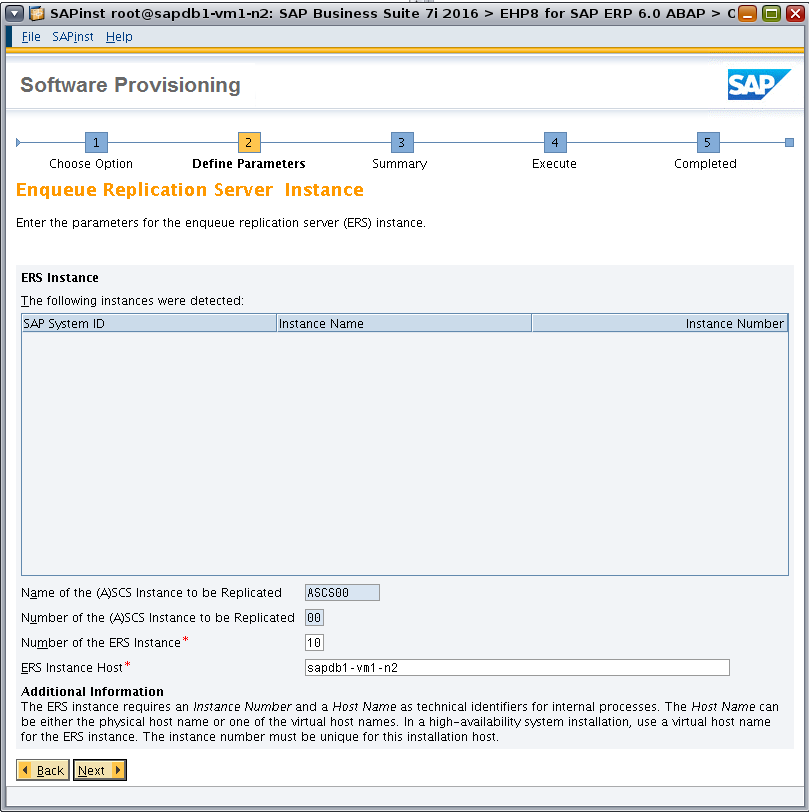
Figure 38. Specifying parameters for the ERS instance.
Restart the ASCS instance to activate the changes (Figure 39).
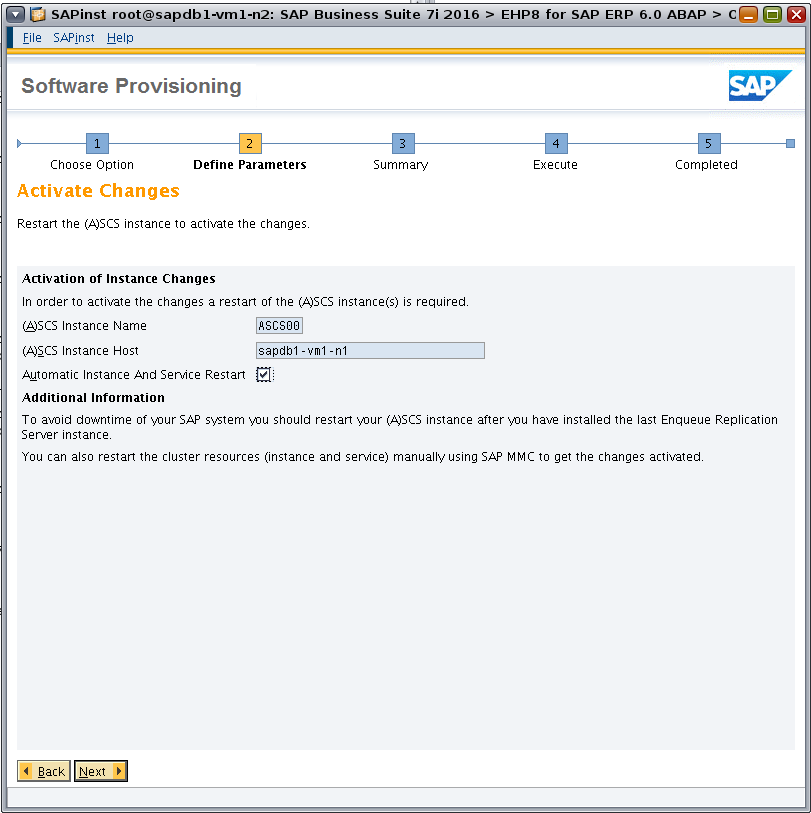
Figure 39. Restarting the ASCS instance to activate changes.
Review the parameter summary, as shown in Figure 40. (If changes are needed, select Revise.) Check all defined parameters and then click Next to start the installation.
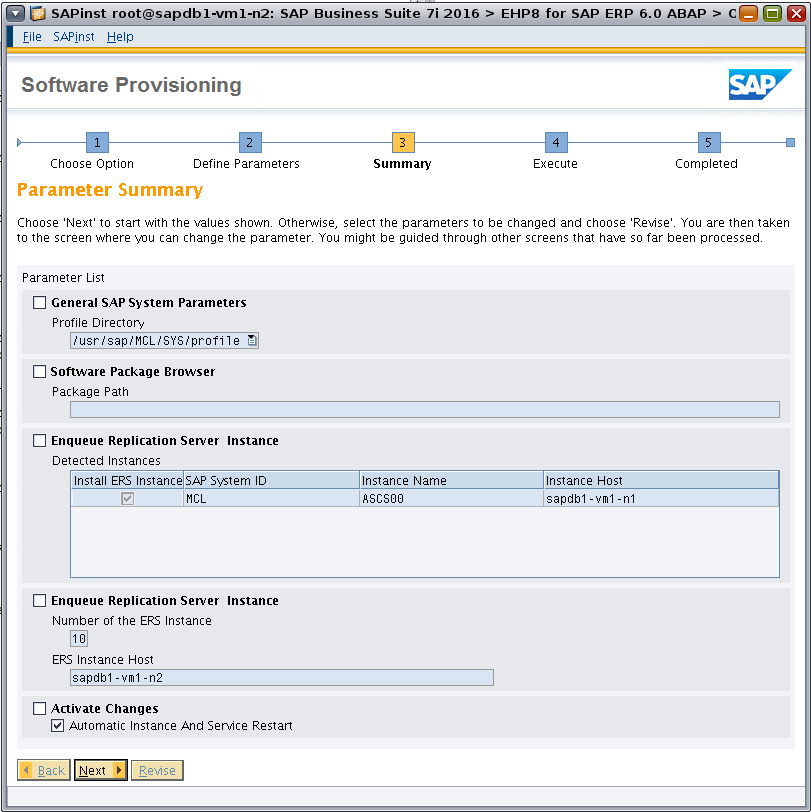
Figure 40. Reviewing the parameter summary.
Continue the installation process using the procedures in the second half of this article, “Installing Highly Available SAP on Oracle MiniCluster, Part 2 (Continued).”