by Hans-Juergen Denecke, Pierre Reynes, and Xirui Yang
This article is a continuation of Part 2 of a multipart series that describes how to set up a highly available configuration to run SAP applications on Oracle MiniCluster. This article supplies step-by-step procedures to install the SAP software components and configure SAPCTL to manage clustered resources.
|
Table of Contents

| |
|

Oracle Optimized Solutions provide tested and proven best practices for how to run software products on Oracle systems. Learn more.
|
|
Introduction
This article is the second half of Part 2 of a multipart series that provides best practices and recommendations for setting up SAP applications on Oracle MiniCluster in a high availability (HA) configuration. (The first half of Part 2 is here.)
To compile and test the step-by-step procedures and recommendations provided in these articles, Oracle engineers and SAP experts constructed a sample deployment using an Oracle MiniCluster S7-2 system. "Part 1: Configuring Oracle MiniCluster for SAP" outlines the steps necessary to set up the Oracle MiniCluster, while Part 2 describes how to install and configure SAP ERP 6.0 EHP8 using Oracle Database 12c and Oracle Real Application Clusters (Oracle RAC) on two nodes in an HA environment.
Install the Oracle Database 12_c_ Instance
Create an installation directory on the first database node and start sapinst (Listing 18).
root@sapdb1-vm1-n1:~# mkdir -p /sapinstlog/db
root@sapdb1-vm1-n1:~# cd /sapinstlog/db
root@sapdb1-vm1-n1:/sapinstlog/db# /software/SWPM/sapinst
Listing 18: Creating a local installation directory and starting sapinst.
As shown in Figure 41, under SAP Business Suite 7i 2016 and EHP8 for SAP ERP 6.0 ABAP, navigate to the following installation option:
Select Oracle -> SAP Systems -> Application Server ABAP -> High-Availability System -> Database Instance.
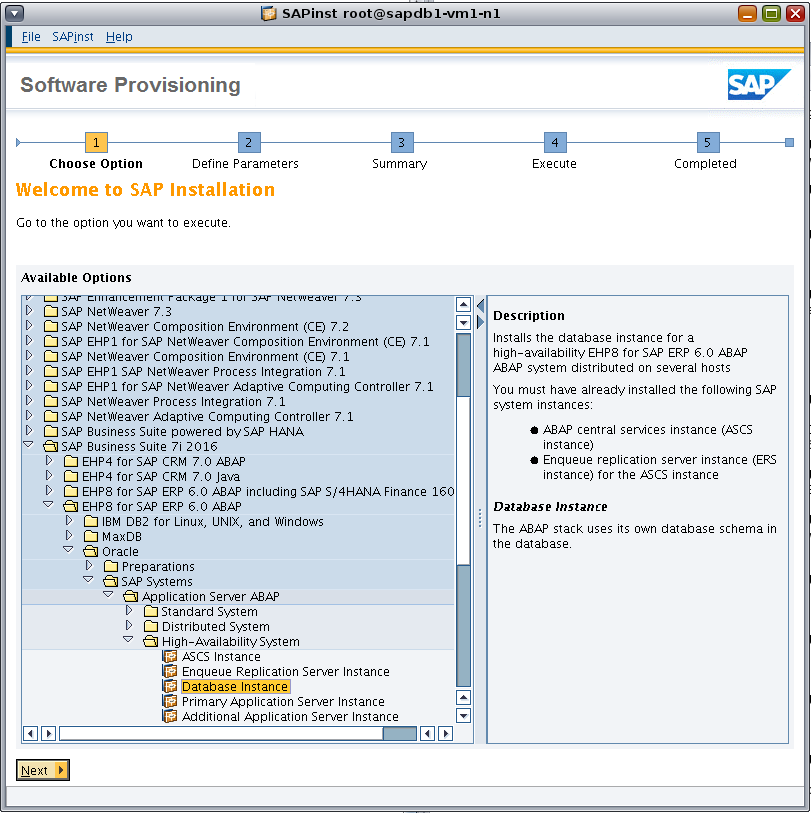
Figure 41. Using the sapinst GUI to install the Oracle Database 12_c_ instance.
A message indicates whether ownership changes are necessary for the installation directory. Click OK to confirm the change.
Another message indicates whether permission changes are necessary for the installation directory. Click OK to confirm the change.
Specify the SAP profile directory (Figure 42).

Figure 42. Specifying the SAP profile directory.
Specify the database parameters (Figure 43). Enter MCL in the Database System ID (DBSID) field and select the option RAC on Oracle ASM. Select RAC on Engineered Systems as the type of Oracle RAC implementation.

Figure 43. Specifying database parameters.
Specify the path to the software archive (Figure 44).

Figure 44. Specifying the software location.
Browse to the location of the software archive for the ECC export files (Figure 45).
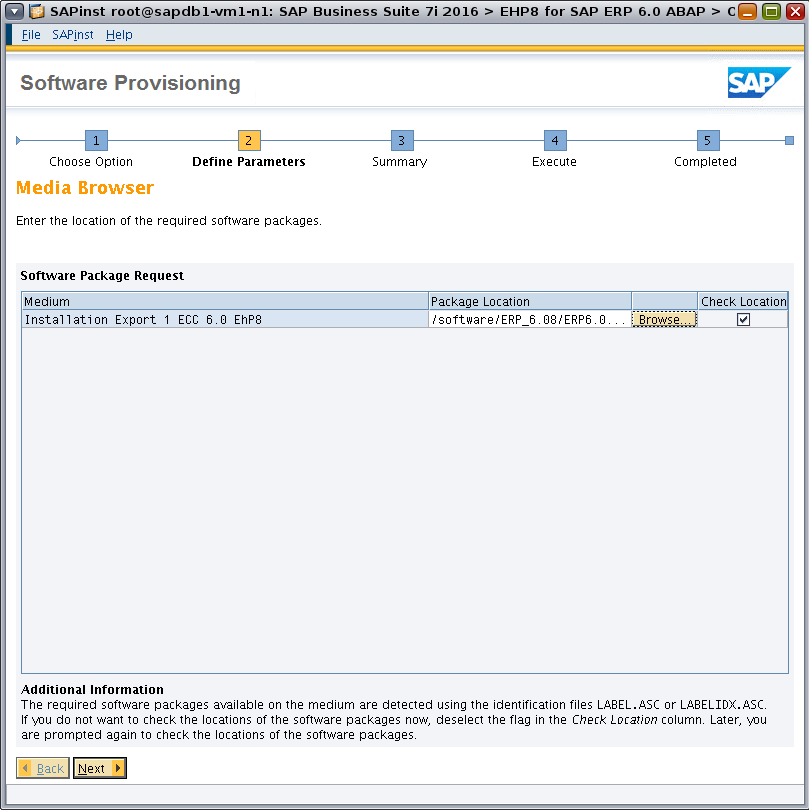
Figure 45. Specifying the software location.
Confirm that Database Server Version and Database Client Version are set to 121 and select Advanced DB Configuration (Figure 46).

Figure 46. Specifying the database version.
Specify the database parameters (Figure 47). Adjust the values in the Database Instance RAM fields to meet your requirements.

Figure 47. Specifying database parameters.
On the Oracle Multitenant Database page, set Install Multitenant DB to No (Figure 48).
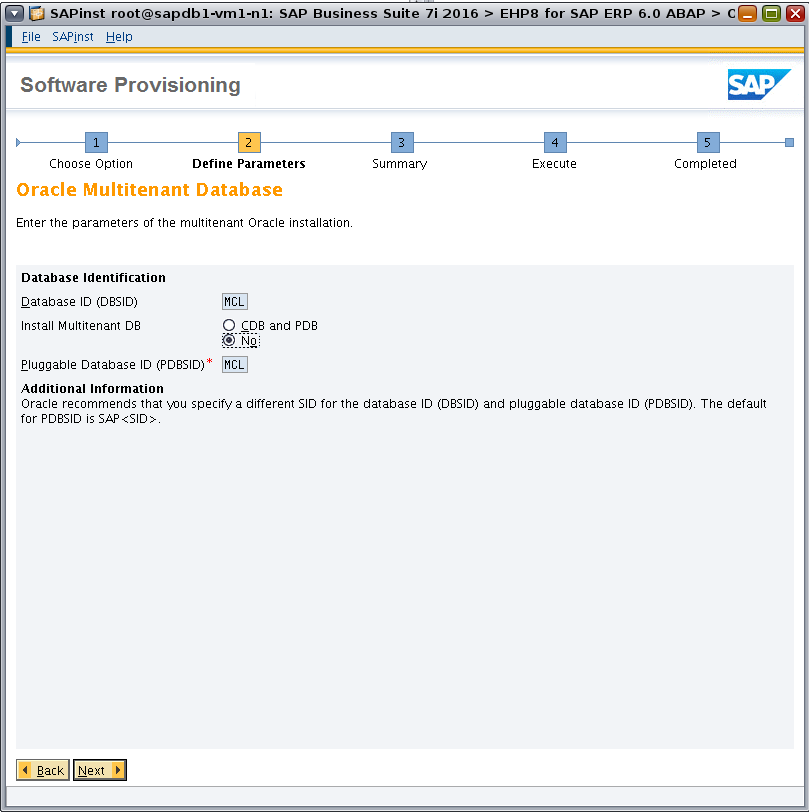
Figure 48. Specifying parameters for Oracle Multitenant.
Accept the defaults for the Oracle Listener Configuration page (Figure 49).
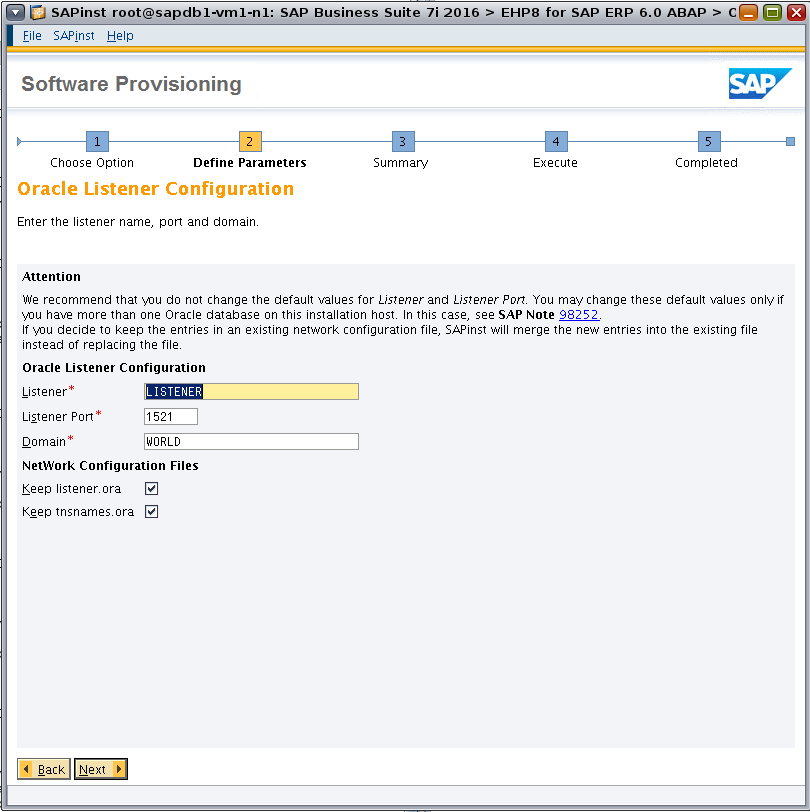
Figure 49. Configuring the Oracle Database listener.
Set the passwords for the Oracle Database sys and system users (Figure 50).

Figure 50. Setting database system passwords.
Set the parameters for the database grid environment (Figure 51).
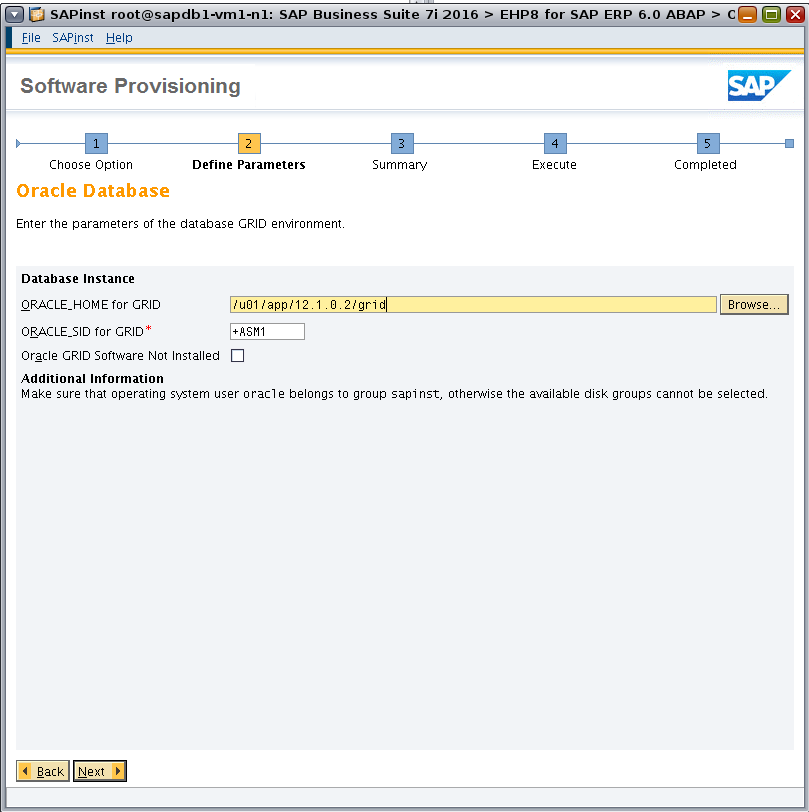
Figure 51. Setting database grid parameters.
Configure parameters on the Oracle ASM Disk Group page (Figure 52).
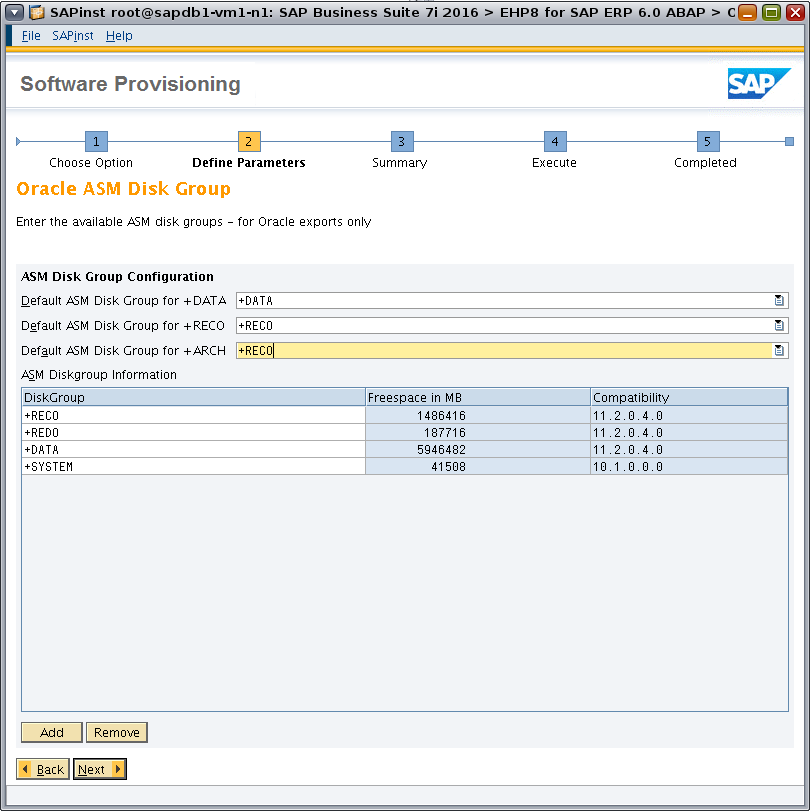
Figure 52. Configuring Oracle ASM disk group parameters.
Specify Oracle RAC parameters, setting Number of Instances to 2 (Figure 53).

Figure 53. Configuring Oracle RAC parameters.
Confirm the parameters for Oracle RAC and set parameters for the file init.ora accordingly (Figure 54).

Figure 54. Specifying Oracle RAC parameters.
In the Advanced Oracle Configuration screen (Figure 55), configure Oracle Database parameters as needed.
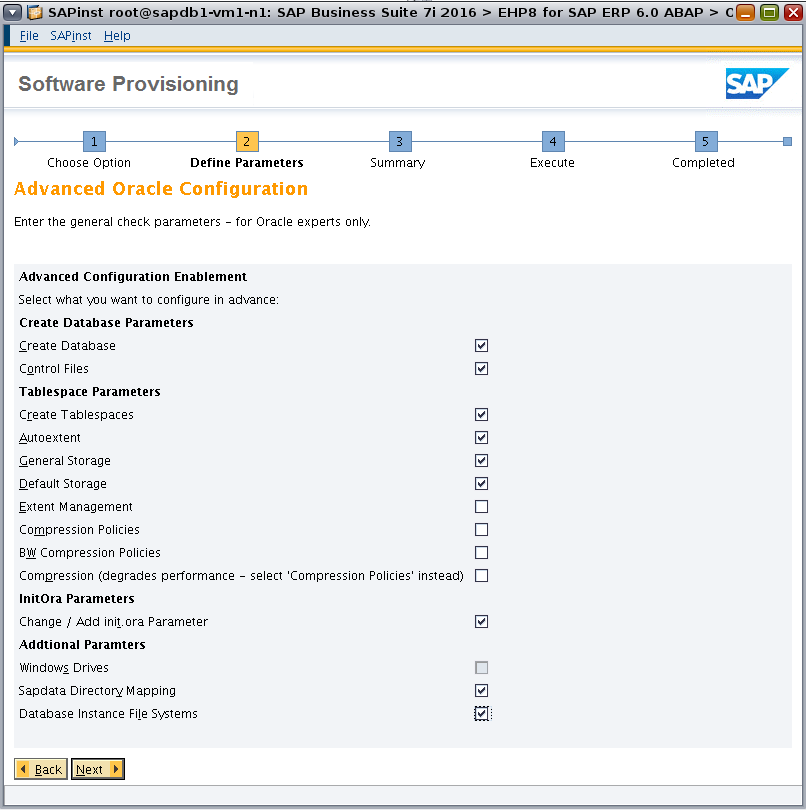
Figure 55. Configuring advanced Oracle Database parameters.
Specify database instance directories (Figure 56).
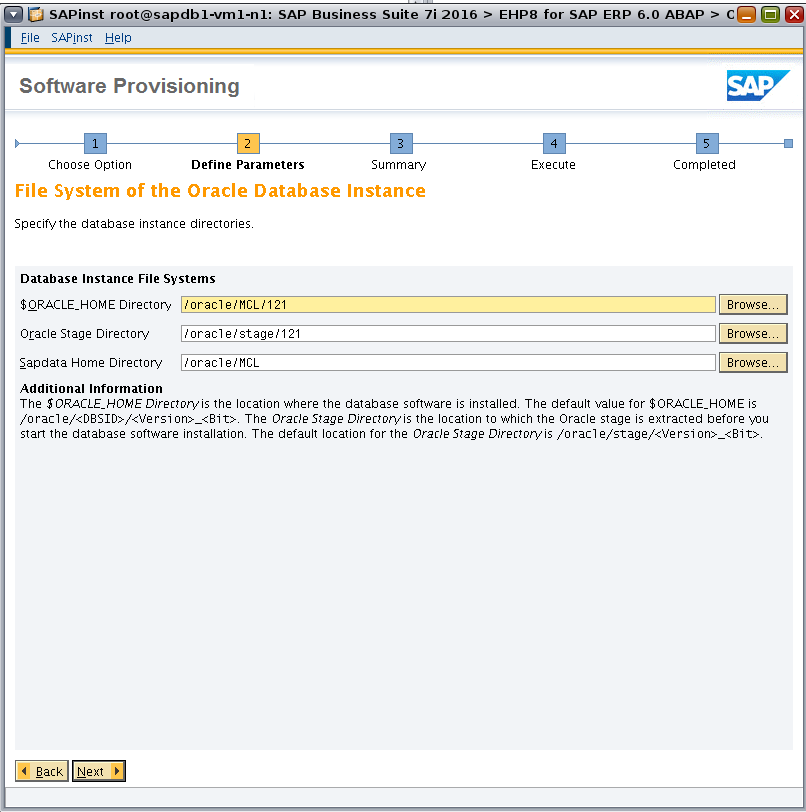
Figure 56. Specifying database instance directories.
Specify the parameters for the sapdata directory distribution (Figure 57).
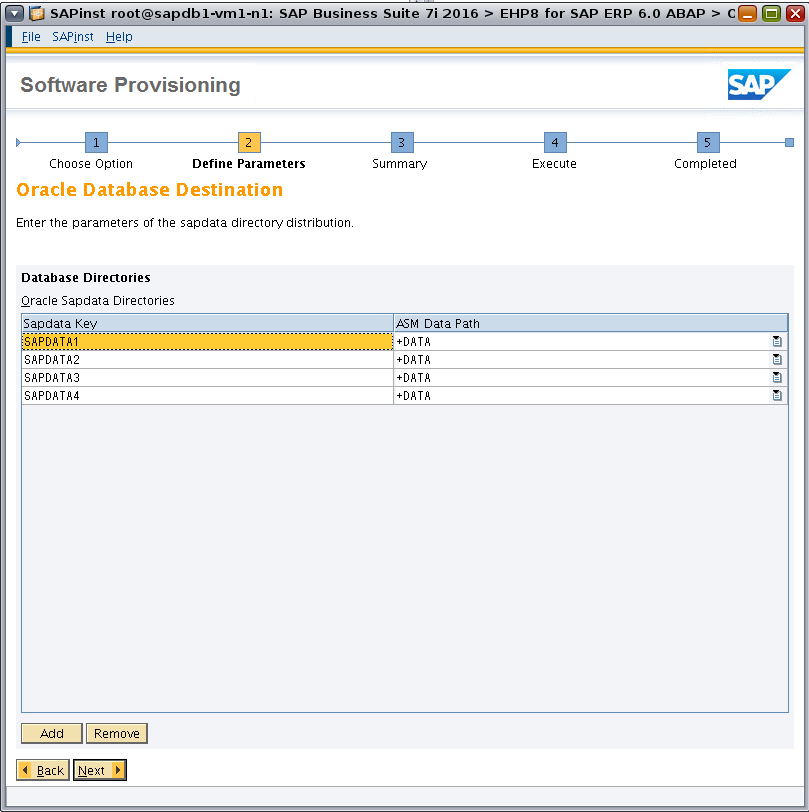
Figure 57. Specifying sapdata directory parameters.
Enter additional database instance parameters (Figure 58).
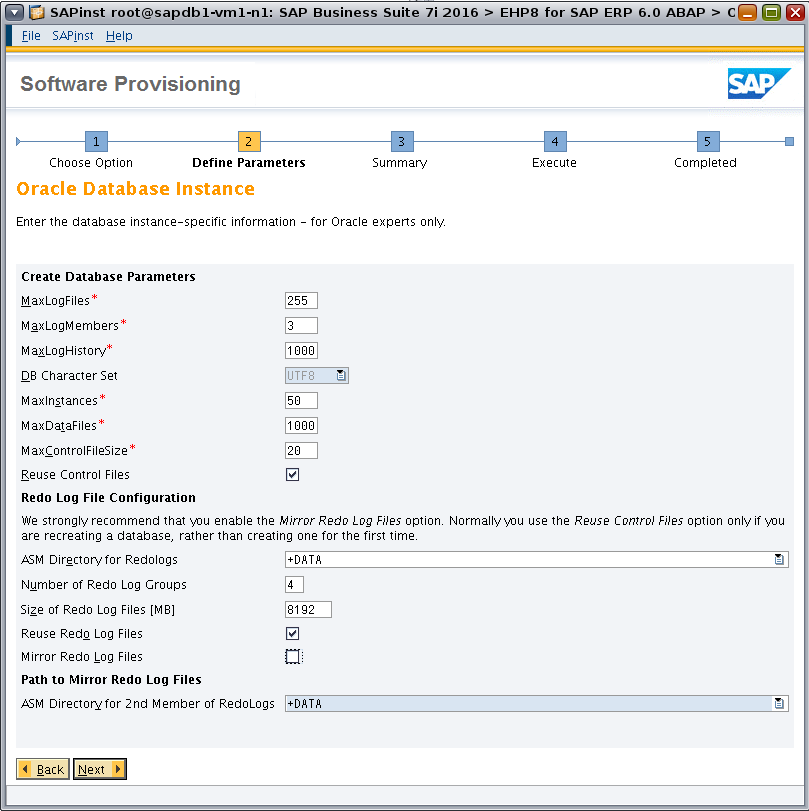
Figure 58. Specifying additional database instance parameters.
Specify the control file location (Figure 59).
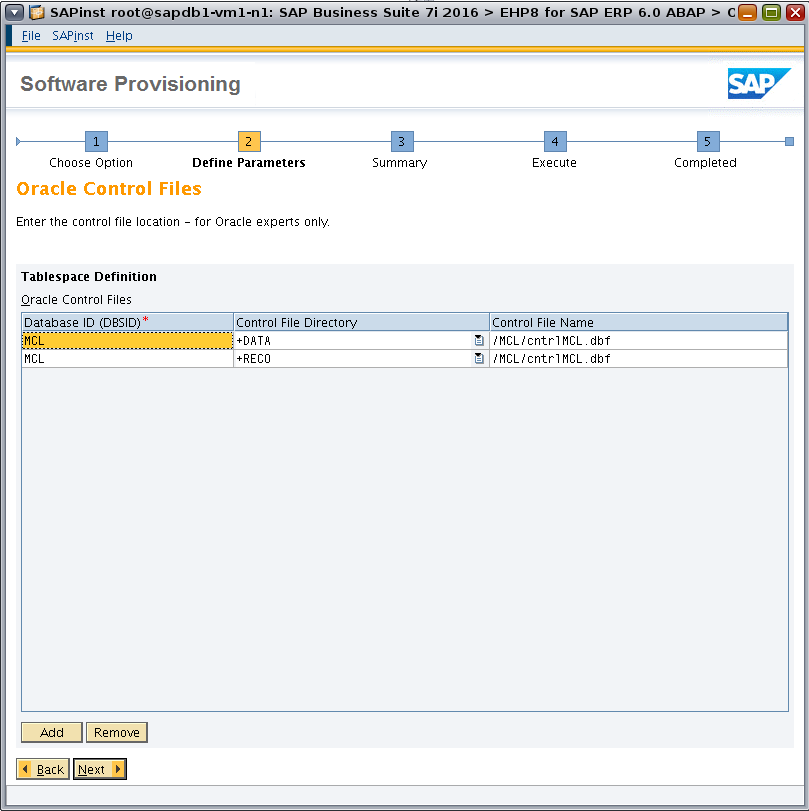
Figure 59. Specifying the control file location.
Specify tablespace parameters (Figure 60).
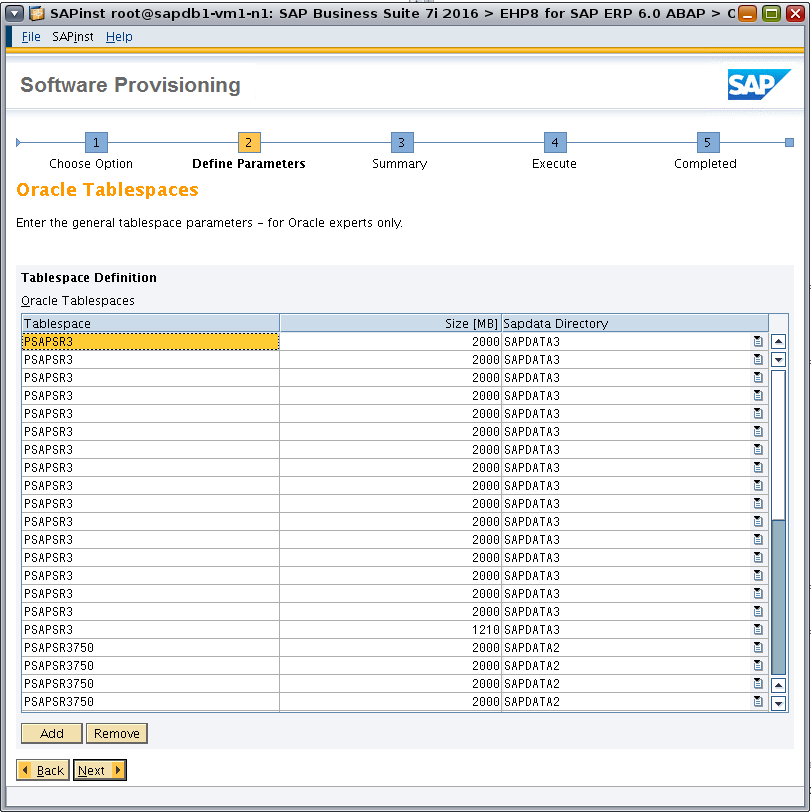
Figure 60. Specifying tablespace parameters.
Specify the autoextent configuration for tablespaces (Figure 61).

Figure 61. Specifying tablespace extensions.
Specify general storage parameters for tablespaces (Figure 62).

Figure 62. Defining general storage parameters for tablespaces.
Specify default storage parameters for tablespaces (Figure 63).

Figure 63. Defining default storage parameters for tablespaces.
Review and, if necessary, configure parameters for init.ora (Figure 64).

Figure 64. Configuring parameters in init.ora.
Configure parameters for declustering and despooling (Figure 65).
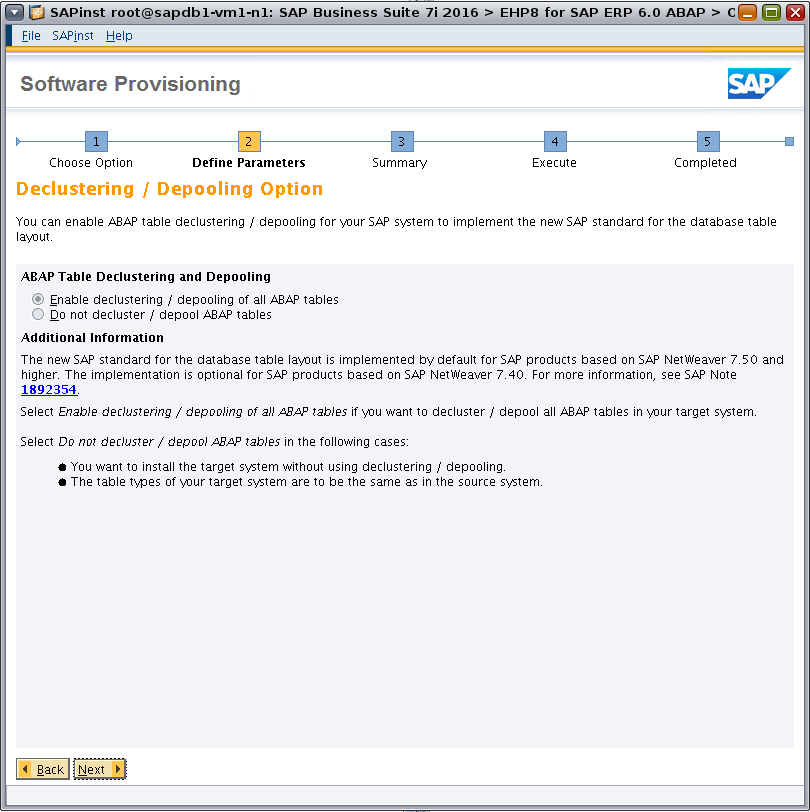
Figure 65. Configuring declustering and despooling parameters.
Configure parameters for SAP system database import (Figure 66).
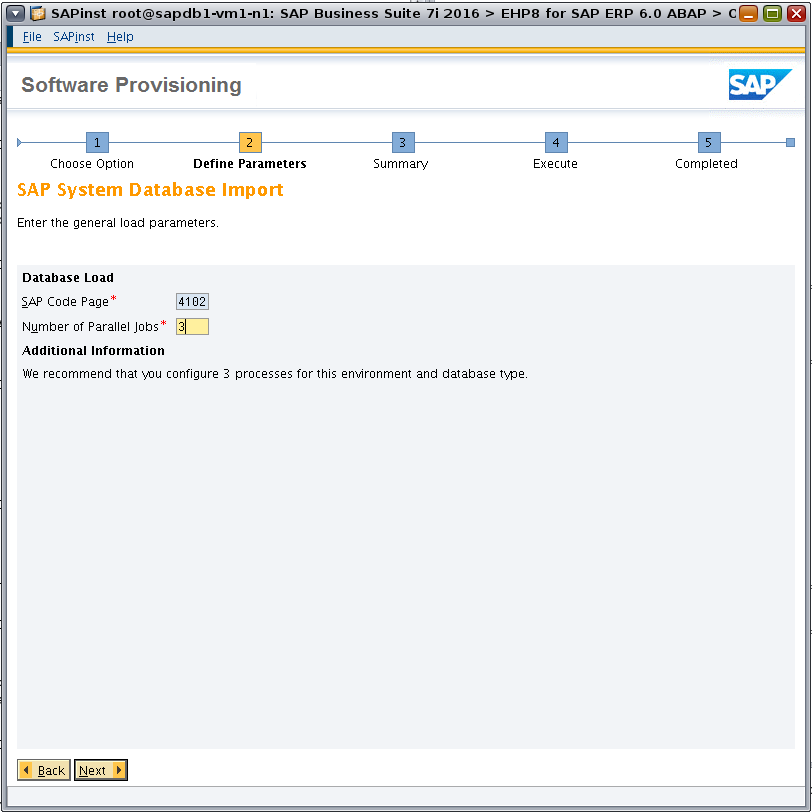
Figure 66. Configuring SAP system database import.
Specify parameters for creating statistics about SAP system database import (Figure 67).
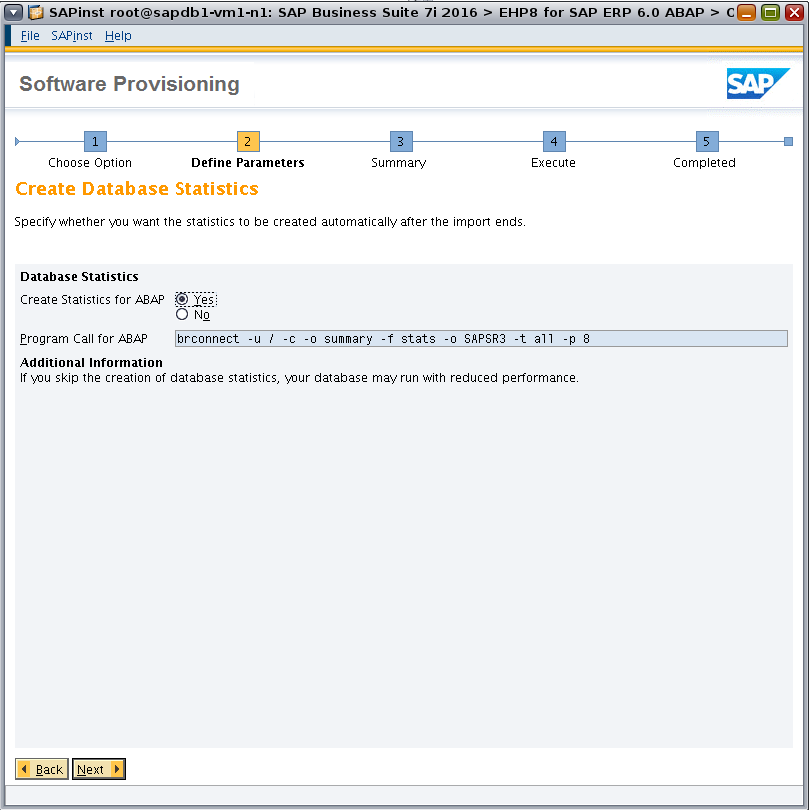
Figure 67. Configuring SAP system database import statistics.
Browse to the location of the Oracle Database Instant Client software (Figure 68).
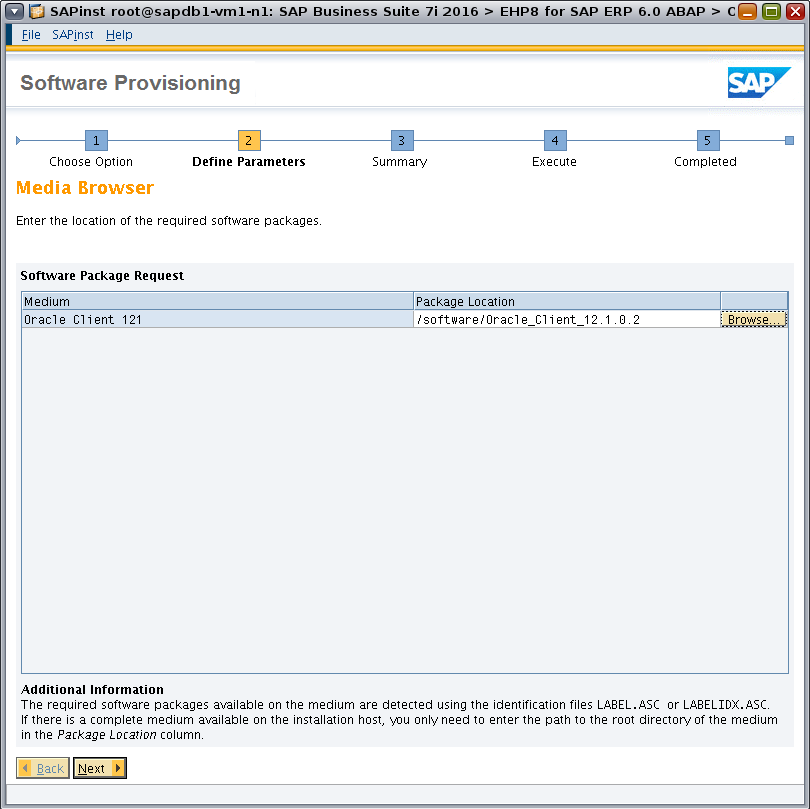
Figure 68. Locating the Oracle Database Instant Client software.
Review the parameter summary, as shown in Figure 69. (If changes are needed, select Revise.) Check all defined parameters and then click Next to start the installation.
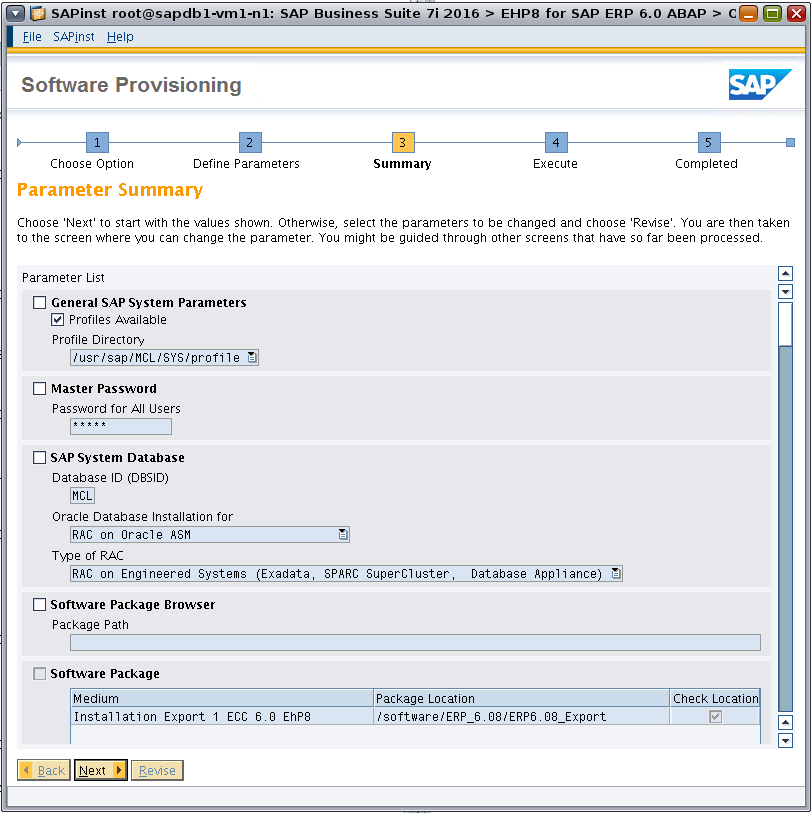
Figure 69. Reviewing the parameter summary.
Post-Installation Steps on Database VMs
During the installation process, SQL*Plus starts the database instance MCL001 only on the first node. To start the database on both nodes (and take advantage of Oracle RAC), it is first necessary to shut down the single instance of the database. On the first database VM, identify the database processes, as shown in Listing 19.
oracle@sapdb1-vm1-n1:~$ ps -efa | grep pmon
oracle 8075 5851 0 12:29:38 ? 0:06 asm_pmon_+ASM1
oracle 8681 5851 0 12:30:00 ? 0:05 mdb_pmon_-MGMTDB
oracle 4668 5851 0 06:14:07 ? 0:01 ora_pmon_MCL001
Listing 19: Identifying the database processes on node 1.
Listing 20 shows the same command executed on node 2.
oracle@sapdb1-vm1-n2:~$ ps -efa | grep pmon
oracle 14187 11553 0 12:01:32 ? 0:07 asm_pmon_+ASM2
Listing 20: Identifying the database processes on node 2.
Use SQL*Plus to shut down the database instance on node 1 (Listing 21).
oracle@sapdb1-vm1-n1:~$ export ORACLE_HOME=/oracle/MCL/121
oracle@sapdb1-vm1-n1:~$ export PATH=/u01/app/oracle/product/12.1.0/dbhome_1/bin:$PATH
oracle@sapdb1-vm1-n1:~$ export ORACLE_SID=MCL001
oracle@sapdb1-vm1-n1:~$ sqlplus / as sysdba
SQL*Plus: Release 12.1.0.2.0 Production on Tue Nov 22 08:42:40 2016
Copyright (c) 1982, 2014, Oracle. All rights reserved.
Connected to:
Oracle Database 12c Enterprise Edition Release 12.1.0.2.0 - 64bit Production
With the Partitioning, Real Application Clusters, Automatic Storage Management, OLAP,
Advanced Analytics and Real Application Testing options
SQL> shutdown immediate
Database closed.
Database dismounted.
ORACLE instance shut down.
Listing 21: Shutting down the database processes on node 1.
Use srvctl to start the Oracle RAC database instances on both nodes.
oracle@sapdb1-vm1-n1:~$ export ORACLE_HOME=/oracle/MCL/121
oracle@sapdb1-vm1-n1:~$ export PATH=/u01/app/oracle/product/12.1.0/dbhome_1/bin:$PATH
oracle@sapdb1-vm1-n1:~$ export ORACLE_SID=MCL
oracle@sapdb1-vm1-n1:~$ srvctl start database -d MCL
oracle@sapdb1-vm1-n1:~$ srvctl status database -d MCL
Instance MCL001 is running on node sapdb1-vm1-n1
Instance MCL002 is running on node sapdb1-vm1-n2
Listing 22: Starting database processes on both nodes.
Install the Primary Application Server
Before running the SAP software provisioning tool sapinst to install the Primary Application Server (PAS), prepare the application VM for SAP deployment.
In the application VM, add the required group entries.
root@oos1-app1:~# groupadd -g 700 sapinst
root@oos1-app1:~# groupadd -g 701 sapsys
root@oos1-app1:~# groupadd -g 200 oinstall
root@oos1-app1:~# groupadd -g 201 dba
root@oos1-app1:~# groupadd -g 1032 oper
Listing 23: Creating groups.
Limit the physical memory allocated for the application server in the VM. Set system resources in the global zone according to application needs and then reboot the application VM.
root@oosmc1-n2:~# zonecfg -z appvm1-vm1-oosmc1-n2
zonecfg:appvm1-vm1-oosmc1-n2> remove capped-memory
zonecfg:appvm1-vm1-oosmc1-n2> add capped-memory
zonecfg:appvm1-vm1-oosmc1-n2:capped-memory> set physical=48G
zonecfg:appvm1-vm1-oosmc1-n2:capped-memory> end
zonecfg:appvm1-vm1-oosmc1-n2> verify
zonecfg:appvm1-vm1-oosmc1-n2> commit
zonecfg:appvm1-vm1-oosmc1-n2> exit
root@oosmc1-n2:~# zoneadm -z appvm1-vm1-oosmc1-n2 reboot
Listing 24: Configuring the memory allocation for the application VM.
Set additional resource parameters according to SAP Note 724713: "Parameter Settings for Oracle Solaris 10 and above" (access to SAP Notes requires logon and authentication to the SAP Marketplace).
Specify project attributes for the application VM, setting resources for the user root for the installation process (Listing 25). After installing SAP, you can remove the resource settings for the user root and default settings will then apply.
root@oos1-app2:~# projmod -s \
> -K "process.max-file-descriptor=(basic,65536,deny)" \
> -K "process.max-sem-nsems=(priv,2048,deny)" \
> -K "project.max-sem-ids=(priv,1024,deny)" \
> -K "project.max-shm-ids=(priv,1024,deny)" \
> -K "project.max-shm-memory=(priv,18446744073709551615,deny)" \
> user.root
Listing 25: Defining project attributes for the application VM.
Add an MCL project and specify project attributes (Listing 26).
root@oos1-app2:~# projadd -p 200 -c "SAP System MCL" -U mcladm,oramcl,oracle,daaadm,sapadm \
> -K "process.max-file-descriptor=(basic,65536,deny)" \
> -K "process.max-sem-nsems=(priv,2048,deny)" \
> -K "project.max-sem-ids=(priv,1024,deny)" \
> -K "project.max-shm-ids=(priv,1024,deny)" \
> -K "project.max-shm-memory=(priv,18446744073709551615,deny)" MCL
Listing 26: Adding the MCL project and specifying attributes.
Append the following lines to /etc/user_attr to specify MCL as the default project for these users at login.
mcladm::::project=MCL
oramcl::::project=MCL
sapadm::::project=MCL
daaadm::::project=MCL
oracle::::project=MCL
Listing 27: Defining MCL as the default project for users.
Create directories needed for the installation in the application VMs.
root@oos1-app2:~# mkdir -p /sapmnt/MCL
root@oos1-app2:~# mkdir -p /usr/sap/trans
root@oos1-app2:~# mkdir /software
root@oos1-app2:~# mkdir /oracle
Listing 28: Creating installation directories.
Unmount /sharedstore and add mount entries in /etc/vfstab. Delete the entry for mounting /sharedstore in /etc/vfstab.
10.133.82.104:/sharedstore/sharedstore/MCL/sapmnt - /sapmnt/MCL nfs - yes rw,bg,hard,rsize=1048576,wsize=1048576,proto=tcp
10.133.82.104:/sharedstore/sharedstore/MCL/trans - /usr/sap/trans nfs - yes rw,bg,hard,rsize=1048576,wsize=1048576,proto=tcp
10.133.82.104:/sharedstore/sharedstore/software - /software nfs - yes rw,bg,hard,rsize=1048576,wsize=1048576,proto=tcp
Listing 29: Adding mount entries in /etc/vfstab.
Mount file systems and set permissions.
root@oos1-app2:~# mountall
root@oos1-app2:~# chown oracle:oinstall /oracle
root@oos1-app2:~# chmod 755 /oracle
root@oos1-app2:~# df -F nfs -h
Filesystem Size Used Available Capacity Mounted on
10.133.82.104:/commonfs/commonfs/sfw
100G 25G 75G 25% /oracleBits
10.133.82.104:/sharedstore/sharedstore/software
18T 157G 17T 1% /software
10.133.82.104:/sharedstore/sharedstore/MCL/sapmnt
18T 157G 17T 1% /sapmnt/MCL
10.133.82.104:/sharedstore/sharedstore/MCL/trans
18T 157G 17T 1% /usr/sap/trans
Listing 30: Mounting file systems and setting permissions.
Install missing packages to run the SAP installation GUI.
root@oos1-app2:~# pkg install pkg:/x11/library/libxtst
root@oos1-app2:~# pkg install pkg:/system/picl
Listing 31: Installing packages.
Create the PAS installation directory, and start sapinst to install the PAS software.
root@oos1-app2:~# mkdir -p /sapinstlog/pas
root@oos1-app2:~# cd /sapinstlog/pas
root@oos1-app2:/sapinstlog/pas# /software/SWPM/sapinst
Listing 32: Creating a local installation directory and starting sapinst.
The sapinst GUI displays the initial screen (Figure 70). Under SAP Business Suite 7i 2016 and EHP8 for SAP ERP 6.0 ABAP, navigate to the following location:
Select Oracle -> SAP Systems -> Application Server ABAP -> High-Availability System -> Primary Application Server Instance.

Figure 70. Using the sapinst GUI to install the Primary Application Server instance.
A message indicates whether ownership changes are necessary for the installation directory. Click OK to confirm the change.
Another message indicates whether permission changes are necessary for the installation directory. Click OK to confirm the change.
Specify the SAP profile directory (Figure 71).
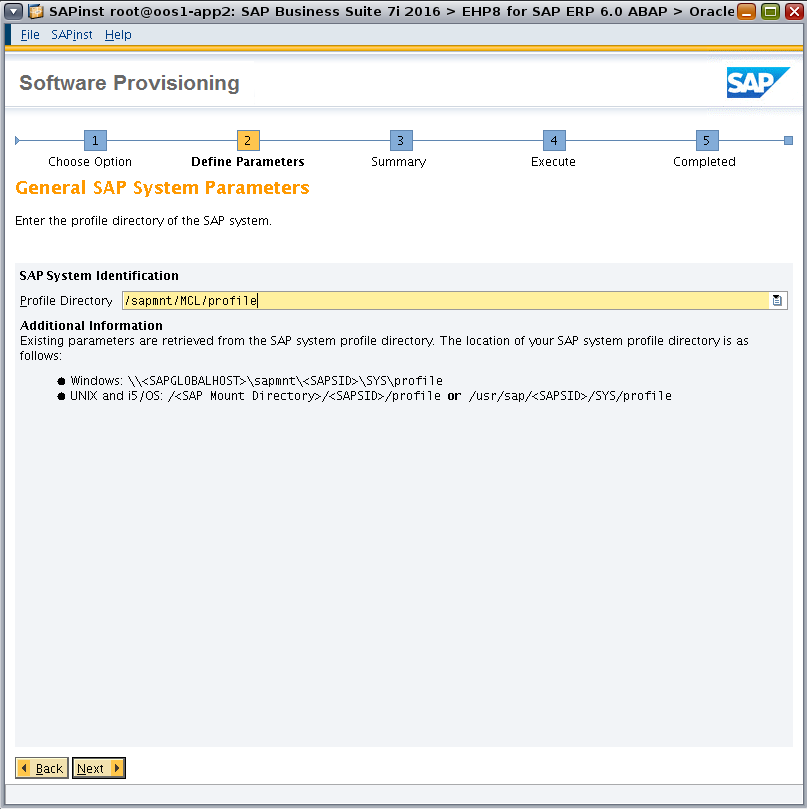
Figure 71. Specifying the SAP profile directory.
Specify the SAP master password (Figure 72).

Figure 72. Specifying the master password.
Specify the database parameters (Figure 73). Enter values for the Database System ID (DBSID) and Database Host fields. Select the option Database on RAC.

Figure 73. Specifying database parameters.
Specify the path to the software location (Figure 74).

Figure 74. Specifying the software location.
On the Oracle Multitenant Database page, set Connect to Pluggable DB to No (Figure 75).

Figure 75. Specifying parameters for Oracle Multitenant.
Enter database system parameters. Confirm that Database Server Version and Database Client Version are set to 121 (Figure 76).

Figure 76. Specifying database system parameters.
Specify Oracle RAC parameters, setting Number of Instances to 2 (Figure 77).
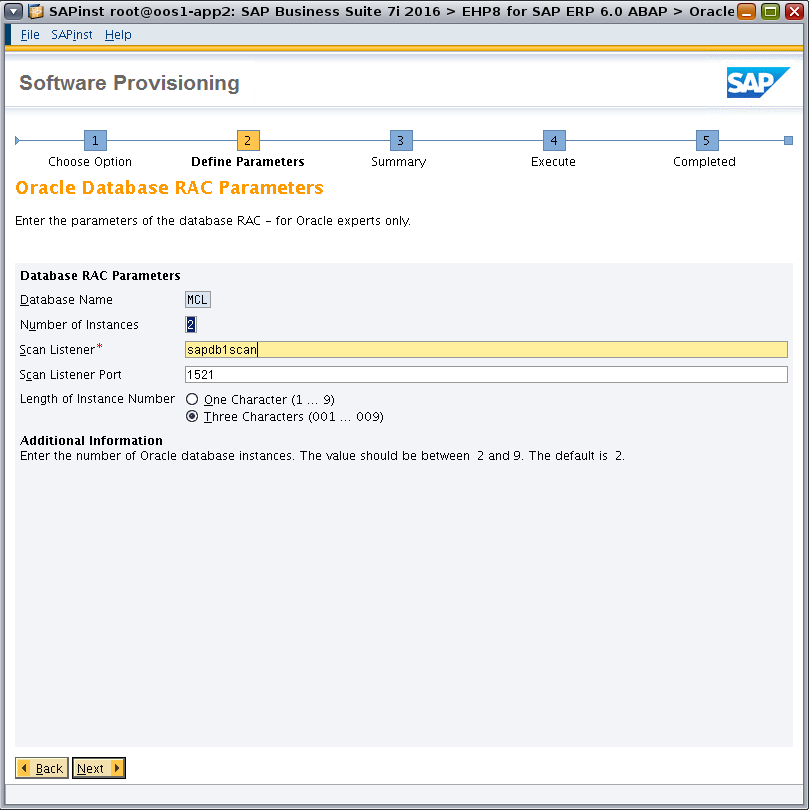
Figure 77. Specifying parameters for Oracle RAC.
Confirm the parameters for Oracle RAC (Figure 78), setting the host names for the instances.
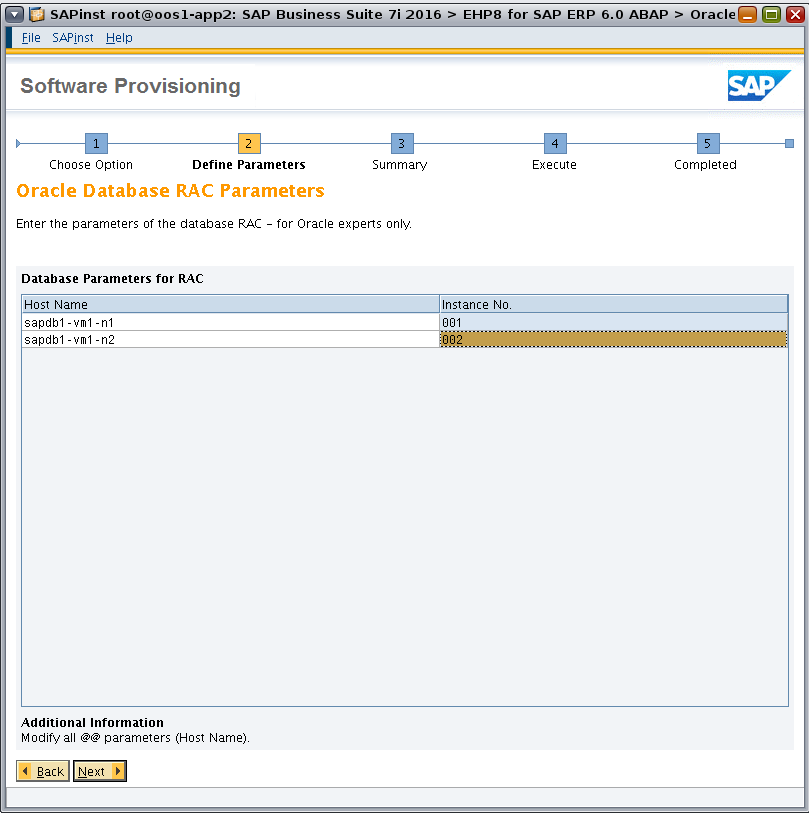
Figure 78. Specifying host names for Oracle RAC nodes.
Specify the PAS instance parameters, including the host name (Figure 79).
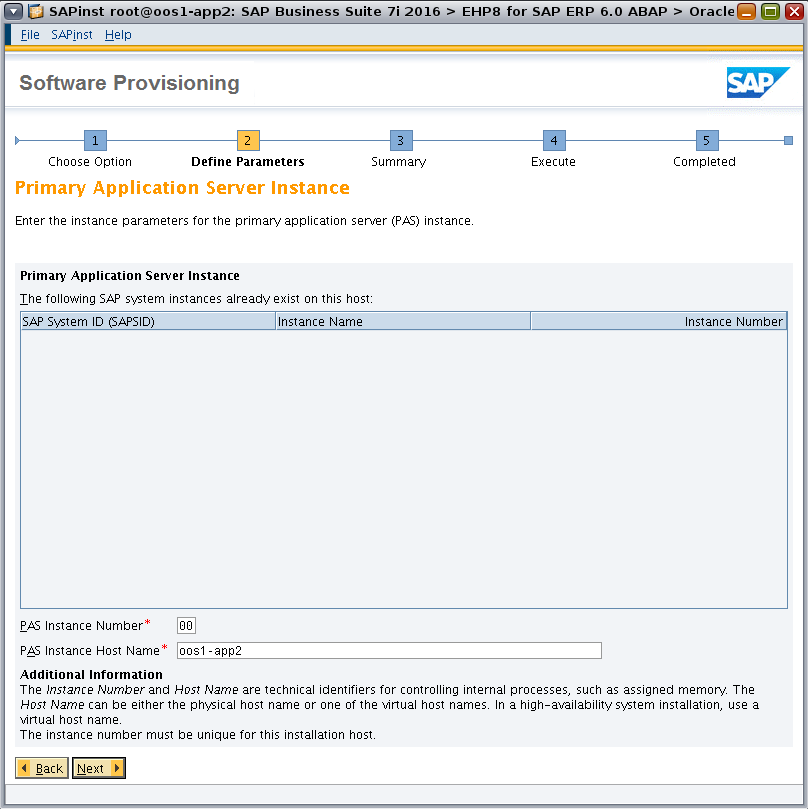
Figure 79. Specifying PAS instance parameters.
Enter port numbers for the message servers (Figure 80).

Figure 80. Specifying message server port numbers.
Enter the password used by the administrative user webadm for the SAP Web Dispatcher (Figure 81).

Figure 81. Specifying the password used by the SAP Web Dispatcher.
For the SAP System Landscape Directory (SLD), select the option No SLD destination (Figure 82).

Figure 82. Specifying no SLD destination.
Select the option Do not create Message Server Access Control List (Figure 83).

Figure 83. Specifying no message server access control list.
Browse to the location of the required software packages (Figure 84).
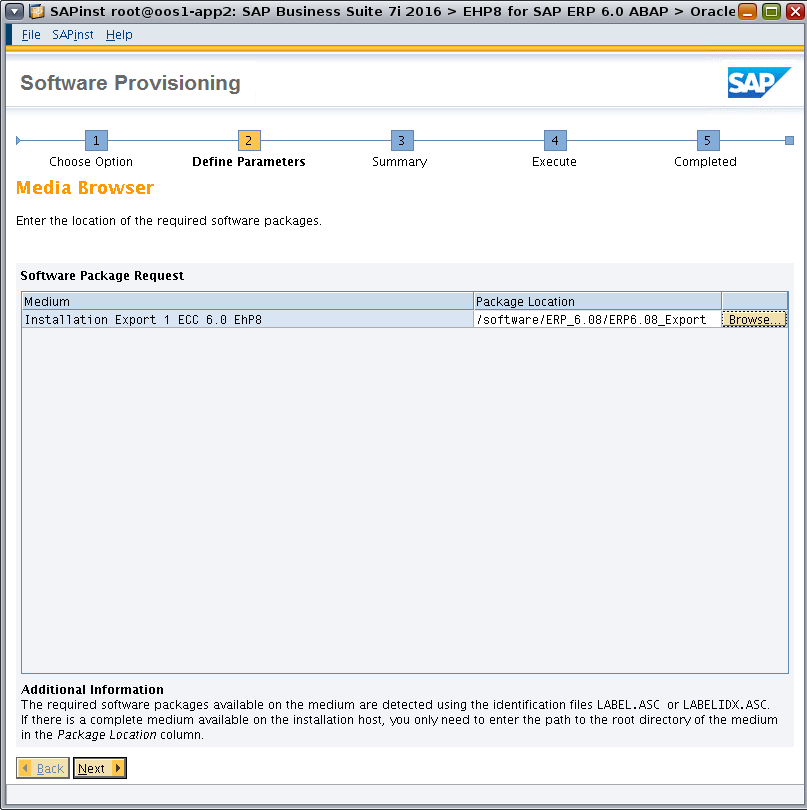
Figure 84. Locating the required software.
If necessary, enter the password for the Data Dictionary (DDIC) user (Figure 85).

Figure 85. Specifying a DDIC password.
Select the option to use the default key for the secure storage of the SAP system (Figure 86). Or, you may enter an individual key according to your needs.

Figure 86. Specifying the secure storage key.
Enter the parameters for the Oracle RAC service and select the Create Shell Script checkbox (Figure 87).

Figure 87. Specifying Oracle RAC service parameters.
Browse to the location of the Oracle Database Install Client software packages (Figure 88).

Figure 88. Locating the Oracle Database Install Client software.
Review the parameter summary, as shown in Figure 89. (If changes are needed, select Revise.) Check all defined parameters and then click Next to start the installation.

Figure 89. Reviewing the parameter summary.
The installer stops in the phase "Update service parameter in RAC environment" to create and start the database service. Execute the script MCL_D00.sh as the user oracle on the first database VM, as shown in Listing 33.
oracle@sapdb1-vm1-n1:/software/ERP_6.08$ cat MCL_D00.sh
#!/bin/sh
#Generated shell script to create oracle RAC services on database host.
#Login as the owner of the oracle database software (typically os user 'oracle') on the
database host.
#Set the $ORACLE_HOME variable to the home location of the database.
#
$ORACLE_HOME/bin/srvctl add service -db MCL -service MCL_D00 -preferred MCL001
-available MCL002 -tafpolicy BASIC -policy AUTOMATIC -notification TRUE -failovertype
SELECT -failovermethod BASIC -failoverretry 3 -failoverdelay 5
$ORACLE_HOME/bin/srvctl start service -db MCL -service MCL_D00
oracle@sapdb1-vm1-n1:/software/ERP_6.08$ export ORACLE_HOME=/oracle/MCL/121
oracle@sapdb1-vm1-n1:/software/ERP_6.08$ ./MCL_D00.sh
Listing 33: Executing the script to add and start the database service.
Once the script has been executed, verify that the database service is running.
oracle@sapdb1-vm1-n1:~$ srvctl status service -d MCL
Service MCL_D00 is running on instance(s) MCL001
Listing 34: Checking service status.
After the installation resumes, the SAP Software Provisioning Manager (sapinst) displays a message to confirm that the installation process has been completed.
Post-Installation Steps
After the SAP software installation is complete, it is necessary to complete the unfinished steps for the SAP bundle patch installation process. Resume this process starting with Step 15 (under section 2.2, "Installing the SAP Bundle Patch") in the readme file that comes with the SAP bundle patch distribution. Step 1 through Step 14 were previously performed in this article under the section "Install the Latest SAP Bundle Patch for Oracle Grid Infrastructure."
As user mcladm, stop the SAP system and stop the application server D00.
oos1-app2:mcladm 1% /usr/sap/MCL/D00/exe/sapcontrol -prot NI_HTTP -nr 00 -function Stop
Listing 35: Stopping the SAP application server.
Stop the ASCS and ERS instances.
sapdb1-vm1-n1:mcladm 1% /usr/sap/MCL/ASCS00/exe/sapcontrol -prot NI_HTTP -nr 00 -function Stop
sapdb1-vm1-n2:mcladm 1% /usr/sap/MCL/ERS10/exe/sapcontrol -prot NI_HTTP -nr 10 -function Stop
Listing 36: Stopping the ASCS and ERS instances.
As user oracle, set the environment variables.
oracle@sapdb1-vm1-n1:~$ export PATH=/oracle/MCL/121/bin:$PATH
oracle@sapdb1-vm1-n1:~$ export OHRDBMS=/oracle/MCL/121
oracle@sapdb1-vm1-n1:~$ export ORACLE_SID=MCL001
Listing 37: Setting environment variables.
As user oracle, execute Step 16 of the readme file, running catsbp to perform the required post-process installation steps for the bundle patch. When script execution ends, confirm that the overall status is complete, as shown in Listing 38.
oracle@sapdb1-vm1-n1:~$ env ORACLE_HOME=$OHRDBMS $OHRDBMS/sapbundle/catsbp
catsbp - Post-process Installation of SBP 12.1.0.2.170117 201702 for Exadata.
Copyright (c) 2015, 2017, Oracle and/or its affiliates. All rights reserved.
...
...
catsbp completed successfully.
Overall Status: COMPLETE
Listing 38: Running catsbp.
Set the database parameters by following the instructions in the readme file (under the section "Recommended parameter settings for '_FIX_CONTROL' and 'EVENT'").
oracle@sapdb1-vm1-n1:~$ sqlplus / as sysdba
SQL*Plus: Release 12.1.0.2.0 Production on Thu May 18 07:59:36 2017
Copyright (c) 1982, 2014, Oracle. All rights reserved.
Connected to:
Oracle Database 12c Enterprise Edition Release 12.1.0.2.0 - 64bit Production
With the Partitioning, Real Application Clusters, Automatic Storage Management, OLAP,
Advanced Analytics and Real Application Testing options
SQL> ALTER SYSTEM SET "_FIX_CONTROL"=
'5099019:ON','5705630:ON','6055658:OFF','6120483:OFF','6399597:ON','6430500:ON',
'6440977:ON','6626018:ON','6972291:ON','7168184:OFF','7658097:ON','8937971:ON',
'9196440:ON','9495669:ON','13077335:ON','13627489:ON','14255600:ON','14595273:ON',
'18405517:2','20355502:8','14846352:OFF','22540411:ON','20107874:OFF','10038517:OFF'
COMMENT='SAP_12102161018_201611 RECOMMENDED SETTINGS'
SCOPE=SPFILE;
System altered.
SQL> ALTER SYSTEM SET EVENT=
'10027',
'10028',
'10142',
'10183',
'10191',
'10995 level 2',
'38068 level 100',
'38085',
'38087',
'44951 level 1024'
COMMENT='SAP_121022_201503 RECOMMENDED SETTINGS'
SCOPE=SPFILE;
System altered.
Listing 39: Setting database parameters.
Stop the database.
oracle@sapdb1-vm1-n1:~$ export ORACLE_HOME=/u01/app/12.1.0.2/grid
oracle@sapdb1-vm1-n1:~$ srvctl stop database -d MCL
Listing 40: Stopping the database.
Remove the project resource settings for user root in the application VM.
root@appvm2-n1:~# projmod -r \
> -K "process.max-file-descriptor=(basic,65536,deny)" \
> -K "process.max-sem-nsems=(priv,2048,deny)" \
> -K "project.max-sem-ids=(priv,1024,deny)" \
> -K "project.max-shm-ids=(priv,1024,deny)" \
> -K "project.max-shm-memory=(priv,18446744073709551615,deny)" \
> user.root
Listing 41: Modifying the project resource settings.
On both database VMs, enter the commands shown in Listing 42 to delete the interfaces for the virtual hosts.
root@sapdb1-vm1-n2:~# ipadm delete-addr sap_net2/v4
root@sapdb1-vm1-n2:~# ipadm delete-ip sap_net2
Listing 42: Deleting interfaces for the virtual hosts.
In the global zone of each Oracle MiniCluster node, delete the sap_net2 virtual network definition from the database VM. Shut down the clustering service and reboot the database VM (Listing 43). Repeat the steps for both database VMs.
root@oosmc1-n2:~# zonecfg -z sapdb1-vm1-oosmc1-n2
zonecfg:sapdb1-vm1-oosmc1-n2> info
zonename: sapdb1-vm1-oosmc1-n2
zonepath: /mcpool/sapdb1-vm1-oosmc1-n2zroot
brand: solaris
autoboot: true
global-time: true
autoshutdown: shutdown
bootargs:
file-mac-profile:
pool:
limitpriv: default,proc_priocntl,proc_clock_highres
scheduling-class:
ip-type: exclusive
hostid:
tenant:
fs-allowed:
[max-shm-memory: 510G]
anet 0:
linkname: aggrpvt0
lower-link: aggrpvt0
...
...
anet 3:
linkname: sap_net2
lower-link: net2
...
...
zonecfg:sapdb1-vm1-oosmc1-n2> remove anet 3
zonecfg:sapdb1-vm1-oosmc1-n2> verify
zonecfg:sapdb1-vm1-oosmc1-n2> commit
zonecfg:sapdb1-vm1-oosmc1-n2> exit
root@oosmc1-n2:~# zoneadm -z sapdb1-vm1-oosmc1-n2 reboot
root@oosmc1-n1:~# zlogin sapdb1-vm1-oosmc1-n1
root@sapdb1-vm1-n1:~# /u01/app/12.1.0.2/grid/bin/crsctl stop cluster -n sapdb1-vm1-n1
root@sapdb1-vm1-n1:~# reboot
Listing 43: Deactivating the virtual network used during the installation of the database nodes.
Edit the file /etc/ssh/sshd_config on every node where it was modified, setting the parameter X11Forwarding=no. This is an important step to maintain system security.
Enable IP filtering in both nodes of the database VM. Repeat this step for both database VMs.
root@sapdb1-vm1-n1:~# svcadm enable svc:/network/ipfilter:default
Listing 44: Enabling IP filtering.
HA Configuration Using SAPCTL
This section describes the installation and configuration of SAPCTL. SAPCTL is bundled with Oracle RAC and enables management of the SAP Enqueue Service for ABAP and Java, the SAP Replication Service for ABAP and Java, and the additional virtual IP addresses used by the SAP Enqueue Service for ABAP and/or Java. Detailed information can be found in "SAP Note 1496927: Protection of SAP instances through Oracle Clusterware" (access to SAP Notes requires logon and authentication to the SAP Marketplace). Download the latest version of SAPCTL from the attachments, unpack it, and open the file sapctl_vx.x.pdf in the subfolder doc.
Change the parameter "Restart_Program_xx" to "Start_Program_xx" in the start and instance profiles. Edit files MCL_ASCS00_vm1-lh1 and MCL_ERS10_vm1-lh2 according to SAP Note 1496927.
SAPCTL Installation
It is necessary to install the SAPCTL software on both database nodes as user root. First, create the required directories (Listing 45).
root@sapdb1-vm1-n1:~# mkdir -p /usr/sap/sapctl/bin
root@sapdb1-vm1-n1:~# mkdir /usr/sap/sapctl/log
root@sapdb1-vm1-n1:~# mkdir /usr/sap/sapctl/perl
Listing 45: Creating directories for SAPCTL installation.
Extract the SAPCTL files in the directory /usr/sap/sapctl.
root@sapdb1-vm1-n1:~# cd /usr/sap/sapctl
root@sapdb1-vm1-n1:/usr/sap/sapctl# cp /software/sapctl/sapctl_v8.2.tgz
root@sapdb1-vm1-n1:/usr/sap/sapctl# tar xvf sapctl_v8.2.tgz
Listing 46: Extracting the SAPCTL files.
Create symbolic links to the Oracle Clusterware executables in the directory /usr/sap/sapctl/bin.
root@sapdb1-vm1-n1:~# ln -s /u01/app/12.1.0.2/grid/bin/crsctl /usr/sap/sapctl/bin/crsctl
root@sapdb1-vm1-n1:~# ln -s /u01/app/12.1.0.2/grid/bin/crsctl.bin \
/usr/sap/sapctl/bin/crsctl.bin
Listing 47: Creating symbolic links to Oracle Clusterware executables.
Recursively copy the files in the perl subdirectory to the directory /usr/sap/sapctl/perl.
root@sapdb1-vm1-n1:~# cp -r /u01/app/12.1.0.2/grid/perl/* /usr/sap/sapctl/perl
Listing 48: Copying files in the perl subdirectory.
Recursively change ownership and permissions for the SAPCTL subdirectories.
root@sapdb1-vm1-n1:~# chown -R mcladm:sapsys /usr/sap/sapctl
root@sapdb1-vm1-n1:~# chmod -R 775 /usr/sap/sapctl
Listing 49: Setting ownership and permissions on the SAPCTL files.
With these permissions, all users in the primary group sapsys have permission to use SAPCTL. Assigning users to the sapsys group allows using this setup for multiple SAP installations with multiple SAP System IDs (SIDs).
Create a link to the SAP cluster connection:
root@sapdb1-vm1-n1:~# ln -s /usr/sap/sapctl/bin/socc /usr/local/bin/sap_cluster_connector
Listing 50: Creating a link to the SAP cluster connection.
Append the lines in Listing 51 to the profile file MCL_ASCS00_vm1-lh1.
#-----------------------------------------------------------------------
# SAP HA-Lib and Cluster Connector
#-----------------------------------------------------------------------
service/halib=/usr/sap/MCL/ASCS00/exe/saphascriptco.so
service/halib_cluster_connector=/usr/sap/sapctl/bin/socc
service/halib_debug_level=3
Listing 51: Adding lines to the ASCS profile file.
Append the lines in Listing 52 to the profile file MCL_ERS10_vm1-lh2.
#-----------------------------------------------------------------------
# SAP HA-Lib and Cluster Connector
#-----------------------------------------------------------------------
service/halib=/usr/sap/MCL/ERS10/exe/saphascriptco.so
service/halib_cluster_connector=/usr/sap/sapctl/bin/socc
service/halib_debug_level=3
Listing 52: Adding lines to the ERS profile file.
Running the SAPCTL executable with the -h (help) argument shows the options for the command.
root@sapdb1-vm1-n1:/usr/sap/sapctl/bin# ./sapctl -h
sapctl version 8.2 Patch 0 Production Copyright 2016 Oracle. All rights reserved
USAGE:
sapctl <command> [<object>] -sapsid <SAP_SID> [options]
command : start|stop|status|create|remove|relocate|config
objects : abapvip|javavip|abapenq|javaenq|abaprep|javarep|abapall|javaall|asinstall|asinstvip|asins
t|gwvip|gwinst|wdspvip|wdspinst|all
NOTE:
create and remove commands work on all objects only
For detailed help on each command and object and its options use:
sapctl <command> -h
Listing 53: Displaying usage information for the SAPCTL executable.
Enter the sapctl command shown in Listing 54 to create resources.
root@sapdb1-vm1-n1:/usr/sap/sapctl# /usr/sap/sapctl/bin/sapctl create -sapsid MCL \
> -if ipmppub0 -nm 255.255.252.0 -net 10.133.80.0 \
> -nodes sapdb1-vm1-n1,sapdb1-vm1-n2 \
> -abapvip 10.133.82.130 \
> -aersvip 10.133.82.131 \
> -abapmsport 3600 \
> -abapenq ASCS00 \
> -abaprep ERS10
sapctl version 8.2 Patch 0 Production Copyright 2016 Oracle. All rights reserved
Creating SAP ABAP VIP
Creating SAP ABAP ERS VIP
Creating SAP ABAP Enqueue resource
Creating SAP ABAP Replication resource
Done
Listing 54: Creating resources using SAPCTL.
Listing 55 shows the SID managed by SAPCTL.
root@sapdb1-vm1-n1:/usr/sap/sapctl/bin# ./sapctl config
sapctl version 8.2 Patch 0 Production Copyright 2016 Oracle. All rights reserved
SAP_SIDs protected by the Oracle Clusterware are :
MCL
Listing 55: Displaying the SID managed by SAPCTL.
Display the status of the resources managed by SAPCTL.
root@sapdb1-vm1-n1:/usr/sap/sapctl/bin# ./sapctl status all -sapsid MCL
sapctl version 8.2 Patch 0 Production Copyright 2016 Oracle. All rights reserved
SAP ABAP Enqueue service is OFFLINE
SAP ABAP Replication service is OFFLINE
Listing 56: Displaying status of the resources managed by SAPCTL.
Start the Enqueue and Replication services using SAPCTL, and recheck service status. For additional information about troubleshooting SAPCTL, see the PDF document in the directory /usr/sap/sapctl/doc.
root@sapdb1-vm1-n1:/usr/sap/sapctl/bin# ./sapctl start all -sapsid MCL
sapctl version 8.2 Patch 0 Production Copyright 2016 Oracle. All rights reserved
Starting SAP ABAP Enqueue service
Starting SAP ABAP Replication service
SAP ABAP Enqueue service is ONLINE on sapdb1-vm1-n1
SAP ABAP Replication service is ONLINE on sapdb1-vm1-n2
Done
root@sapdb1-vm1-n1:/usr/sap/sapctl/bin# ./sapctl status all -sapsid MCL
sapctl version 8.2 Patch 0 Production Copyright 2016 Oracle. All rights reserved
SAP ABAP Enqueue service is ONLINE on sapdb1-vm1-n1
SAP ABAP Replication service is ONLINE on sapdb1-vm1-n2
Listing 57: Checking service status.
Start the SAP application server in the application VM as the user mcladm:
oos1-app2:mcladm 1% /usr/sap/MCL/D00/exe/sapcontrol -prot NI_HTTP -nr 00 -function Start
Listing 58: Checking service status.
Connect to the SAP system with the SAPGUI and check the availability of all instances.
Final Thoughts
Business-critical SAP applications require database and application servers implemented on a resilient infrastructure. Oracle MiniCluster S7-2 features fully redundant, high-performance, shared flash storage and active/active independent compute nodes with redundant network connectivity, enabling a highly available architecture for strategic, performance-sensitive SAP applications. As shown in this article, installing SAP software components using Oracle RAC and configuring clustered resources using SAPCTL allows creating a highly available SAP implementation on Oracle MiniCluster.
See Also
Online Resources
White Papers
Documentation
About the Authors
Xirui Yang is a principal software engineer in Oracle's Cloud Applications Engineering organization in Walldorf, Germany. She is responsible for high availability SAP systems that use Oracle Solaris Cluster, including codeveloping, installing, testing, and SAP certification for these systems. For the Oracle Optimized Solution for SAP project, Yang drove the installation and testing of high availability SAP systems on Oracle Solaris Cluster with Oracle Database (with and without Oracle RAC).
Pierre Reynes is a solution manager for Oracle Optimized Solution for SAP and Oracle Optimized Solution for PeopleSoft. He is responsible for driving the strategy and efforts to help raise customer and market awareness for Oracle Optimized Solutions in these areas. Reynes has over 25 years of experience in the computer and network industries.
Hans-Juergen Denecke is a principal software engineer in Oracle's Cloud Applications Engineering organization in Germany. He is responsible for certifications of the SAP software stack on Oracle hardware and Oracle Solaris and other Oracle software products. Denecke is a graduate engineer in mechanical engineering and has over 20 years of experience in the computer industry.