In this blog, I will provide step-by-step implementation of 2-legged OAuth-2 Flow using IDM Cordova Plugin and Oracle MCS. We will develop a JET hybrid mobile application that will authenticate with Oracle MCS , access the secured API to fetch salary of logged in user and display details of the same in form of PIE chart on the mobile application.
About the cordova-plugin-oracle-idm-auth
This cordova plugin lets you perform authentication and access secured resources from cordova applications. The plugin is designed to handle multiple authentication flows in parallel. Android 5.0 or later with WebView v39.0.0.0 is required for this plugin. This is an open source project maintained by Oracle Corp.
Key Components
Below tables summarizes the key components involved in this solution:
| **Component
** | Details |
| Client Application (JET Hybrid app) | A JET Hybrid application that communicates with Oracle MCS via IDM Cordova Plugin |
| Oracle MCS | MCS (Mobile Cloud Service) delivers cloud-based, server-side mobile services to enable quick and easy app development. |
Application Flow
Below is the application flow:
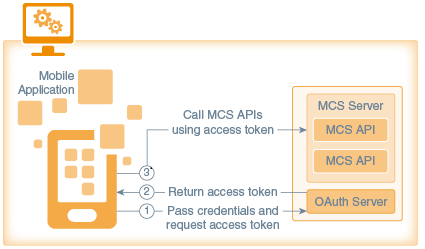
-
The mobile app sends credentials to the OAuth server in an HTTP header.
-
The OAuth server returns an access token.
-
The mobile app uses the access token to access secure MCS APIs.
Component: Oracle Mobile Cloud Service
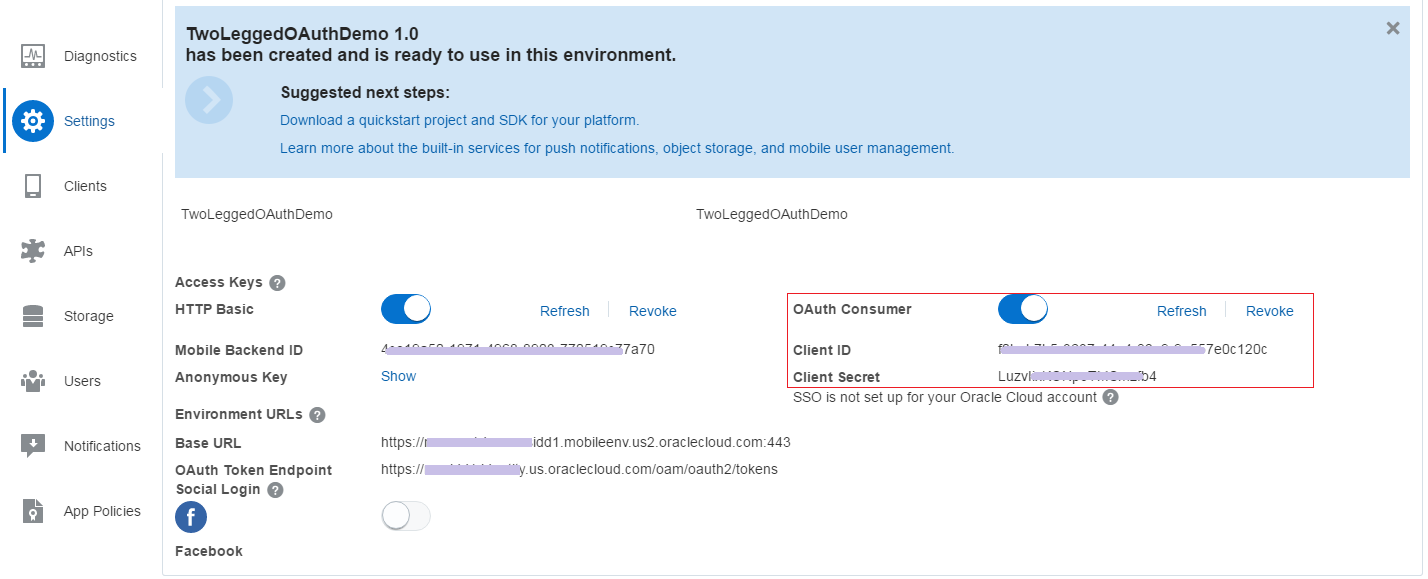
Step 1: Create a mobile back-end
- Login into Oracle MCS and create a new mobile back-end, provide a suitable Name and description
- Enable OAuth Consumer
Step 2: Create a custom API
Here are the steps to create a custom API:
- General: Create a new custom API, provide API display Name and API name. This API name translates to the external URL for the custom API for our mobile apps to connect with it.
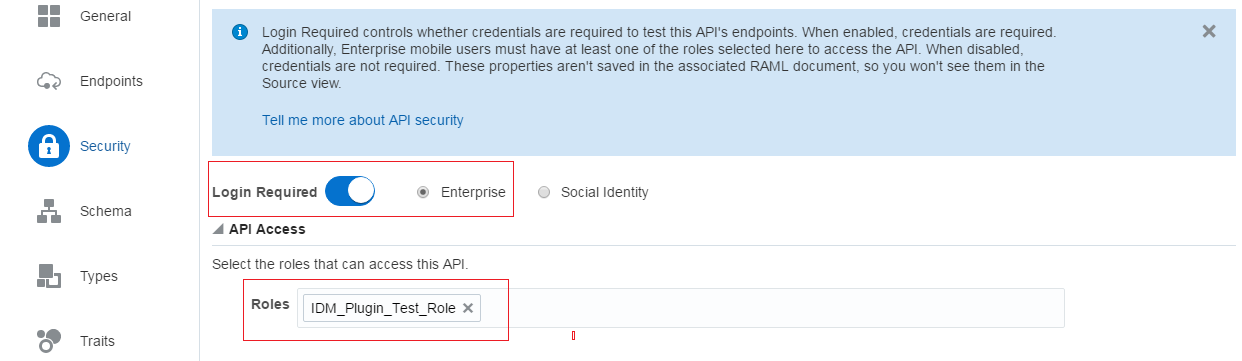
- Endpoints: The next step is to define REST end points and add response details.
- Security: Enable login required. Select Enterprise. Also, select the roles that can access this API.
Step 3: Select API and associate with your Mobile Backend
The next step is to select the custom API created and associate it with your mobile backend.
Step 4: Test the Custom API
The last step is to test the custom API
Component - Client Application - Oracle JET Hybrid application
Once the backend is ready, our next step is to develop client side application. You may refer to Troubleshooting while developing your First JET based Hybrid Application blog in case of issues faced during development/configuration issues.
Project Setup using Yeoman
Yeoman generator for Oracle JET lets you quickly set up a project for use as a Web application or mobile-hybrid application for Android and iOS. Use following command to generate hybrid application for Android:
yo oraclejet:hybrid idmoauth --appId=com.rdh.idmoauth --appName="IDMssample" --template=navBar --platforms=android
Cordova Plugin Required
- cordova-plugin-oracle-idm-auth
Go to project directory's hybrid folder and execute following command to install the plugin
cordova plugin add cordova-plugin-oracle-idm-auth
Additional Step for Android
Add org.slf4j dependency to cordova application's build.gradle file.
Go to <app>/hybrid/platforms/android/build.gradle
Add this line inside the dependency section:
dependencies {
...
compile group: 'org.slf4j', name:'slf4j-api', version: '1.7.13'
...
}
Implementation Steps
I will be implementing the code in dashboard.html and dashboard.js for easy implementation. Please find the dashboard.html file.
Dashboard.js
Update define block in dashboard.js
define(['ojs/ojcore', 'knockout', 'jquery', 'appController', 'ojs/ojchart', 'ojs/ojinputtext', 'ojs/ojbutton'],
Step 1: Create Authentication Flow Object
This step is starting point for initiating login flows. This method expects an object containing configuration for authentication built using one of the authentication builders.
var oauth2Flow;
self.initOAuth2Legged = function () {
console.log('inside initOAuth2Legged');
var authProps = cordova.plugins.IdmAuthFlows.newOAuthPropertiesBuilder('JasmineJsTests',
cordova.plugins.IdmAuthFlows.OAuthAuthorizationGrantTypes.OAuthResourceOwner,
'[https://mcsidd1.identity.us.oraclecloud.com/oam/oauth2/tokens](https://mcsidd1.identity.us.oraclecloud.com/oam/oauth2/tokens)',
'f0beb7b5-3637-XXX-82e9-9a557e0c120c')
.oAuthClientSecret('XXXxKONpoTMSmzfb4')
.customAuthHeaders({'X-User-Identity-Domain-Name': 'mcsidd1'})
.build();
cordova.plugins.IdmAuthFlows.init(authProps).then(function (flow) {
console.log('IdmAuthFlows init success');
self.oauth2Flow = flow;
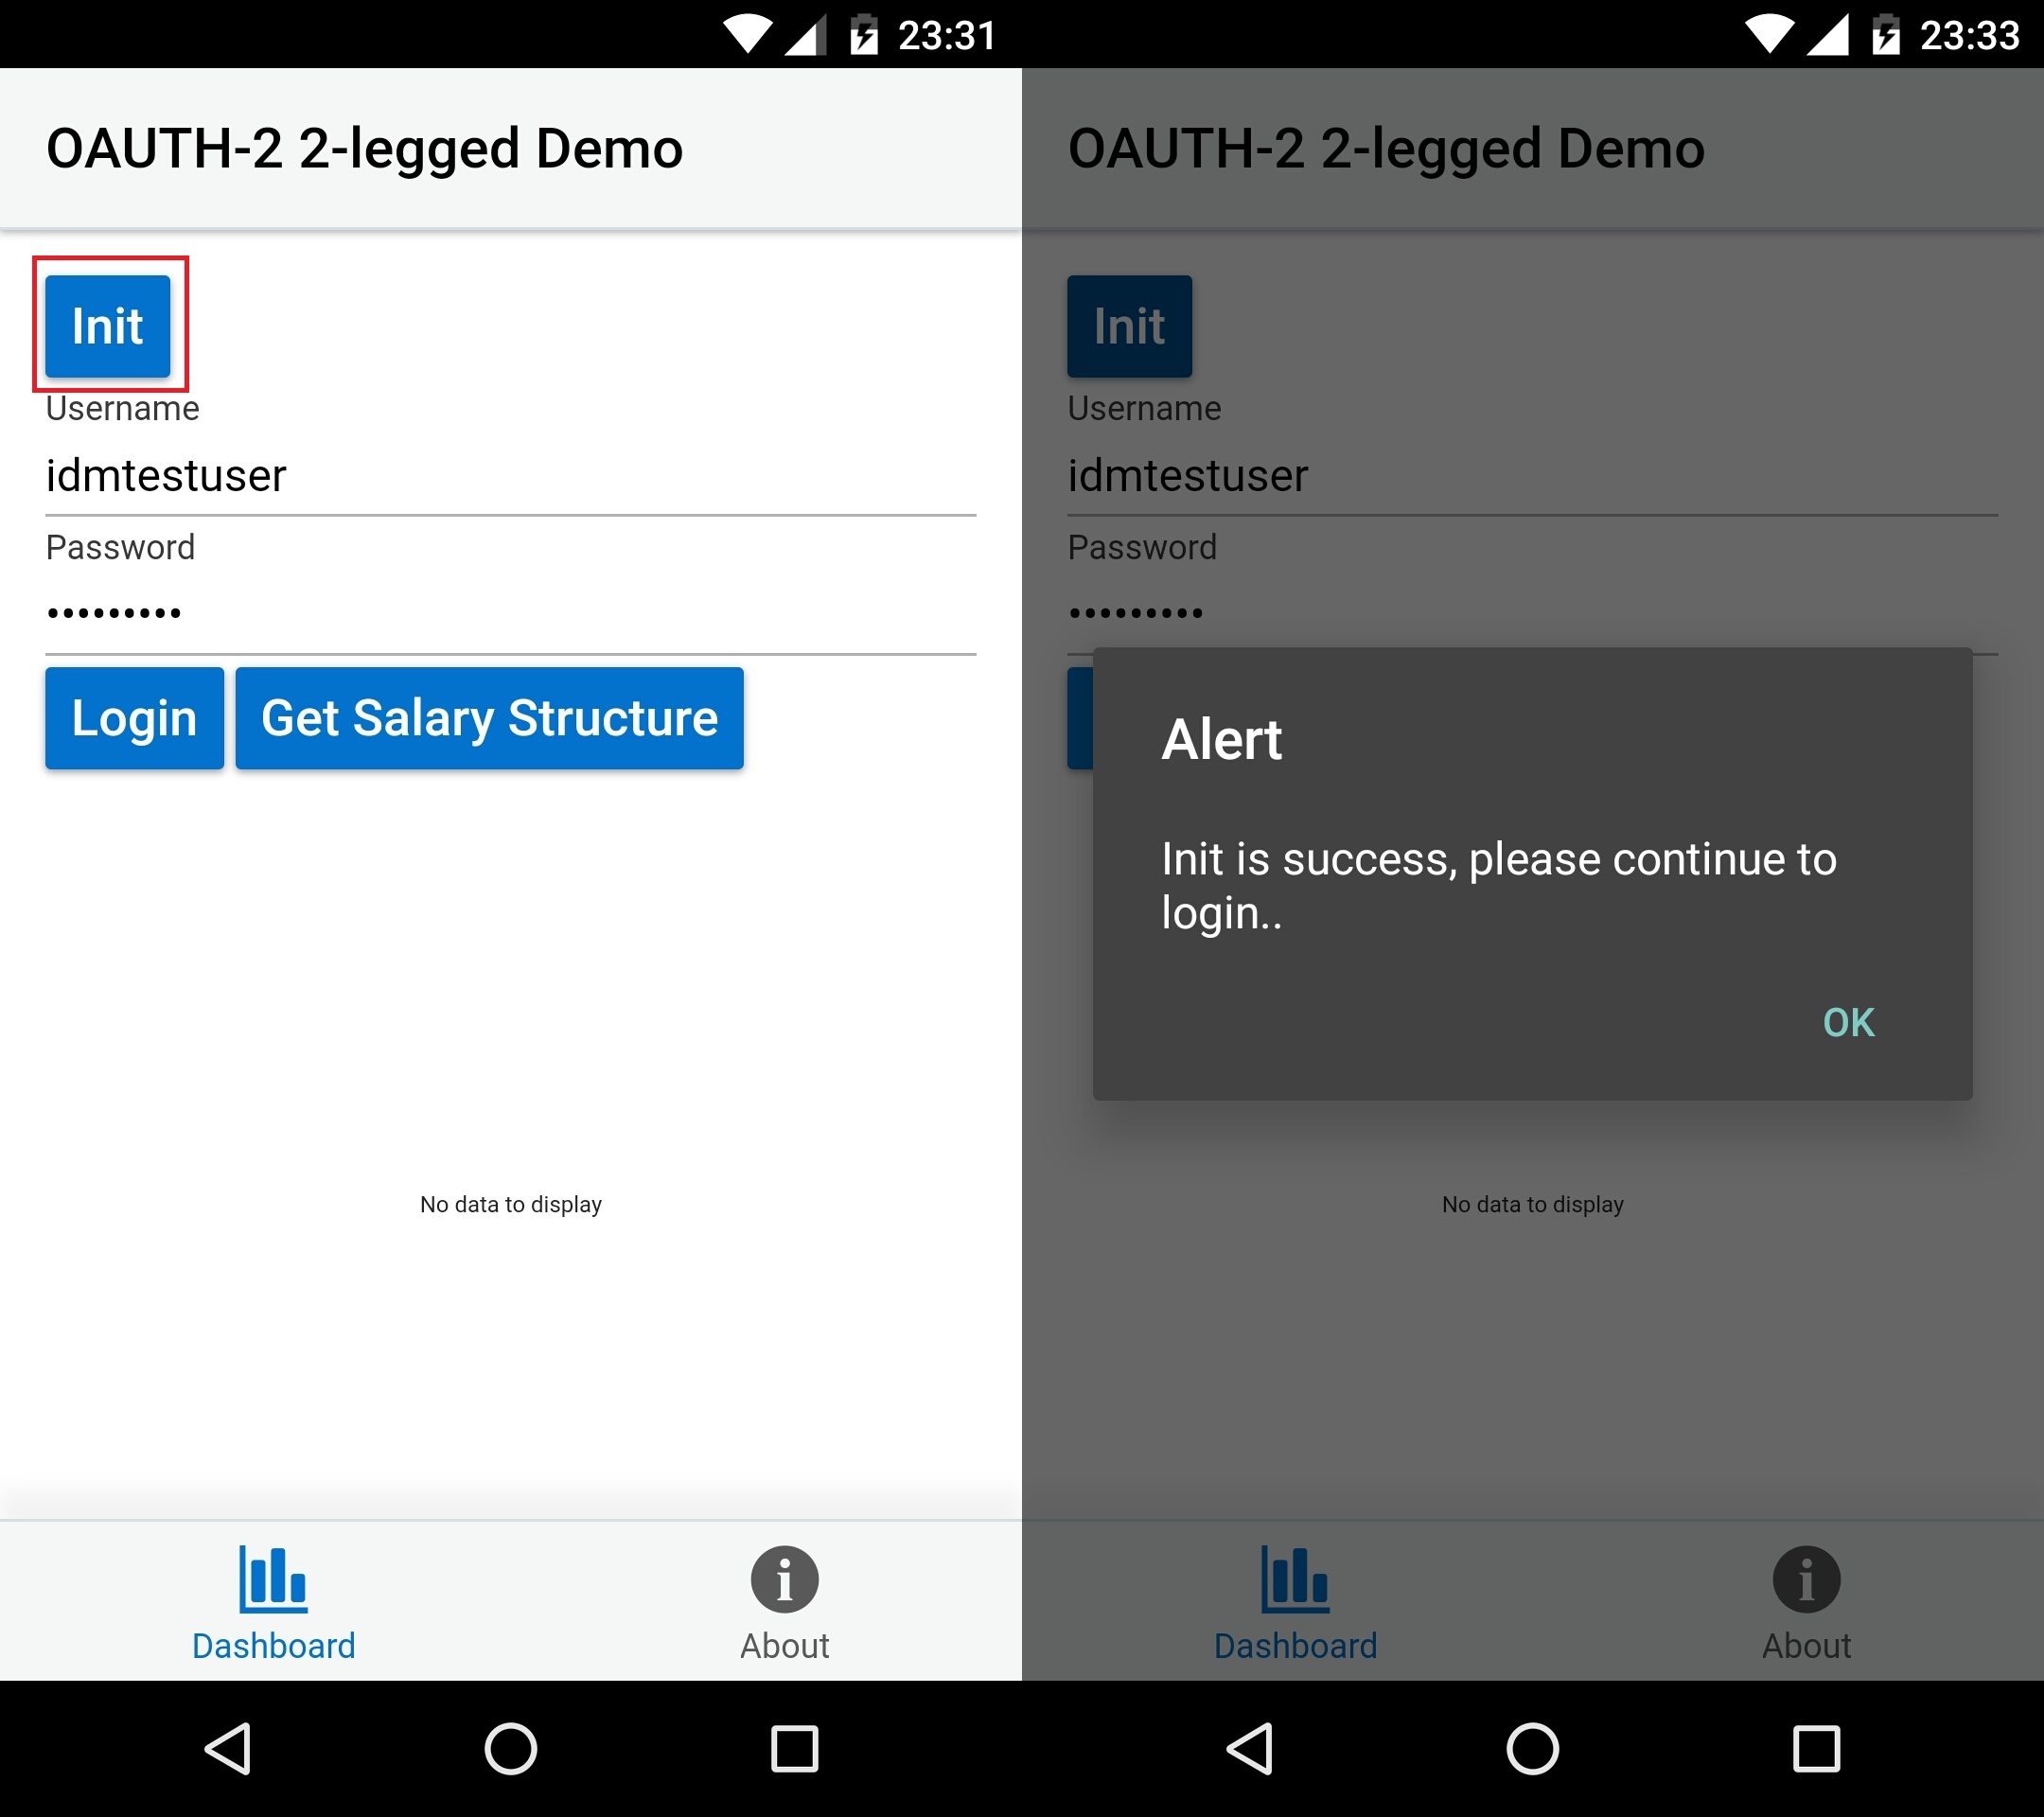
alert("Init is success, please continue to login..");
});
};
Step 2: Login
Login to the authentication flow:
self.userName = ko.observable("idmtestuser");
self.passWord = ko.observable("XXXXX");
var oauth2Login;
var oauthCC = function (fields, proceedHandler) {
// show the user a login screen
// collect the information from user.
console.log('Oauth challenge callback\<');
var errCode = fields\[cordova.plugins.IdmAuthFlows.AuthChallenge.ErrorCode\];
if (errCode)
{
console.log('ErrorCode ' + errCode);
alert("AuthChallenge Error =" + errCode);
}
fields\[cordova.plugins.IdmAuthFlows.AuthChallenge.UserName\] = self.userName();
fields\[cordova.plugins.IdmAuthFlows.AuthChallenge.Password\] = self.passWord();
proceedHandler(fields);
};
self.loginOauth2Legged = function () {
self.oauth2Flow.login(oauthCC).then(function (flow) {
oauth2Login = flow;
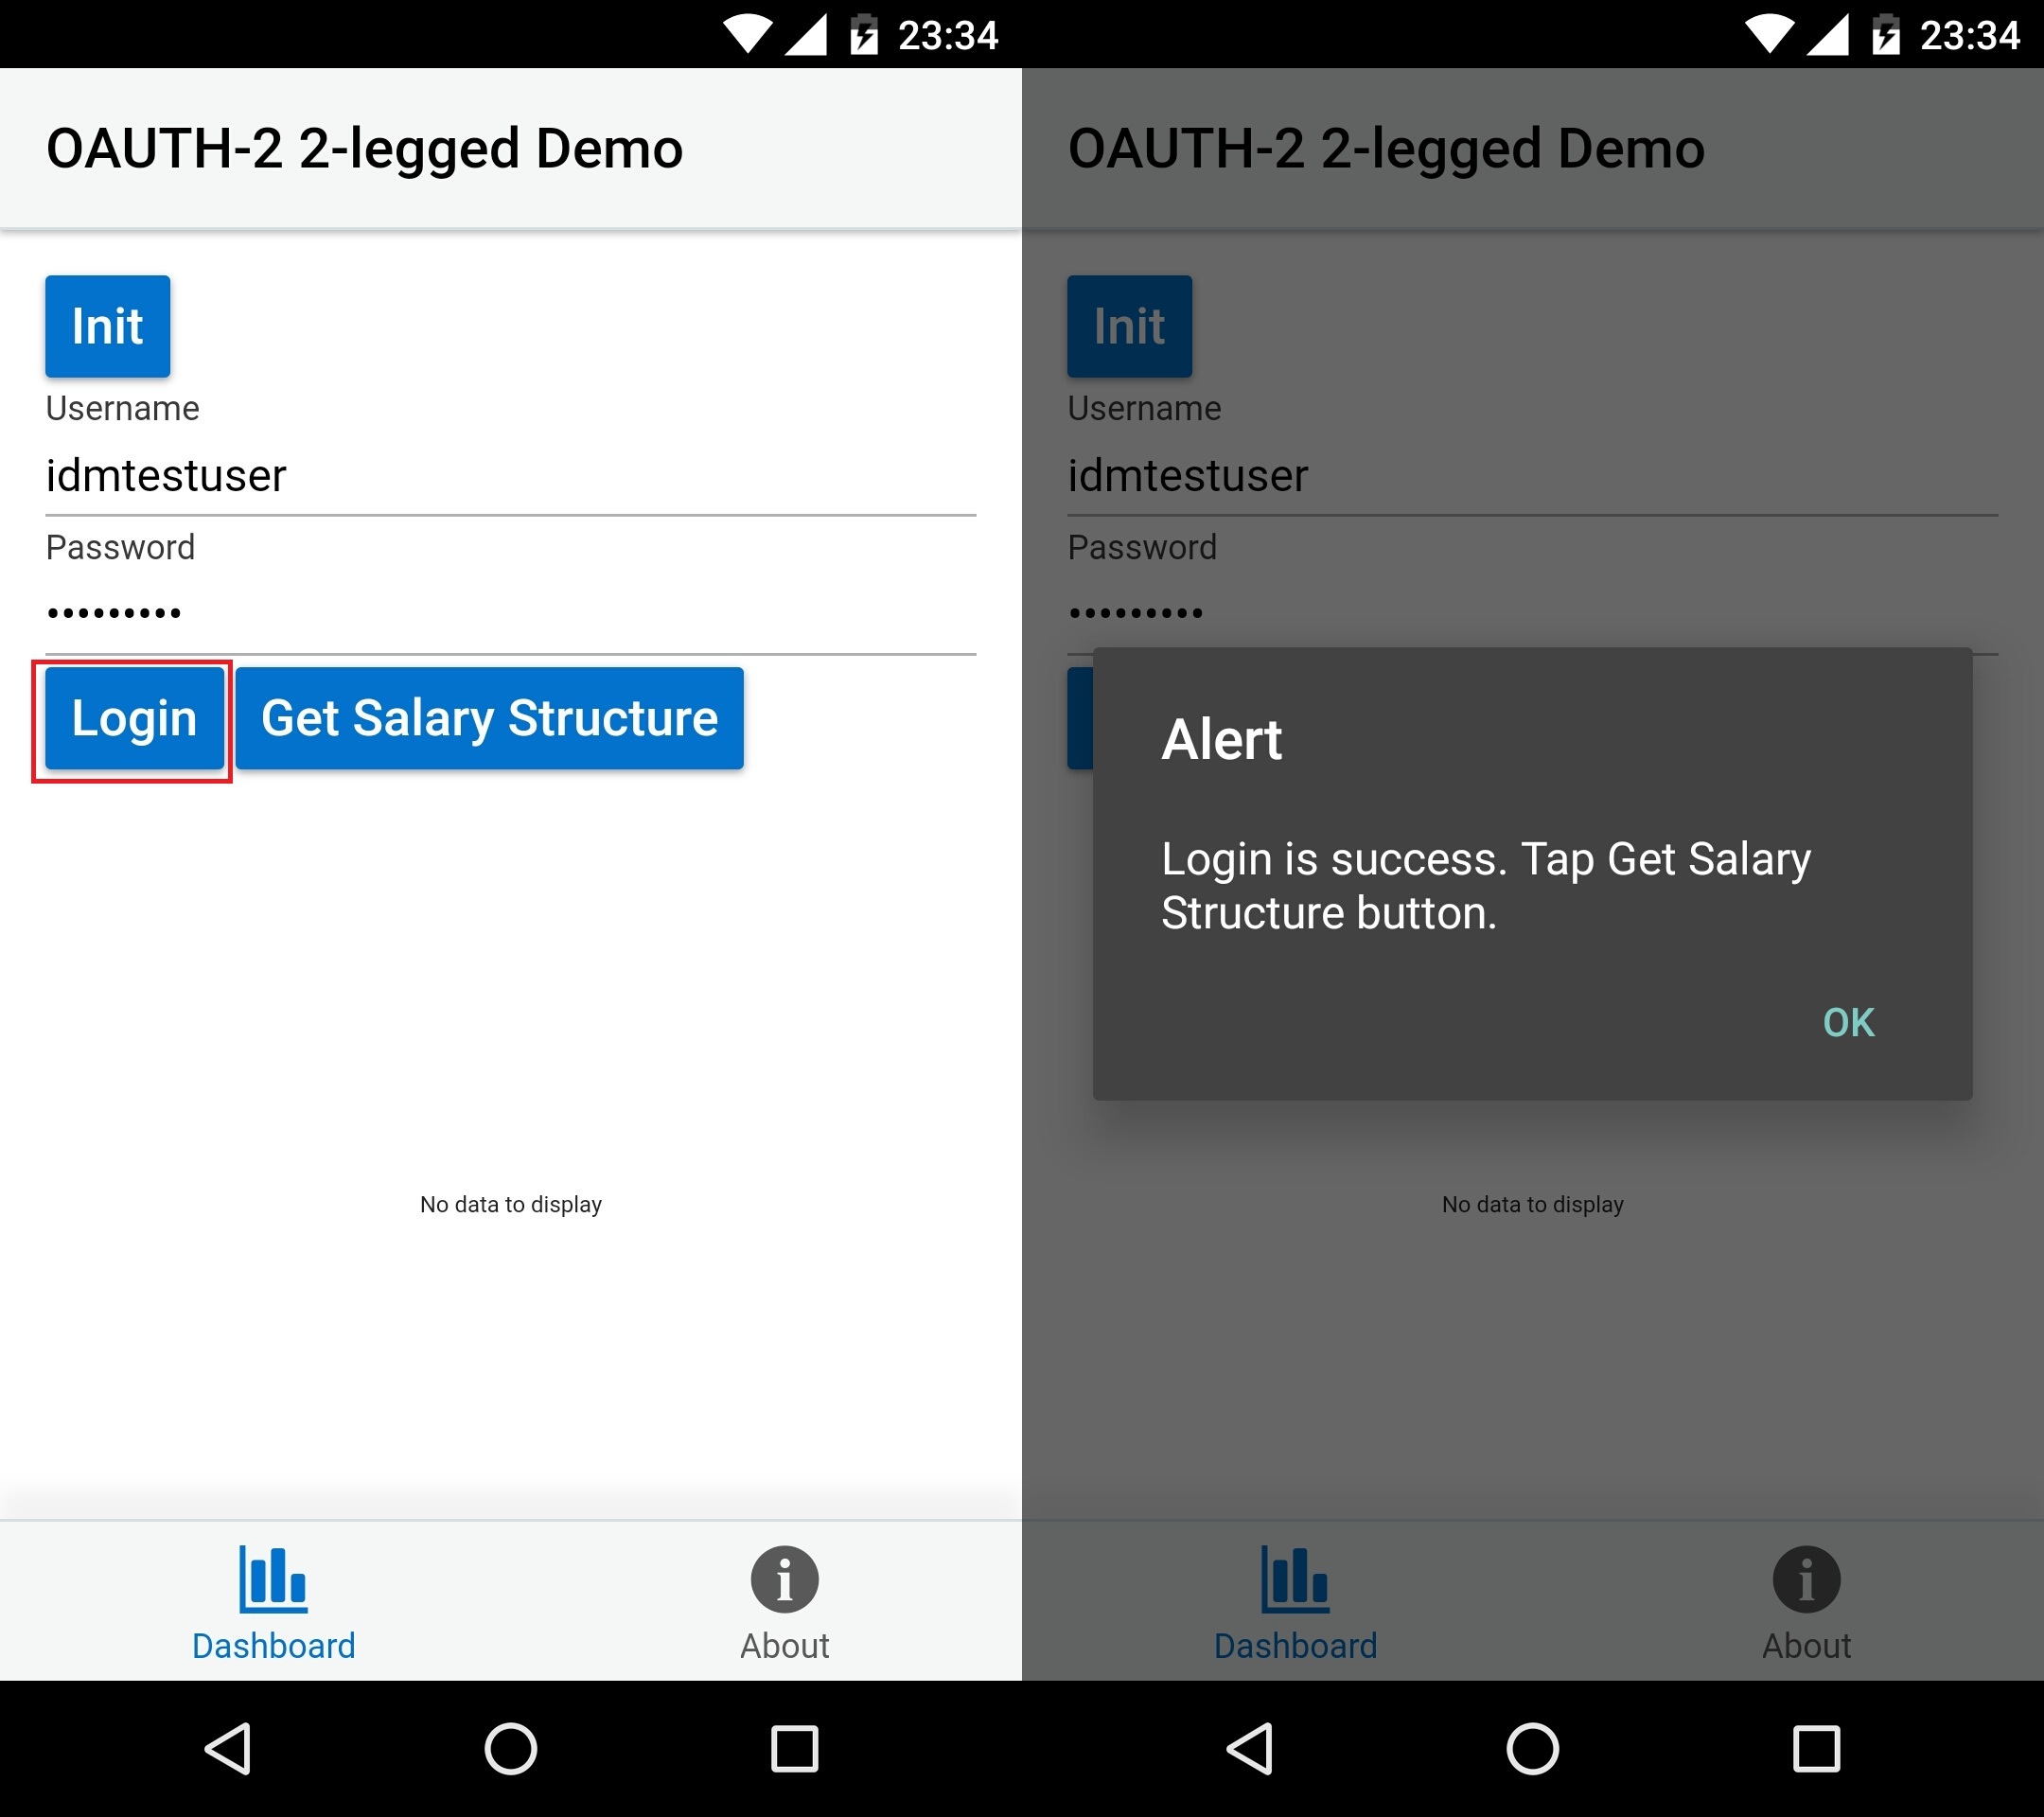
alert("Login is success. Tap Get Salary Structure button.");
});
};
Step 3: Retrieve Headers
Get Authorization headers to be set for making XHR requests to secured end points:
        self.getSalaryStructure = function () {

                console.log("self.authtoken=" + self.authtoken);

                oauth2Login.getHeaders().then(function (headers) {

                    console.log('Headers retrieved');

                    self.authtoken = 'Bearer ' + headers.oauth\_access\_token1.value;

                    console.log("self.authtoken=" + self.authtoken);

                    updateChart();

                });

            }
Step 4: Access secured API
Finally using the access token, call the secured API:
/* chart data */
            var pieSeries = \[\];

            var jsonObj = {

                name: "e1",

                items: \[10\]

            };

            self.pieSeriesValue = ko.observableArray(pieSeries);
function updateChart()
            {

                var settings = {

                    "url": "[https://mcssvc1dev-mcsidd1.mobileenv.us2.oraclecloud.com:443/mobile/custom/salarybreakup/getsalarybreakup](https://mcssvc1dev-mcsidd1.mobileenv.us2.oraclecloud.com:443/mobile/custom/salarybreakup/getsalarybreakup)",

                    "method": "GET",

                    "headers": {

                        "authorization": self.authtoken

                    }

                };

                $.ajax(settings).done(function (response) {

                    for (var index = 0; index \< response.length; index++) {

                        var obj = response\[index\];

                        jsonObj = {

                            name: obj\["name"\],

                            items: obj\["items"\]

                        };

                        console.log(jsonObj);

                        self.pieSeriesValue.push(jsonObj);

                        $('#pieChart').ojChart("refresh");

                    }

                });

            }
Build and Serve
The code is now ready to be build and serve to device:
grunt build --platform=android
grunt serve --platform=android --destination=device --disableLiveReload=true
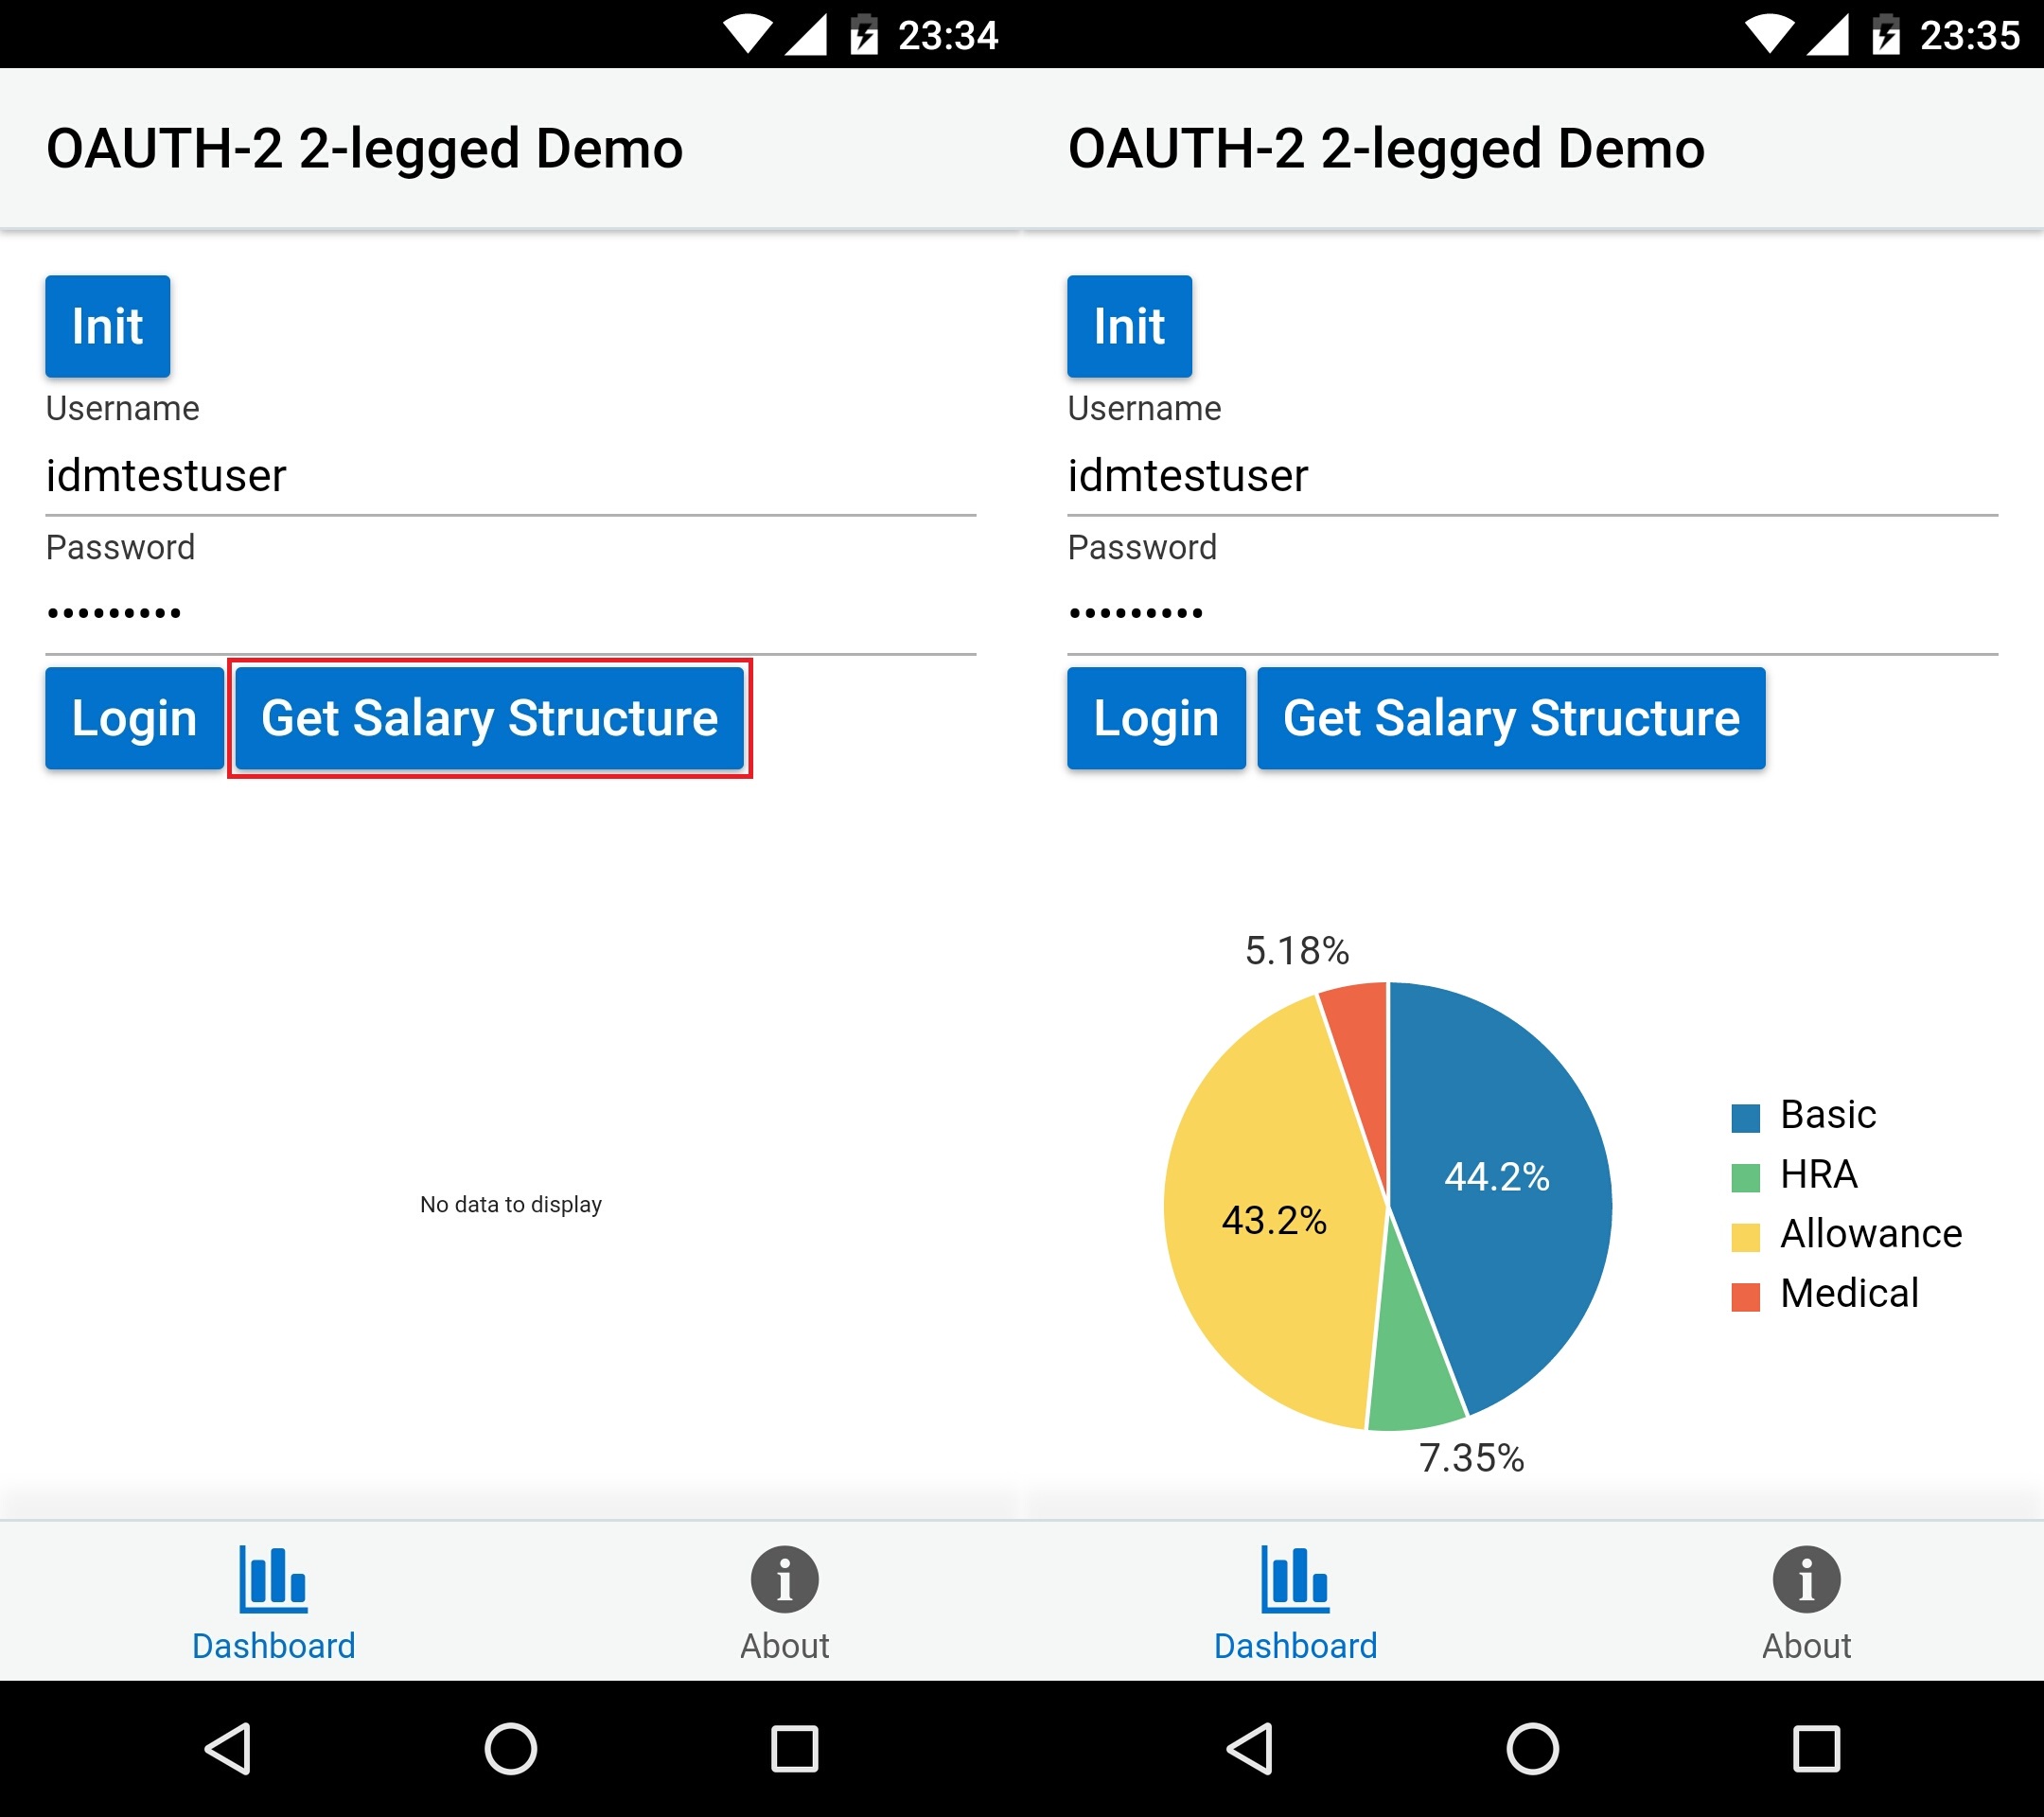
Demo Output
Below is the output:
Initialization
Login
Access secured API