I create this thread in hope that Google list it for the people searching it in the future, because the information I found was fragmentary, outdated and confusing.
I don't know much of SQL or APEX, so I welcome advice and improvements.
This is based on this webpage, which is outdated and doesn't works in APEX 5.
IMPORTANT: you don't need any of this if you have permission to access the database. SQL Developer lets you upload images directly on your table as BLOB.
EDIT: The easier method is probably using automated row processing, which is described here
Below is explained the method using the APEX_APPLICATION_TEMP_FILES table.
To upload an image from file to a table
An application should be created for the uploading. First, we need a table to store the images:
We will create a table named "MYIMAGES_TBL"
CREATE TABLE "MYIMAGES_TBL"
( "ID" NUMBER NOT NULL ENABLE,
 "IMAGE\_NAME" VARCHAR2(400),

 "FILENAME" VARCHAR2(350),

 "MIME\_TYPE" VARCHAR2(255),

 "DOC\_SIZE" NUMBER,

 "CHARSET" VARCHAR2(128),

 "LAST\_UPDATE\_DATE" DATE,

 "CONTENT" BLOB,
CONSTRAINT "MYIMAGES_TBL_PK" PRIMARY KEY ("ID")
USING INDEX ENABLE
)
/
CREATE OR REPLACE EDITIONABLE TRIGGER "BI_MYIMAGES_TBL"
before insert on "MYIMAGES_TBL"
for each row
begin
if :NEW."ID" is null then
select "MYIMAGES\_TBL\_SEQ".nextval into :NEW."ID" from sys.dual;
end if;
end;
/
ALTER TRIGGER "BI_MYIMAGES_TBL" ENABLE
/
Then we need to create a page in APEX's App Builder to upload the images
On this page we add 3 items, of type "File Browse..." to pick the files, "Text" to write a name for the image, and "Display Image", to show a preview
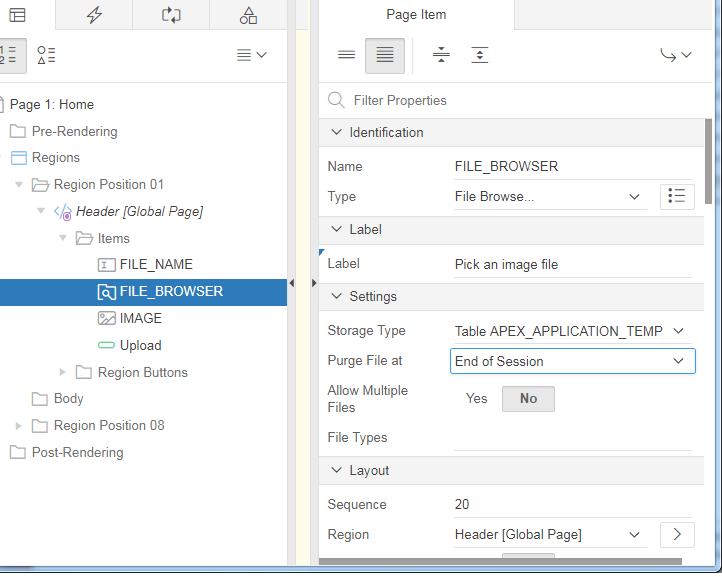
Note that "File Browse..." item is named FILE_BROWSER, and his property "Settings>Storage type" is set to "Table APEX_APPLICATION_TEMP_FILES".
"Table APEX_APPLICATION_TEMP_FILES" is a table where the uploaded files will be temporarily stored. (In older APEX versions. it used to be named WWV_FLOW_FILES, so you will find useless information with that name which cause confusion and no more works).
As shown in the former image, the FILE_BROWSER is set
- Properties>Label>Label="Pick an image file"
We need a name for the image, so we will name the "Text" item "FILE_NAME", to allow the user to edit the name.
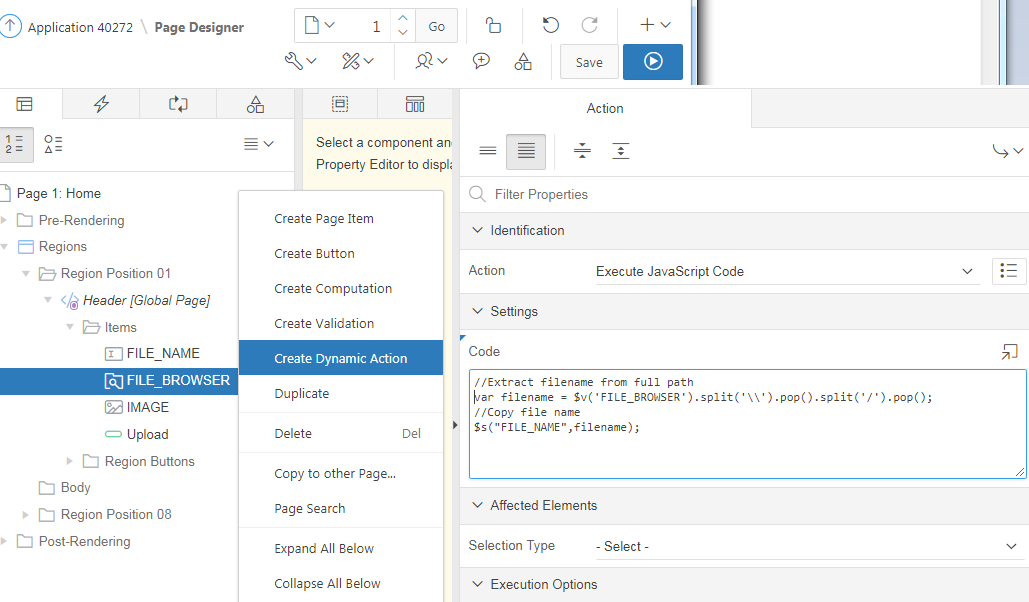
We will use "FILE_NAME" text, as name, to store the image on the table, so, to be sure that it is filled, we will add a dynamic action to FILE_BROWSER, whose action is "Execute JavaScript Code", and his code is
//Extract filename from full path
var filename = $v('FILE_BROWSER').split('\\').pop().split('/').pop();
//Copy file name
$s("FILE_NAME",filename);
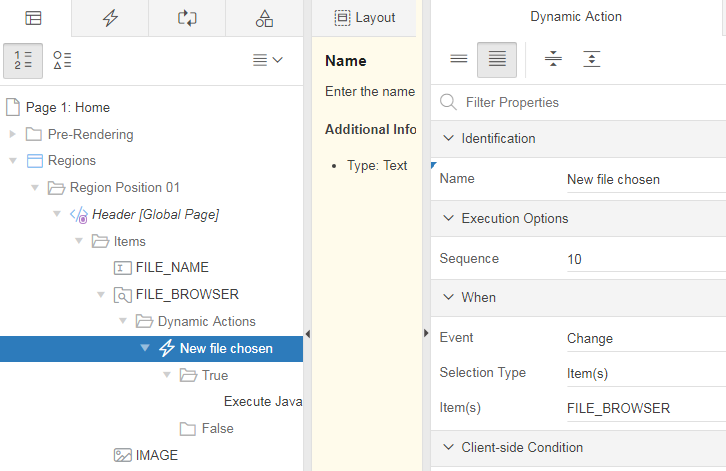
The Dynamic action:
- Will be named “New file chosen”
- Fire When Event Result Is: True
- Set to trigger with the setting "When>Event=change"
To display the preview of the image
We add a "Display Only" item named "IMAGE", set to:
- Properties>Settings>Based On ="Image URL stored in Page Item Value"
- Source>Type=Static Value=""
- Label>Label="Image preview:"
The image will not be uploaded to the database until the page is submitted, so, to show a preview, it is necessary to fetch the image from the user computer.
To do that, we add a javascript code in "Page Name>Properties>JavaScript>Function and Global Variable Declaration"
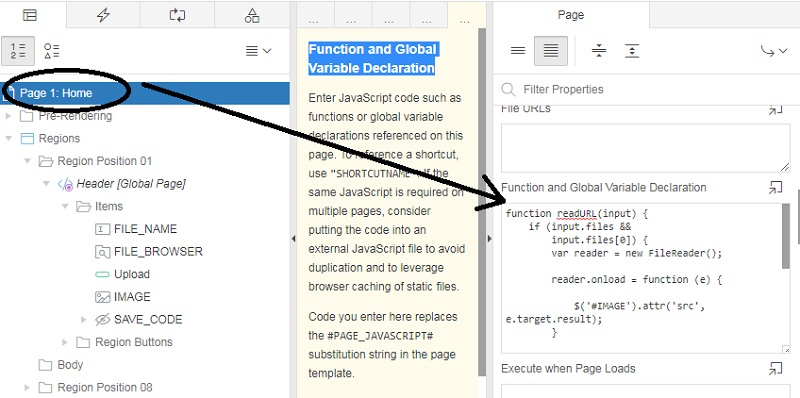
We introduce this code:
function readURL(input) {
if (input.files &&

    input.files\[0\] &&

    input.files\[0\].type.match('image.\*')) {

    var reader = new FileReader();

    reader.onload = function (e) {

        $('#IMAGE').attr('src', e.target.result);

    }

    try {

        reader.readAsDataURL(input.files\[0\]);

    }

    catch(err) {

        alert("error: " + err.message);

    }

}
}
$("#FILE_BROWSER").change(function(){
readURL(this);
});
To copy the data to the table
The FILE_BROWSER item uploads the image file to APEX_APPLICATION_TEMP_FILES, after the page is submitted. Then we need to copy it to "MYIMAGES_TBL".
To do that, we make a procedure named Insert_imageBLOB_to_Table set to:
- "Identification>type" = PL/SQL code
- "Execution options>Point"= After submit

As PL/SQL code, we write:
declare
doc_size integer;
Upload_blob blob;
begin
--Copy BLOB to Upload_blob variable
select blob_content
into Upload_blob
from APEX_APPLICATION_TEMP_FILES
where name = :FILE_BROWSER;
--Get BLOB size
doc_size := dbms_lob.getlength(Upload_blob);
--Copy data to table MyIMAGES_TBL
if doc_size <= 1000000 then
insert into MyIMAGES_TBL (
      IMAGE\_NAME, FILENAME,

      MIME\_TYPE, DOC\_SIZE,

      CONTENT )
select :FILE_NAME, filename,
      mime\_type, doc\_size,

      blob\_content
from APEX_APPLICATION_TEMP_FILES
where name = :FILE_BROWSER;
--Delete temp files
delete from APEX_APPLICATION_TEMP_FILES where name = :FILE_BROWSER;
else
delete from APEX_APPLICATION_TEMP_FILES where name = :FILE_BROWSER;
commit;
raise_application_error(-20001,'Cannot upload pictures bigger than 1MB!');
end if;
exception
when others then
raise\_application\_error(-20001,'Error when uploading image!');
end;
Note that at the end, the file in APEX_APPLICATION_TEMP_FILES is deleted. This is probably unnecessary, because the FILE_BROWSER item has a setting to “Purge files after submission”, and we had set this code to run at submission.
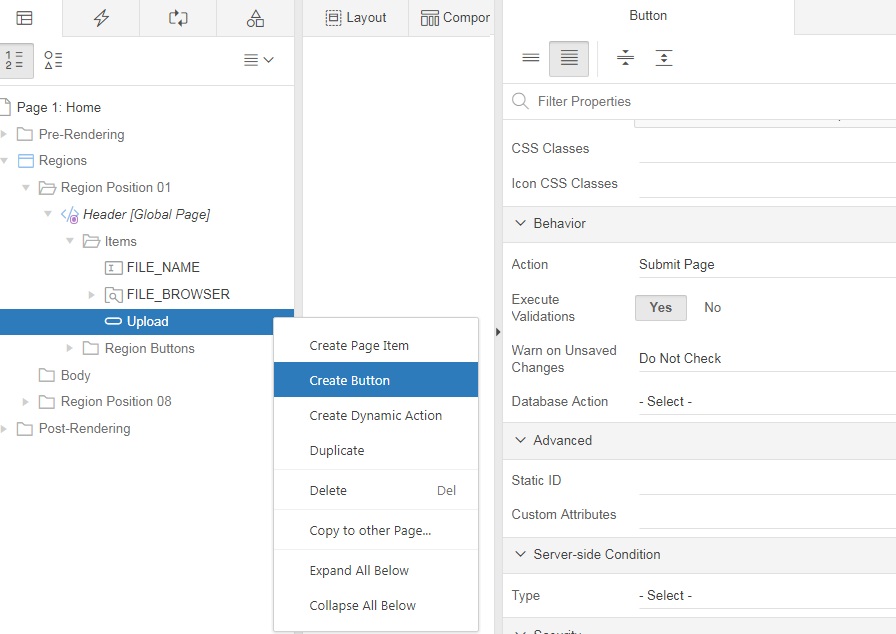
To run this code, we simply trigger submission with a button. We will add a button which we may label "Upload", set to "Behavior>Action=Submit page"
To load the images, we simply run it, choose the file, edit his name if we want, and press "upload"

We can check that the images are stored on "MYIMAGES_TBL", by going to "SQL Workshop>MYIMAGES_TBL>Data"
