
Introduction
Bare Metal Provisioning is a framework within Oracle Enterprise Manager Cloud Control which enables rapid and efficient provisioning of Linux and Oracle VM Server onto multiple x86 hosts. The framework uses standard PXE (Preboot Execution Environment) booting process for provisioning both bare-metal and virtual servers. The framework provides a role-based UI (User Interface), for the creation of the Bare Metal Provisioning framework components. These components will be explained in detail with regard to their configuration and use cases.
Bare Metal Provisioning Concepts
The following are concepts related to the Bare Metal Provisioning framework within Oracle Enterprise Manager:
Software Library
The Bare Metal Provisioning framework stores metadata within the Oracle Enterprise Manager Software Library. The Software Library maintains version, maturity versions and state. Examples of the metadata are Deployment Plans, Operating System (OS), Disk Layout and Oracle VM Server provisioning profiles.
Boot Server
The Boot Server enables the target provisioning host to boot over the network. The Boot Server must be a host target within Oracle Enterprise Manager and therefore requires an Oracle Enterprise Manager agent installed and running. The Boot Server must be able to receive the BOOTP (Bootstrap Protocol) and TFTP (Trivial File Transfer Protocol) requests over the network from the target provisioning host.
Stage Server
During the provisioning process, the required binaries and files are transferred to a Stage Server. This process, referred to as staging, is responsible for preparing images to be installed over the network. The Stage Server must be a host target within Oracle Enterprise Manager and therefore requires an Oracle Enterprise Manager agent installed and running. The Stage Server delivers content via HTTP or NFS, therefore an HTTP or NFS server is required to be installed and running. The Bare Metal Provisioning framework requires at least one Stage Server. The Stage Server can also be used to host an Oracle Enterprise Manager agent RPM which can be used in the Bare Metal Provisioning process. This enables the seamless install and configuration of the Oracle Enterprise Manager agent on the target provisioning host.
RPM Repository
The Bare Metal Provisioning framework receives the RPM’s for the target provisioning hosts’ OS from the RPM Repository. From a networking perspective, it is a best practice to have the RPM Repository as close to the target provisioning host as possible. This will bring down the installation time by reducing the time taken to transfer RPM’s from the RPM Repository to the target provisioning hosts. The RPM Repository must be a host target within Oracle Enterprise Manager and therefore requires an Oracle Enterprise Manager agent installed and running. The RPM Repository delivers content via HTTP or NFS, therefore an HTTP or NFS server is required to be installed and running. The Bare Metal Provisioning framework requires at least one RPM Repository.
DHCP Server
A DHCP Server is required as part of the PXE provisioning process. See Figure 2 and Appendix A for details on the PXE process. It is a best practice and recommended to have the DHCP Server and Boot Server on the same host. If this is not possible, the DHCP Server must be a host target within Oracle Enterprise Manager and therefore requires an Oracle Enterprise Manager agent installed and running.
Reference Host
A reference host (also called a gold machine), is a host that the Bare Metal Provisioning framework can use to create the Linux OS provisioning profiles which are stored in the Oracle Enterprise Manager Software Library. The Bare Metal Provisioning framework picks up the list of RPM’s installed on the reference host. It then fetches those RPM’s from an RPM repository, to create a Linux OS provisioning profile that represents the OS installed on the reference host. The reference host must be an Oracle Enterprise Manager host target and therefore have an Oracle Enterprise Manager agent installed and running.
Target Provisioning Hosts
A Target Provisioning Host must contain a physical or virtual NIC (Network Interface Controller) which is PXE capable.
Bare Metal Provisioning portal
The Oracle Enterprise Manager Bare Metal Provisioning framework has a portal which consists of three sections:
- Deployments: all provisioning for Linux and Oracle VM Server is defined and tracked.
- Infrastructure: Bare Metal Provisioning framework components such as the Boot, Stage, RPM and DHCP servers are defined and managed.
- Saved Plans: allows the user to view all the deployment procedures that were saved as templates with all the essential attribute values for future runs.
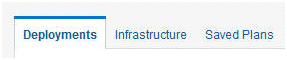
Figure 1 Bare Metal Provisioning portal tabs

Figure 2 PXE Process
Bare Metal Provisioning Deployment Concepts
It is essential to understand all aspects of Oracle Enterprise Manager security concepts when planning a Bare Metal Provisioning framework.
The following is required:
- Boot, Stage, RPM and DHCP servers require a supported Oracle Linux operating system detailed in the Installing Oracle Management Agents
- A valid Customer Support Identifier (CSI) from Oracle is required to access the Unbreakable Linux Network (ULN). Alternatively, public access to the Oracle Linux Yum Server.
- Boot, Stage, RPM and DHCP servers require an Oracle Enterprise Manager agent to be installed and running
- SSH and SCP are required to push the Oracle Enterprise Manager agent on Boot, Stage, RPM and DHCP servers
- The Oracle Enterprise Manager agent user requires sudo root access to deploy the Oracle Enterprise Manager agent on the Boot, Stage, RPM and DHCP servers. Configuration of root
- Once the Oracle Enterprise Manager agent is deployed, it only requires sudo root nmosudo binary
- Firewall settings should allow the Oracle Enterprise Manager agent port as well as protocols for each server component:
- Boot Servers: TFTP and ProxyDHCP (UDP)
- DHCP Servers: DHCP
- Stage Servers: HTTP or NFS
- RPM Servers: HTTP
Refer to the Oracle Enterprise Manager Cloud Control Advanced Installation and Configuration Guide which describes the firewall port requirements for Oracle Enterprise Manager
Bare Metal Provisioning Framework Setup
Configure the Oracle Enterprise Manager Software Library
The configuration of the Oracle Enterprise Manager Software Library is a prerequisite for the Bare Metal Provisioning framework as the Software Library stores metadata such as OS, Disk Layout and Oracle VM Server provisioning profiles. A relevant or shared Software Library location must be configured. For further information refer to the Configuring Software Library section of the Oracle Enterprise Manager Cloud Control Getting Started Guide.
Setup flow as the super administrator:
- Setup > Provisioning and Patching > Software Library
Install the Oracle Enterprise Manager agent on the Boot, Stage, RPM and DHCP servers
The Boot, Stage, RPM and DHCP servers, if separate servers, all require the Oracle Enterprise Manager agent installed and running. The following example can be used for each server.
The Boot, Stage, RPM and DHCP servers can be installed on the same server or split into multiples as required. The recommendation is that the Boot and DHCP server are on the same server.
Create the Oracle Enterprise Manager agent install user
As the root user, create a user to install the Oracle Enterprise Manager agent; in this example we will use oma:
[root@mybmpserver~]# groupadd oinstall
[root@mybmpserver~]# useradd -g oinstall oma
[root@mybmpserver~]# passwd oma
Create the key required directories and set ownership for the Oracle Enterprise Manager agent
[root@mybmpserver~]# mkdir -p /u01/app/oracle/product/
[root@mybmpserver~]# chown oma:oinstall /u01/app/oracle/product
Check the properties file on the Oracle Enterprise Manager management server (OMS)
As the oracle user, check and if required, set the oracle.sysman.prov.agentpush.enablePty property to true in the $<OMS_HOME>/sysman/prov/agentpush/agentpush.properties file. This will enable the agent deployment to complete without any need to edit the Pty property in the /etc/sudoers file on the target server host. There is no need to restart the Oracle Enterprise Manager management server following this configuration change.
Enable sudo access on the Boot, Stage, RPM and DHCP server(s) for the Oracle Enterprise Manager agent install
The agent deployment is executed from the Oracle Enterprise Manager UI. The last step of the guided process executes a script that must be run as the root user. If the Oracle Enterprise Manager agent install user (oma) on the target server cannot execute the script as root, a manual login as root on the target server is required to run the script manually. Oracle Enterprise Manager will indicate the name of the scripts you will need to execute as the root user.
However, for a fully automated Oracle Enterprise Manager agent deployment it is possible to configure sudo to allow the oma user to execute the script as root to avoid this manual step at the end of the agent deployment. Execute the following command as root on the target server:
[root@mybmpserver~]# visudo
Add the following entry based upon this example and the agent home location. The following string should be on a single line in the file opened by the visudo command:
oma ALL=(root) /usr/bin/id, /u01/app/oracle/product/*/agentdeployroot.sh, /u01/app/oracle/product/core/agent_13.2.0.0.0/root.sh, /bin/sh
Once the Oracle Enterprise Manager agent has been correctly installed the above line can be removed from the sudoers file. However in order to support patching and provisioning functionality the following line should exist to provide privileged access to the Oracle Enterprise Manager nmosudo binary.
oma ALL=(root) <agent home>/sbin/nmosudo
Oracle recommends that you check the latest documentation for your version of Oracle Enterprise Manager to verify this process hasn’t changed since this document was published.
For further details on sudo configuration, consult the Oracle Enterprise Manager 13.2 basic install guide for Standalone Agent install. Note the section on sudo/pbrun/sesu/su for executing commands as the root user.
Register the Boot, Stage, RPM and DHCP server(s) with the ULN or Oracle Linux Yum Server
It is always a good practice to have the target server at the latest revision for Oracle Linux. By registering with the ULN the latest packages can be installed as well as any required ones for the Bare Metal Provisioning framework setup. If this is a new server install, a review of the Unbreakable Linux Network FAQ, with regard to ULN registration, is recommended. For successful registration with the ULN a valid Customer Support Identifier (CSI) from Oracle is required. To register with the ULN, run the following command as the root user:
[root@mybmpserver~]# uln_register
Run through the prompts entering the relevant information regarding the server.
Once the process has completed, it is possible to run the following command to check what repositories (or channels) were chosen during the registration process:
[root@mybmpserver~]# yum repolist
Next, it is a good practice to update the Bare Metal Provisioning framework server(s) to the latest version of Oracle Linux by running the following command:
[root@mybmpserver~]# yum update
It is advisable to log on to the ULN and view the server configuration. Channels are added and removed using the Manage Subscriptions button under the Subscribed Channels panel.
Install software needed by the Oracle Enterprise Manager agent
Ensure the following software packages are installed on the server using the following command. If any packages exist they will simply report as installed and not re-install:
[root@mybmpserver~]# yum install binutils gcc glibc-common glibc-devel libaio libstdc++ make sysstat
For access to the Oracle Linux Yum Server follow the Downloading the Oracle Yum Server Repository Files section from the Oracle Linux Administrators Guide. The previous link is from the Administrators Guide for Oracle Linux 7.
Add Oracle Enterprise Manager agent firewall rule
It is possible to skip this step if the firewall is not being used on the Boot, Stage, RPM and DHCP server(s).
If a firewall is to be used, a firewall rule for the default port of 3872 is required to allow the Oracle Enterprise Manager agent to be installed, configured and used. The following example command, based upon iptables, can be used to allow access to the Oracle Enterprise Manager agent. Adjust the service port if the default port of 3872 is not being used. The default port can be changed during the install agent flow via the UI.
[root@mybmpserver~]# iptables -A INPUT -m state --state NEW -m tcp -p tcp --dport 3872 -j ACCEPT
Save and restart iptables as shown below:
[root@mybmpserver~]# service iptables save
[root@mybmpserver~]# service iptables restart
Create a Named Credential for the Oracle Enterprise Manager agent user
A Named Credential is required for the Bare Metal Provisioning framework and must relate to the Oracle Enterprise Manager agent user for the Boot, Stage, RPM and DHCP server(s). This Named Credential is the target user account authentication information stored in Oracle Enterprise Manager and used for running the Bare Metal Provisioning framework jobs. Named Credentials can be created with a user name / password or SSH keys.
Create a Named Credential with the user you intend to install as the Oracle Enterprise Manager agent. Use Figure 6 – 8 below as an example.
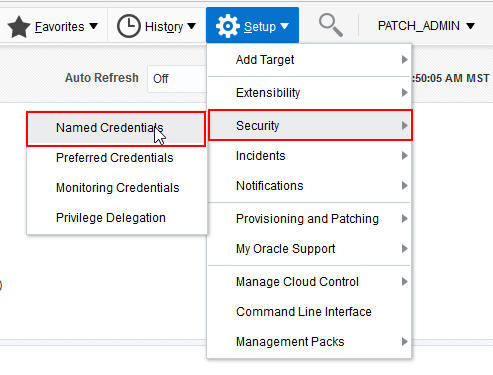
Figure 3 Create Named Credentials
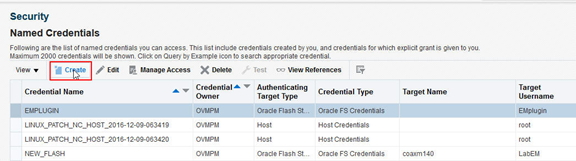
Figure 4 Create Named Credentials, continued
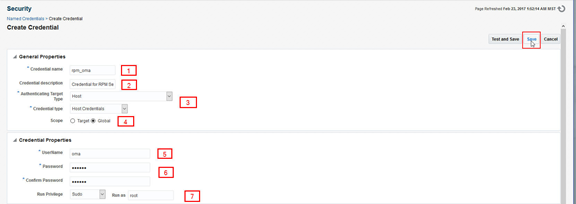
Figure 5 Fill in Create Credential form using Table 1 below
Table 1: Explanation of numbered items in Figure 5
|
Item
|
Description
|
|
1
|
Provide the name for the Named Credential that will be used to install the Oracle Enterprise Manager agent on the Boot, Stage, RPM and DHCP server(s)
|
|
2
|
A short description that will enable administrators to understand the role and purpose of the Named Credential
|
|
3
|
Choose “Host” and “Host Credentials”
|
|
4
|
Select “Global”. You can specify a single host, however this credential may be a common standard in the data center and be reused
|
|
5
|
The administrator user account created on the RPM server to install the Oracle Enterprise Manager agent
|
|
6
|
The password for the administrator user account created on the Boot, Stage, RPM and DHCP server(s) to install the Oracle Enterprise Manager agent
|
|
7
|
If sudo has been configured on the Boot, Stage, RPM and DHCP server(s) then choose sudo and run as root
|
Finally, click on Save to complete the process.
Note: It is not possible to test the credential until the Oracle Enterprise Manager agent has been installed and is running. Therefore, confirm to save the credential without testing.
Deploy Oracle Enterprise Manager agents via the UI
The following steps are required to deploy the Oracle Enterprise Manager agent to the Boot, Stage, RPM and DHCP server(s). This process can be carried out by a superuser or by any user with the Add Target privilege. The following screenshot depicts a user, (patch_admin) which has been configured with the Oracle Enterprise Manager role EM_LINUX_PATCHING_ADMIN. This role is able to be used to push Oracle Enterprise Manager agents as well as configure the Linux Host Patching and Bare Metal Provisioning framework.
Add the targets manually using Figure 9 as an example.
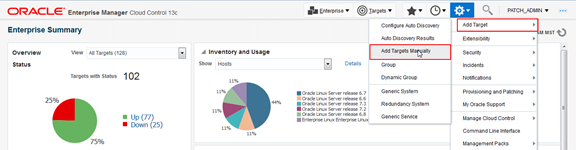
Figure 6 Choose to add targets manually
Choose to install an agent on a host as shown in Figure 10 below.
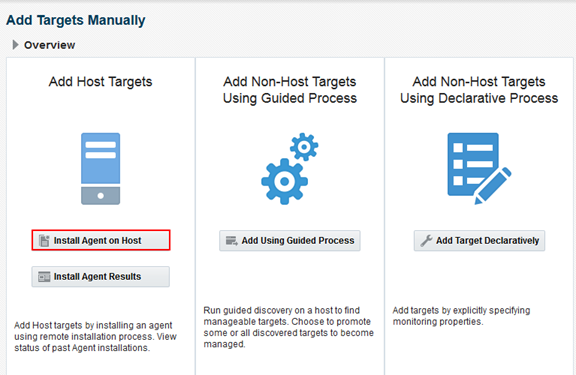
Figure 7 Choose to install agent on host
Choose Add as shown in Figure 11 and then provide the hostname for the Boot, Stage, RPM and DHCP server(s).
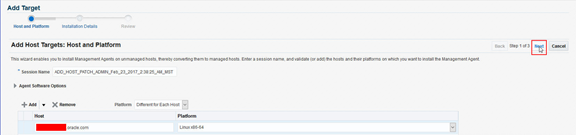
Figure 8 Add the Boot, Stage, RPM and DHCP server(s) using a FQDN and selecting the correct platform.
Populate the page as shown in Figure 12 below. Refer to Table 2 below for detailed explanations about each of the required fields indicated by the callouts in the screen shot.
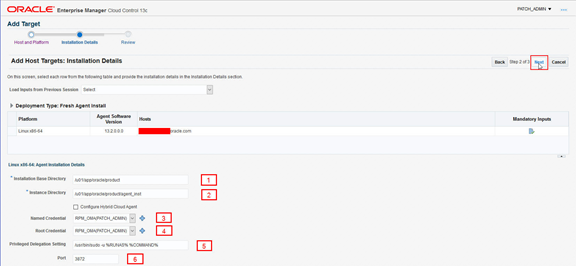
Figure 9 Installation details for the Oracle Enterprise Manager agent
Table 2: Explanation of numbered items in Figure 9 above
|
Item
|
Description
|
|
1
|
The value should reflect the installation base directory created for the Oracle Enterprise Manager agent, in our example: /u01/app/oracle/product
|
|
2
|
The value is automatically populated with the correct string, based on the installation base directory when this field is selected; the default value should not be modified once it is automatically populated
|
|
3
|
Choose the named credential (oma user)
|
|
4
|
Choose the named credential (oma user)
|
|
5
|
If sudo access for the oma user was enabled, then leave the default setting. If no sudo is configured, then this value can be removed. If no sudo is configured, one of the final steps of the Oracle Enterprise Manager agent install will fail and the process will advise that a script must be run manually as the root user. Follow the prompts to continue to complete the install process and then run the scripts as the root user as directed
|
|
6
|
This shows the default service port (3872). This value should be changed if a different port is to be used.
|
This step will deploy the Oracle Enterprise Manager agent to the Boot, Stage, RPM and DHCP server(s).

Figure 10 Deploy the Oracle Enterprise Manager agent
The progress can be viewed closely, to help ensure all steps are completed.


Figure 11 Monitor the progress of the Oracle Enterprise Manager agent installation
Following the successful install of the agent, the /etc/sudoers file should be edited (as the root user using visudo) to:
- Remove the Oracle Enterprise Manager agent install requirements
- Add the nmosudo
Using the document example, remove the following line:
oma ALL=(root) /usr/bin/id, /u01/app/oracle/product/*/agentdeployroot.sh, /u01/app/oracle/product/core/agent_13.2.0.0.0/root.sh, /bin/sh
Add the following line:
oma ALL=(root) /u01/app/oracle/product/agent_13.2.0.0.0/sbin/nmosudo
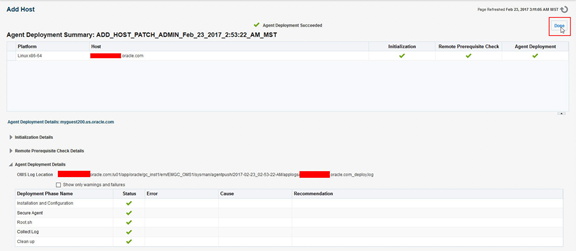
Figure 12 Successful completion of the Oracle Enterprise Manager agent installation
Configure Privilege Delegation
All Oracle Enterprise Manager deployment procedures (DP’s) require privileged user access; the Bare Metal Provisioning framework requires running of DP’s. Therefore Oracle Enterprise Manager needs to be informed of which hosts have privileged user access; this is achieved using Privilege Delegation.
To configure Privilege Delegation, follow the examples in Figure 16 – 19:
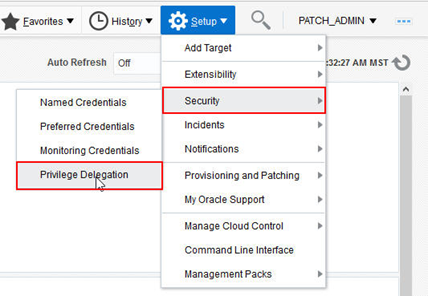
Figure 13 Configure Privilege Delegation

Figure 14 Edit to set Privilege Delegation
To edit the settings, choose sudo and then input the command. For Oracle Linux, this is usually /usr/bin/sudo, then copy the example command string from –u ie /usr/bin/sudo -u %RUNAS% %COMMAND%
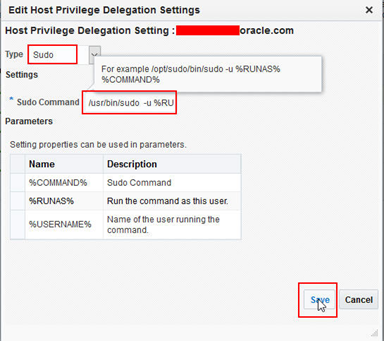
Figure 15 Set sudo Privilege Delegation
Once set, the following screenshot reflects the Type and Command information just set. It is possible to test the setting using the Test button.
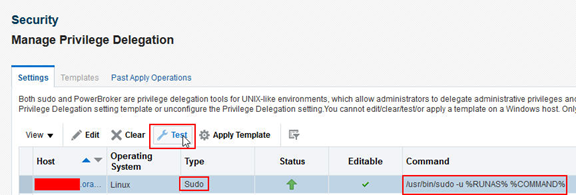
Figure 16 Test Privilege Delegation
A template can be created which can be quickly and easliy replicated to multiple hosts. Privilege Delegation should be set for the Boot, Stage, RPM and DHCP server(s).
Configure Preferred Credentials
Preferred Credentials are stored within Oracle Enterprise Manager. Once stored, Preferred Credentials enable simpler deployment or patching flows as they are set system wide and the user does not have to set individual credentials for each host. A best practice is to create a “normal” user credential with no root privilege, then another for the “privilege” user which has root privilege set. For this example, the same user with root privilege is used for simplicity.
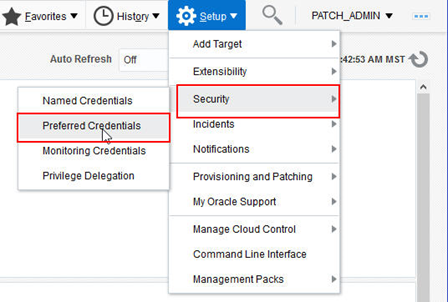
Figure 17 Configure Preferred Credentials
Highlight the Host target and select Manage Preferred Credentials.
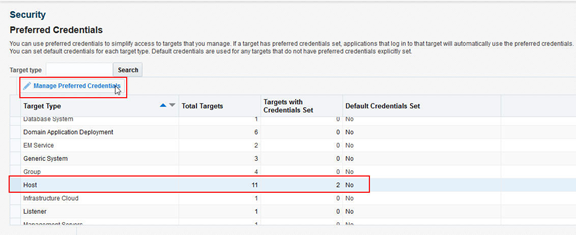
Figure 18 Manage Preferred Credentials
If you have separate users, for Normal and Privilege then highlight each and use Set to configure the Preferred Credential. For our example, there is a single user set for both, therefore both are highlighted.

Figure 19 Set Preferred Credentials
The Named Credential is selected and displays the username and privilege type. Click Save to set.
The Preferred Credentials are now set as in the screenshot below:

Figure 20 Set Preferred Credentials, continued
It is required to set Preferred Credentials for the Stage Server and Reference host, however, it is a good practice to set Preferred Credentials for the Boot, RPM and DHCP server(s).
Configure Stage Server
NFS or HTTP can be used for the Stage server; for this example, NFS is used. The Stage Server requires a minimum of 100MB for the staging directory. For both implementations, the top level or stage directory should be created as the Oracle Enterprise Manager agent user, which must have sudo access to root. This setting of sudo access is described on page 9.
If the Stage Server is running a firewall, then NFS must be enabled for the firewall.
Check that NFS is installed and running on the Stage server. For this example the Stage Server is Oracle Linux 7:
[root@mybmpserver~]# yum install nfs-utils
We then need to create the stage directory and add to the /etc/exports file:
[root@mybmpserver~]# mkdir –p /scratch/stage
[root@mybmpserver~]# chown oma:oinstall /scratch/stage
[root@mybmpserver~]# STAGE_TOP_LEVEL_DIRECTORY=/scratch/stage
[root@mybmpserver~]# echo "${STAGE_TOP_LEVEL_DIRECTORY} *(ro,sync)" >>/etc/exports
[root@mybmpserver~]# cat /etc/exports
/scratch/stage *(ro,sync)
Next, start and enable the NFS server:
[root@mybmpserver~]# systemctl start nfs
[root@mybmpserver~]# systemctl enable nfs-server
Check the exports:
[root@mybmpserver~]# showmount -e
Export list for mybmpserver:
/scratch/stage*(ro,sync) *
Now, we need to create and copy the Oracle Enterprise manager agent RPM to the Stage Server NFS share. This process needs to be run on the Oracle Enterprise Manager management server (OMS).
Firstly, as the root user (or oracle with sudo configured) check for the existence of two RPMs:
[root@myomsserver~]$ yum info rpm-build gcc
Next, as the oracle user run the following commands:
[oracle@myomsserver~]$ $OMS_HOME/bin/emcli login -username=patch_admin
[oracle@myomsserver~]$ $OMS_HOME/bin/emcli get_agentimage_rpm -destination="/home/oracle" -platform="Linux x86-64"
This process may take a few minutes to complete. Once complete, copy the agent RPM (oracle-agt-13.2.0.0.0-1.0.x86_64.rpm) from the OMS server to the Stage Server and place in /scratch/stage. The agent RPM should be owned by the Named Credential user (in our example oma) and also have permissions of 755.
Finally, we need to add the Stage Server to the Oracle Enterprise Manager Bare Metal Provisioning framework portal. Using the UI and as the patch_admin user, the flow is as follows:
- Enterprise > Provisioning and Patching > Bare Metal Provisioning
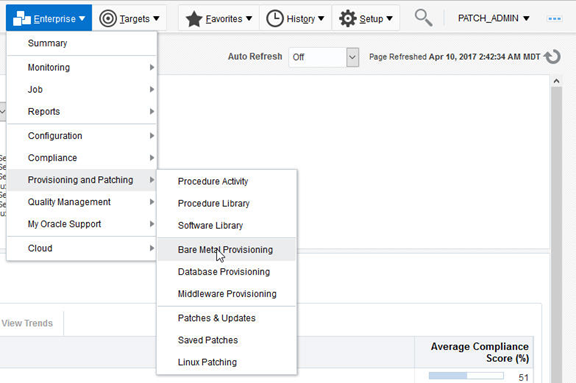
Figure 21 Access the Bare Metal Provisioning portal
Next, click on the Infrastructure tab, then within the Stage Server section click Add Server:
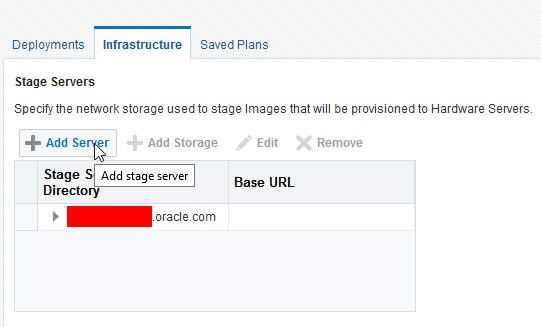
Figure 22 Add Stage Server
The Add Stage Server section should be completed as follows:
- Stage Server: use the radio or search button to select the Stage Server
- Stage Directory: enter in the NFS or HTTP directory path. In our NFS example /scratch/stage
- Base URL: for NFS the format is file://FQDN or IP Address/stage directory path. In our NFS example file://mybmphost/scratch/stage
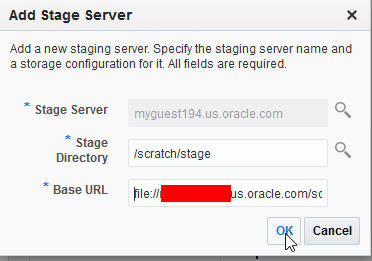
Figure 23 Add Stage Server NFS example
Once the Stage Server has been added, to view the configuration click on the collapse / expose arrow next to the newly added Stage Server:
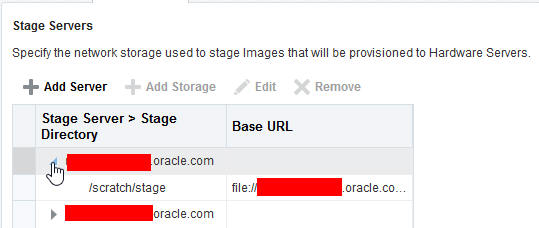
Figure 24 Stage Server details
Configure Boot Server
The Boot Server should have a minimum of 2GB RAM. As previously detailed the recommendation, this is for the Boot and DHCP Server to exist on the same server. If the Boot Server is running a firewall, then TFTP and ProxyDHCP must be enabled for the firewall.
Check that the required packages are installed and running on the Boot server. For this example the Boot Server is Oracle Linux 7:
[root@mybmpserver~]# yum install tftp tftp-server syslinux
Once installed we need to copy the pxelinux.0 file over to the TFTP directory:
[root@mybmpserver~]# rpm –ql syslinux | grep pxe
/usr/share/doc/syslinux-4.05/pxelinux.txt
/usr/share/syslinux/gpxecmd.c32
/usr/share/syslinux/gpxelinux.0
/usr/share/syslinux/gpxelinuxk.0
/usr/share/syslinux/pxechain.com
/usr/share/syslinux/pxelinux.0
[root@mybmpserver~]# mkdir –p /var/lib/tftpboot/pxelinux.cfg
[root@mybmpserver~]# cp /usr/share/syslinux/pxelinux.0 /var/lib/tftpboot
Next, we need to start and enable the TFTP service:
[root@mybmpserver~]# systemctl start tftp
[root@mybmpserver~]# systemctl enable tftp
Finally, we need to add the Boot Server to the Oracle Enterprise Manager Bare Metal Provisioning framework portal. Using the UI and as the patch_admin user, the flow is as follows:
- Enterprise > Provisioning and Patching > Bare Metal Provisioning > infrastructure
Within the Boot Server section click Add:

Figure 25 Add Boot Server
The Add Boot Server section should be completed as follows:
- Boot Server: use the radio or search button to select the Boot Server
- TFTP Boot Directory: enter in the directory path. In our example/var/lib/tftpboot/
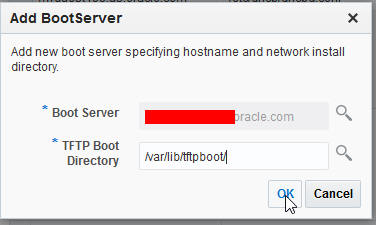
Figure 26 Add Boot Server example
Configure DHCP Server
The DHCP Server should have a minimum of 2GB RAM. As previously detailed, the recommendation is for the Boot and DHCP Server to exist on the same server. If the DHCP Server is running a firewall, then DHCP must be enabled for the firewall.
Check that the required packages are installed and running on the DHCP server. For this example the DHCP Server is Oracle Linux 7:
[root@mybmpserver~]# yum install dhcp
Once DHCP is installed we need to create the /etc/dhcp/dhcpd.conf file.
An example file is below:
option domain-name "mydom.org";
option domain-name-servers 192.168.2.1, 10.0.1.4;