Introduction
Linux Host Patching is a framework within Oracle Enterprise Manager Cloud Control that keeps the hosts updated with security and critical bug fixes. This framework enables the administrator to:
- Set up multiple Linux RPM Repositories based on Unbreakable Linux Network (ULN) channels
- Download Advisories (Errata’s) from ULN
- Manage RPM repositories and channels (clone channels, copy packages from one channel into another, delete channels)
- Create Custom Channels containing user-specified RPM’s
- Manage configuration file channels (create/delete channels, upload files, copy files from one channel into another)
- Set up multiple Linux Patching Groups to update a collection of Linux hosts and collect compliance information. Compliance is defined within the Host Patching section
- Allow non-compliant packages to be patched. Non-compliance is defined within the Host Patching section
- Rollback or uninstall packages from a host
Linux Host Patching Concepts
The following are concepts related to the Linux Host Patching framework within Oracle Enterprise Manager:
Linux Host
This is a host target in Oracle Enterprise Manager that is running the Oracle Linux operating system. An Oracle Enterprise Manager host target is created when an Oracle Enterprise Manager agent is installed in the target operating system.
Linux Patching Group
This is a set of managed Oracle Linux hosts that are associated with a common list or RPM repositories. Each group is configured with an update schedule, according to which a recurring job is triggered, that will update the hosts of the group with the associated RPM repositories.
Unbreakable Linux Network (ULN)
The ULN is a web presence hosted by Oracle to provide updates for Oracle Linux.
ULN Channel
A channel is a group of RPM packages on the ULN.
RPM Repository
An RPM repository (or repo) is a directory that contains RPM packages and their metadata which is extracted by running the yum-arch and createrepo commands. The RPM repository is accessible via http or ftp. An RPM repository can be organized to contain packages from multiple channels.
Custom Channel
A Custom Channel is created by the user to store a set of custom RPM packages. A common use case is when the administrator wants to separate out an application or infrastructure set of RPM packages to help ensure they are always the same and therefore compliant.
Configuration Channel
A Configuration Channel is created by the user to store a set of Linux configuration files. Configuration Channels can be used in the Linux Host Patching application UI to deploy configuration files on Linux hosts.
Linux Host Patching Deployment Concepts
It is essential to understand all aspects of Oracle Enterprise Manager security concepts when planning a Linux Host Patching framework.
The following is required:
- RPM servers and target patching hosts require a supported Oracle Linux operating system detailed in the Installing Oracle Management Agents section of the documentation for your version of Oracle Enterprise Manager.
- A valid Customer Support Identifier (CSI) from Oracle is required to access the Unbreakable Linux Network (ULN).
- RPM servers and target patching hosts require an Oracle Enterprise Manager agent to be installed and running.
- SSH and SCP are required to push the Oracle Enterprise Manager agent on the RPM servers and target patching hosts.
- The Oracle Enterprise Manager agent user requires sudo root access to deploy the Oracle Enterprise Manager agent on the RPM servers and target patching hosts. Configuration of root access via sudo is explained below.
- Once the Oracle Enterprise Manager agent is deployed, it only requires sudo root access to the Oracle Enterprise Manager nmosudo binary.
- Firewall settings should allow the Oracle Enterprise Manager agent port as well as SSH, HTTP and HTTPS for patching communication. Refer to the Oracle Enterprise Manager Cloud Control Advanced Installation and Configuration Guide section of the documentation for your version of Oracle Enterprise Manager.
- SElinux enforcing is supported on the target RPM hosts, however configuration is required.
Linux Host Patching Framework Setup
Please note, for an Oracle Linux 8 based RPM server Oracle Linux 8 U3 as a minimum is required due to an updated yum mirror package.
Please note, the tar and curl packages are required for the RPM server.
Configure the Oracle Enterprise Manager Software Library
The configuration of the Oracle Enterprise Manager Software Library is a prerequisite for the Linux Host Patching framework as the Software Library stores RPM channel and host target information. A relevant or shared Software Library location must be configured. For further information refer to the Configuring Software Library section of the Enterprise Manager Cloud Control Getting Started Guide section of the documentation for your version of Oracle Enterprise Manager.
The setup flow is possible as the super administrator user (sysman) or a user with the EM_LINUX_PATCHING_ADMIN role and the ability to add any target:
Create the Oracle Enterprise Manager agent install user on the RPM server
As the root user, create a user to install the Oracle Enterprise Manager agent; in this example we will use oma:
[root@myrpmserver~]# groupadd oinstall
[root@myrpmserver~]# useradd -g oinstall oma
[root@myrpmserver~]# passwd oma
Create the key required directories and set ownership for the Oracle Enterprise Manager agent
[root@myrpmserver~]# mkdir -p /u01/app/oracle/product/
[root@myrpmserver~]# chown oma:oinstall /u01/app/oracle/product
Check the properties file on the Oracle Enterprise Manager management server (OMS)
As the oracle user check and if required set the oracle.sysman.prov.agentpush.enablePty property to true in the $<OMS_HOME>/sysman/prov/agentpush/agentpush.properties file. This will enable the agent deployment to complete without any need to edit the Pty property in the /etc/sudoers file on the target RPM server host. There is no need to restart the Oracle Enterprise Manager management server following this configuration change.
The agent deployment is executed from the Oracle Enterprise Manager UI. The last step of the guided process executes a script that must be run as the root user. If the Oracle Enterprise Manager agent install user (oma) on the RPM server cannot execute the script as root, a manual login as root on the RPM server is required to run the script manually; Oracle Enterprise Manager will indicate the name of the scripts you will need to execute as the root user.
However, for a fully automated Oracle Enterprise Manager agent deployment it is possible to configure sudo to allow the oma user to execute the script as root to avoid this manual step at the end of the agent deployment. Execute the following command as root on the RPM server:
[root@myrpmserver~]# visudo
Add the following entry based upon this example and the agent home location. The following string should be on a single line in the file opened by the visudo command:
oma ALL=(root) /usr/bin/id, /u01/app/oracle/product/*/agentdeployroot.sh
Once the Oracle Enterprise Manager agent has been correctly installed the above line can be removed from the sudoers file. However in order to support patching and provisioning functionality the following line should exist to provide privileged access to the Oracle Enterprise Manager nmosudo binary.
oma ALL=(root) /u01/app/oracle/product/<agent_home>/sbin/nmosudo
Oracle recommends that you check the latest documentation for your version of Oracle Enterprise Manager to verify this process hasn’t changed since this document was published.
For further details on sudo configuration, consult the Oracle Enterprise Manager basic install guide for Standalone Agent install. Note the section on sudo/pbrun/sesu/su for executing commands as the root user.
Register the RPM server with the ULN
This is a required step for the RPM setup, however it is always good practice to have the target server at the latest revision for Oracle Linux. By registering with the ULN the latest packages can be installed as well as any required ones for the RPM setup. If this is a new server install, a review of the Unbreakable Linux Network FAQ with regard to ULN registration is recommended. For successful registration with the ULN a valid Customer Support Identifier (CSI) from Oracle is required.
To register with the ULN, run the following command as the root user:
[root@myrpmserver~]# uln_register
Run through the prompts entering the relevant information regarding the server.
Once the process has completed, it is possible to run the following command to check what repositories (or channels) were chosen during the registration process:
[root@myrpmserver~]# yum repolist
Next, a good practice is to update the RPM server to the latest version of Oracle Linux by running the following command:
[root@myrpmserver~]# yum update
If the server has kernel updates or SELinux has been disabled or reconfigured it is advisable to reboot.
It is advisable to log on to the ULN and view the server configuration. Also, if the RPM server is going to host other channels apart from the server operating system, then click on the server name, then Edit on the System Details panel. This exposes the Edit System Properties panel and it is possible to tick the Yum Server box. This exposes more channels for subscription.
Install software needed by the Oracle Enterprise Manager agent
Ensure the following software packages are installed on the RPM server using the following command. If any packages exist they will simply report as installed and not re-install. It is advisable to check the relevant documentation for the Oracle Linux package requirements, for example Oracle Linux 8 also requires the libnsl rpm to be installed:
[root@myrpmserver~]# yum install binutils gcc glibc-common glibc-devel libaio libstdc++ make sysstat
Add firewall rules
It is possible to skip this step if the firewall is not being used on the RPM server.
If a firewall is to be used, a firewall rule for the default port of 3872 is required to allow the Oracle Enterprise Manager agent to be installed, configured and used. The following example command, based upon iptables, can be used to allow access to the Oracle Enterprise Manager agent. Adjust the service port if the default port of 3872 is not being used. The default port can be changed during the install agent flow via the UI.
For example for OL6:
[root@myrpmserver~]# iptables -A INPUT -m state --state NEW -m tcp -p tcp --dport 3872 -j ACCEPT
If the firewall has not been configured for SCP, SSH, HTTP or HTTPS it is required to configure it now using the relevant Oracle Linux documentation.
Save and restart iptables as shown below:
[root@myrpmserver~]# service iptables save
[root@myrpmserver~]# service iptables restart
For example for OL7 and above:
[root@myrpmserver~]# firewall-cmd --zone=public --permanent --add-port 3872/tcp
[root@myrpmserver~]# firewall-cmd --reload
[root@myrpmserver~]# firewall-cmd --list-all
[root@myrpmserver~]# systemctl daemon-reload
Create a Named Credential for the Oracle Enterprise Manager agent user
A named credential is required for the patching framework and must relate to the Oracle Enterprise Manager agent user for the RPM server. This named credential is the target user account authentication information stored in Oracle Enterprise Manager and used for running the patching framework jobs. Named credentials can be created with a user name / password or SSH keys.
Create a named credential with the user you intend to install the Oracle Enterprise Manager agent as.
- Setup > Security > Named Credentials
Click Next to launch the Create Named Credentials wizard.
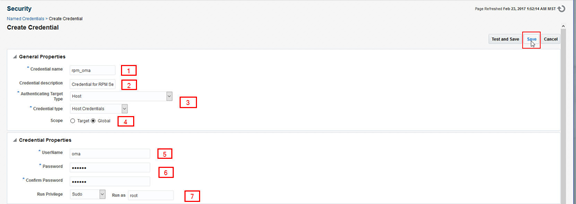
Fill in Create Credential form using the numbered items below.
1. Provide the name for the Named Credential that will be used to install the Oracle Enterprise Manager agent on the RPM server, in this example we use rpm_oma
2. A short description that will enable administrators to understand the role and purpose of the Named Credential
3. Choose “Host” and “Host Credentials”
4. Select “Global”. You can specify a single host, however this credential may be a common standard in the data center and be reused
5. The administrator user account created on the RPM server to install the Oracle Enterprise Manager agent
6. The password for the administrator user account created on the RPM server to install the Oracle Enterprise Manager agent
7. If sudo has been configured on the RPM server then choose sudo and run as root
Finally, click on Save to complete the process.
It is not possible to test the credential until the Oracle Enterprise Manager has been installed and is running. Therefore, confirm to save the credential without testing.
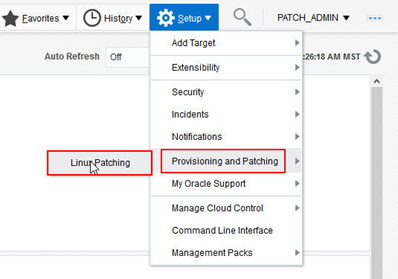
Deploy Oracle Enterprise Manager agents via the UI
The following steps are required to deploy the Oracle Enterprise Manager agent to the RPM server. This process can be carried out by a superuser or by any user with the Add Target privilege. The following screenshot depicts a user (patch_admin) which has been configured with the Oracle Enterprise Manager role EM_LINUX_PATCHING_ADMIN. This role is able to be used to push Oracle Enterprise Manager agents as well as configure the Linux Host Patching framework.
Add the targets manually.
- Setup > Add Target > Add Targets Manually
- Install Agent on Host
- Choose Add and then provide the hostname for the RPM server.
Populate the page as shown below. Refer to the numbered items below for detailed explanations about each of the required fields indicated by the callouts in the screen shot.
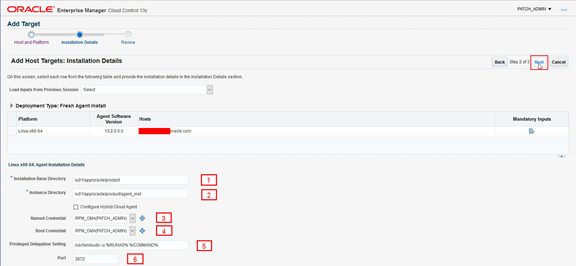
1. The value should reflect the installation base directory created for the Oracle Enterprise Manager agent, in our example: /u01/app/oracle/product
2. The value is automatically populated with the correct string, based on the installation base directory when this field is selected; the default value should not be modified once it is automatically populated
3. Choose the rpm_oma named credential (oma user)
4. Choose the rpm_oma named credential (oma user)
5. If sudo access for the oma user was enabled, then leave the default setting. If no sudo is configured, then this value can be removed. If no sudo is configured, one of the final steps of the Oracle Enterprise Manager agent install will fail and the process will advise that a script must be run manually as the root user. Follow the prompts to continue to complete the install process and then run the scripts as the root user as directed
6. This shows the default service port (3872). This value should be changed if a different port is to be used.
This step will deploy the Oracle Enterprise Manager agent to the RPM server. It is possible to view the progress closely, to help ensure all steps are completed.
Following the successful install of the agent, the /etc/sudoers file should be edited (as the root user using visudo) to:
- Remove the Oracle Enterprise Manager agent install requirements
- Add the nmosudo
Using the document example, remove the following line:
oma ALL=(root) /usr/bin/id, /u01/app/oracle/product/*/agentdeployroot.sh
Add the following line:
oma ALL=(root) /u01/app/oracle/product/<agent_home>sbin/nmosudo
Configure Privilege Delegation
All Oracle Enterprise Manager deployment procedures (DP’s) require privileged user access; the Linux Host Patching framework requires running of DP’s. Therefore Oracle Enterprise Manager needs to be informed of which hosts have privileged user access; this is achieved using Privilege Delegation.
Configure Privilege Delegation:
- Setup > Security > Privilege Delegation

Edit the settings, choose sudo and then input the command. For Oracle Linux, this is usually /usr/bin/sudo, then copy the example command string from –u ie /usr/bin/sudo -u %RUNAS% %COMMAND%
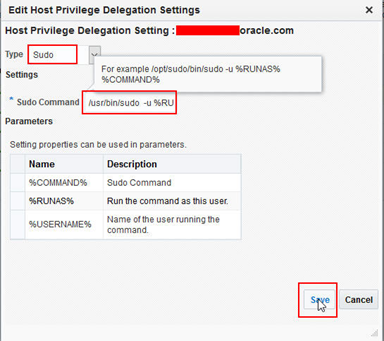
Once set, the following screenshot reflects the Type and Command information just set. It is possible to test the setting using the Test button.
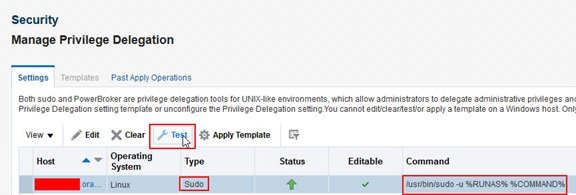
Once set, it is possible to create a template which can be quickly and easily replicated to multiple hosts.
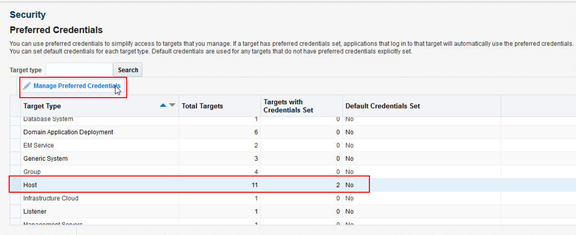
Configure Preferred Credentials
Preferred Credentials are stored within Oracle Enterprise Manager. Once stored, Preferred Credentials enable simpler deployment or patching flows as they are set system wide and the user does not have to set individual credentials for each host. A best practice is to create a “normal” user credential with no root privilege, then another for the “privilege” user which has root privilege set. For this example, the same user with root privilege is used for simplicity.
- Setup > Security > Preferred Credentials
Highlight the Host target and select Manage Preferred Credentials.
If you have separate users, for Normal and Privilege then highlight each and use Set to configure the Preferred Credential. For our example, there is a single user to set for both, therefore both are highlighted.
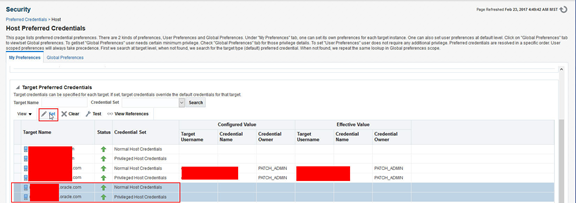
The RPM_OMA Named Credential, set earlier, is selected and displays the username and privilege type. Click Save to set.
The Preferred Credentials are now set.
Configure HTTP
The Linux Host Patching framework requires an HTTP server, therefore the following package needs to be installed and configured to start to boot time. Refer to the relevant Oracle Linux documentation with respect to service configuration.
[root@myrpmserver~]# yum install httpd
To test the HTTP configuration use a browser to view the FQDN of the RPM server. This should return the test page, if configured correctly.
Configure RPM Repository prerequisites
It is required that the GPG keys are imported. To achieve this, run the following command:
[root@myrpmserver~]# rpm --import /etc/pki/rpm-gpg/RPM-GPG-KEY
If the RPM server is, for example, Oracle Linux 7-based and will be required to host Oracle Linux 6 channels (ol6_*), then the GPG key for OL6 is required. The keys are available from the http://public-yum.oracle.com using the following document.
It is recommended that you allow 50 – 60GB disk capacity per channel (ie ol7_x86_64_latest) which is required in /var/www/html. Also bear in mind that if the use of Custom Channels is required, you will need to plan for additional space, which will depend on the amount of packages required.
The following packages are required to be installed: uln-yum-mirror (available from the Add-Ons channel) and yum-utils (available from the latest channel).
It may be needed to access the ULN and subscribe to the Add-Ons channel. Once uln-yum-mirror is installed this channel can be removed from the subscription if it is not required for host patching.
[root@myrpmserver~]# yum install uln-yum-mirror yum-utils
Once the yum-uln-mirror package is installed this creates a daily server crontab job to synchronize the repositories. This RPM server will be under the control of the Oracle Enterprise Manager Linux Host Patching framework, which will run a job every 24 hours to perform this synchronization and recalculate compliance. Therefore the daily crontab job should be disabled by editing the /etc/sysconfig/uln-yum-mirror file and setting CRON_ENABLED to 0``.
This document has used an Oracle Enterprise Manager user with the role EM_LINUX_PATCHING_ADMIN to configure and setup the Linux Host Patching framework. For general patching, once the framework has been setup, it is recommended that a user be created with the EM_PATCH_DESIGNER role and Operator Any Target privilege (however any user with super-administrator privilege is able to do this).
If you are using OL8 for the RPM server you need to install python3 and set this as the preferred python version:
[root@myrpmserver~]# dnf install python3
[root@myrpmserver~]# alternatives --set python /usr/bin/python3
[root@myrpmserver~]# python --version
Configure the RPM server
Before running this flow check on the ULN for what channels the RPM server is subscribed to. The default channels may now no longer be required as any subscribed channels will be synchronized by the RPM server setup procedure.
Using the Linux patch_admin user, configure the RPM server following the examples below:
Using the radio or search button on the RPM Repository server, select the target RPM server. Next, check that the Normal and Privileged Host credentials are set, then Apply.
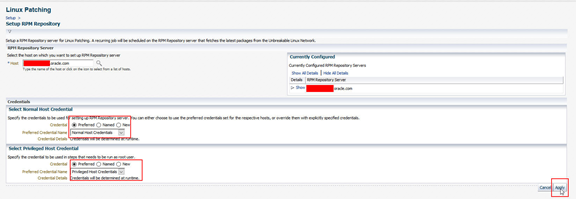
Once applied, this will create a Procedure Activity Job to create and configure the RPM server. Click on the job link to go to the Procedure Activity. Either set the View Data field on the right hand corner to a Refresh Setting (30 seconds for example) or press the refresh arrow above Procedure Actions.
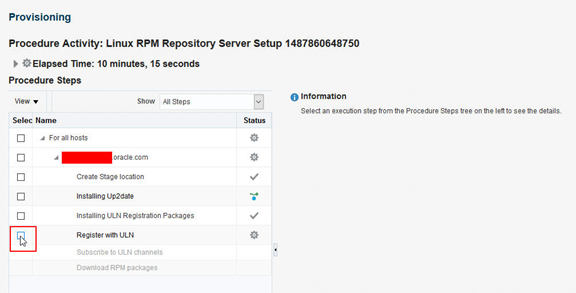
There are two actions required to allow the RPM server job to continue. The first is to confirm that the RPM server has been registered with the ULN. The second is to confirm that the RPM server has subscribed to the required channels.
To proceed with these steps, click on Register with ULN under procedure steps, then confirm:
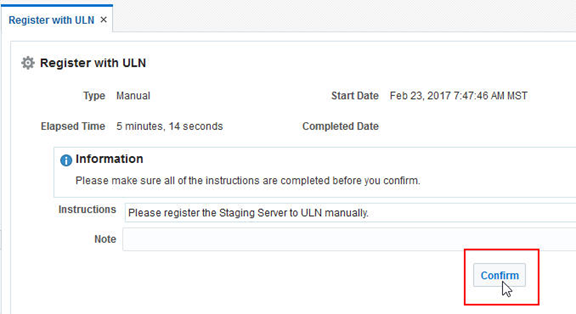
Once the screen has refreshed and the Subscribe to ULN channels step appears, click on the step and confirm.
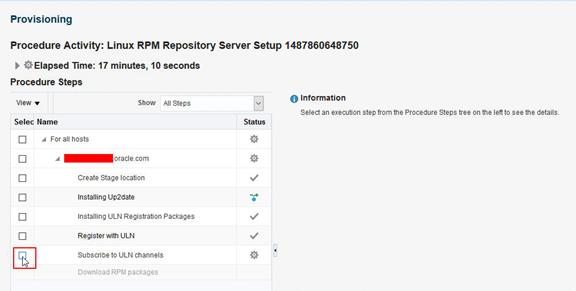
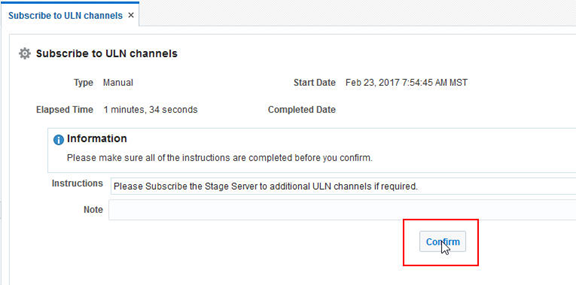
Once the Subscribe to ULN channels step has been confirmed and the screen refreshes, the job will automatically continue to the Download RPM packages step. The log for this download process can be monitored by clicking the box next to this step.
This step may take some time as it is dependent upon the number and size of the subscribed channels.
Removing ULN or Custom Channels
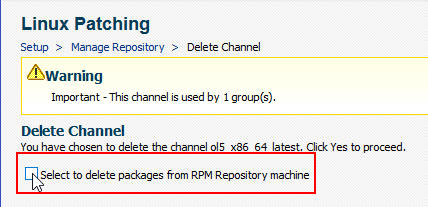
If any of the ULN or Custom Channels under the control of Oracle Enterprise Manager need to be removed use the UI: Setup > Provisioning and Patching > Linux Patching. From the Setup menu select Manage RPM Repository. From here select the channel to delete and click Delete.

Before the channel is deleted, a choice is offered to delete the packages from the RPM server. This is useful with respect to saving space for future channels.
Adding ULN channels
If a new channel is available via the ULN and subscribed to via the ULN interface, the Oracle Enterprise Manager Linux Host Patching framework must be made aware of the new channel. This directs it to create the directory structure, and manipulates the Linux Host Patching job framework to include the channel in subsequent downloads. To do this, go through the steps of the configure RPM section detailed above, choosing the RPM server as the target using Normal and Privileged credentials. The job will ignore any configured channels and will add the new ULN channel(s).
Configure Linux Patching Groups
Patching Groups are a feature of the Oracle Enterprise Manager Linux Host Patching framework which enables the grouping of host target types together in order to compute compliance and to install, update and undo (remove) packages. Compliance within this framework is the comparison of what packages exist in the Patching Group assigned channel(s) compared to the packages that are present on the host targets within the Patching Group. It is possible to configure a Patching Group with multiple live or Custom Channels and also possible to have multiple Patching Groups using the same channels.
There is also a Rouge Package feature which, if enabled, will report packages that are not present in the channel but exist on the target host. An example of a rogue package is a specialized package such as an Oracle Application package or special device package. It is possible when setting up the patching group to either include or exclude this Rogue Package feature from computing compliance. This and other group features can be changed post Patching Group creation.
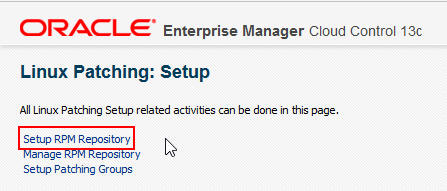
From the UI: Setup > Provisioning and Patching > Linux Patching. From the Setup menu select Setup Groups.
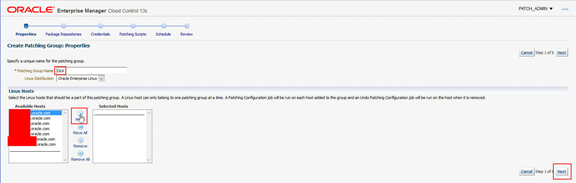
From here select Create. Run through the Create Patching Group wizard and on the Properties page enter a Patching Group Name, then select which target patching hosts should be in the new patching group. Once these are selected, click Next to move to the Package Repositories page.
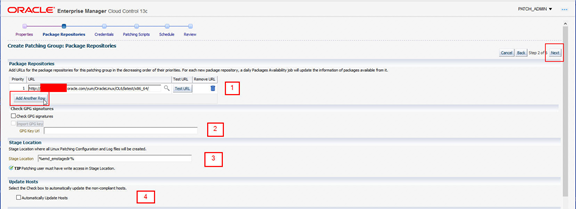
Using the numbered items below complete the fields and click Next:
1. Using the radio or search button, select the required channel (Custom or ULN) from the offered list. It is possible to test the URL. New channels can also be added using the Add Another Row button.
2. In the Check GPG Signatures section it is possible to select Check GPG signatures to ensure that yum performs a GPG signature check on the packages obtained from the specified repositories. In some cases yum may require a public GPG key to verify the packages obtained from the repositories. This key may not be previously imported into the RPM database. To ensure that this key is imported, select Import GPG key, then specify the GPG key URL.
3. This value can be changed with respect to the Staging location.
4. If the Automatically Update Hosts box is checked, the user is prompted later in the wizard to define a schedule for the updater job to run. This job will update any packages installed on the hosts in the group that are non-compliant.
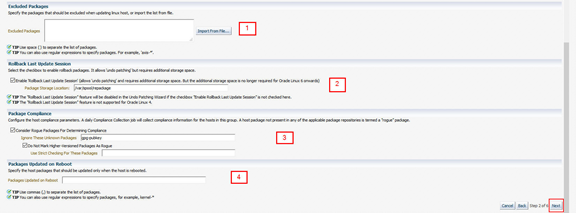
Using the numbered items below complete the fields and click Next:
1. Define any packages to be excluded from update within the Patching Group. Examples of excluded packages could be server specific device driver packages which must remain at the same level. It is possible to import a large list of excluded packagesfrom a file.
2. This enables rollback or the removal / ‘undo’ of any patching run. If this is not selected then the remove or ‘undo’ patching feature will not be possible.
3. Rogue Package examples could be server specific device driver packages or vendor packages which would not be in the ULN or Custom Channel and may therefore not be relevant to channel compliance. If this is not selected, these packages would be ignored from any compliance reporting.
- Specify the list of packages that must be updated only when the host is rebooted.

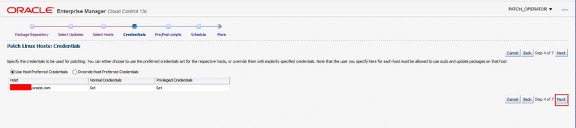
This example screenshot above shows a host that does not have preferred credentials set. In this case, tick the highlighted Override Host Preferred Credentials to select another normal and privileged credential to perform the patching. In this example ORACLE is the normal and privileged user.
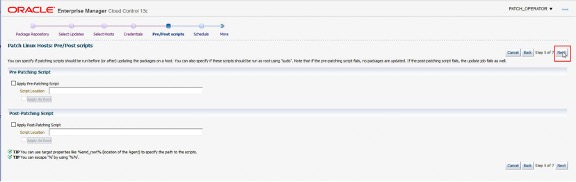
If the Automatically Update Box was not ticked in the Package Repository step then the Patching Scripts and Schedule pages will not be run. The Patching Scripts page enables the user to upload any custom scripts to be run before and after an automatic update job. The Schedule page defines the frequency of the host packages updater job. As part of a normal patching run, for example not an automatic update job, it is possible to run pre- and post-patching scripts.
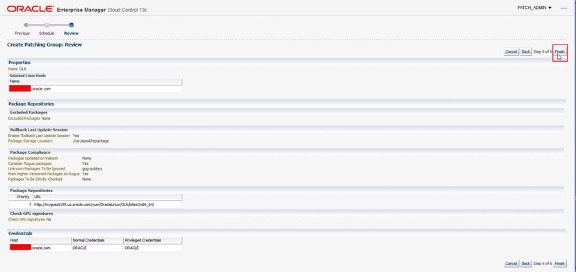
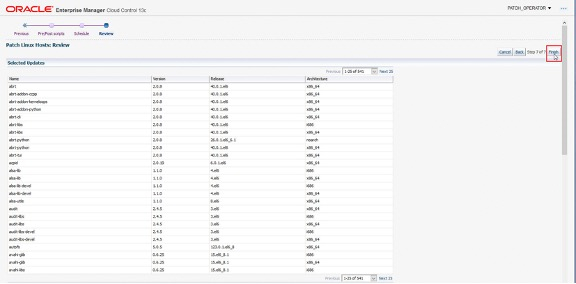
The above screenshot is the final review page.
Select Finish to continue. This creates the Patching Group and runs compliance jobs to determine which hosts, if any, require updates.
Management of RPM repositories
Once the RPM server(s) are configured with ULN channels, it is possible to manage and create other channels. The following screenshot shows a single RPM server with two channels. It shows the Type as a ULN channel and also details the numbers of Packages, Advisories (Errata) and which Patching Groups to which the channels belong. Using the Create Like button it is possible to create a directory structure on either the RPM server or another host with an Oracle Enterprise Manager agent (and httpd configured) to be used as a Custom Channel. Custom Channels are a feature where specific packages are able to be placed to satisfy use cases outside of the main ULN channels.
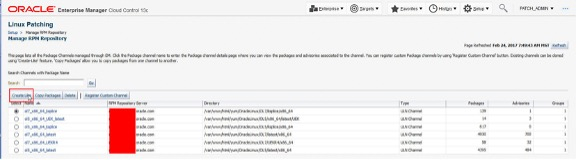
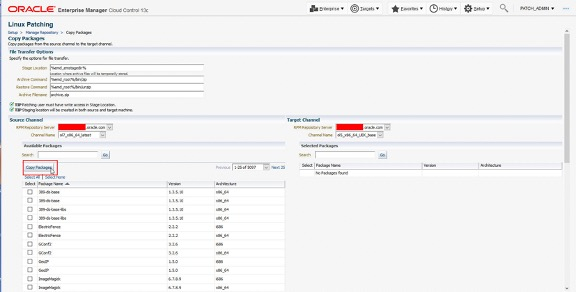
Also it is possible to use the Copy Packages feature to copy packages between, for example, ULN and Custom Channels.
The following is an example flow, firstly creating a Channel using the Create Like feature and then from that new directory structure on the RPM server, creating a Custom Channel which can be used for a new patching group.
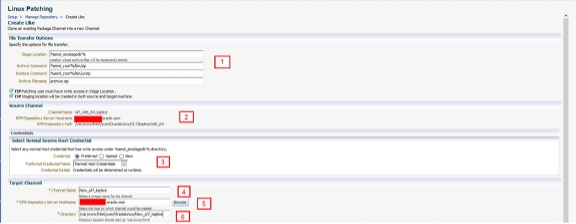
Using the numbered items below complete the fields and click OK:

|
|
|
1
|
These values can be changed with respect to Staging location and archive tooling.
|
|
2
|
This is the RPM server source channel from where the target packages will be copied.
|
|
3
|
These named credentials have been set earlier, however they can be changed. These are for the staging area on the hosting RPM server.
|
|
4
|
The new channel name.
|
|
5
|
The target RPM server to host the new channel.
|
|
6
|
The directory on the RPM server where the copied packages will reside.
|
|
7 / 8
|
Normal and Privileged named credentials for the RPM server where the copied packages will reside.
|
|
Configure Custom Channels
There are two methods to create a custom channel: First, the directory can be created manually (via CLI) on the target RPM server within the /var/www/html/ directory structure. Once the directory has been created the target RPM packages can be copied in using CLI tools. Once the RPM packages are copied, the following utilities must be run to generate the metadata required for the Custom Channel:
createrepo
yum-arch
These two utilities, once run, create the /repodata and /headers directories.
Second, using the Oracle Enterprise Manager Create Like feature, described above, create a clone of another Custom or Live channel. Once this clone is created it is possible to add RPM packages using the Copy Packages feature. RPM packages can be chosen from the serving channel to the new cloned channel. Once the copy feature is complete, channel metadata is automatically created.
To register a Custom Channel which has either been created manually or by the Oracle Enterprise Manager UI, use the Register Customer Channel feature.


Using the numbered items below complete the fields and click OK:
|
1
|
The name for the new Custom Channel.
|
|
2
|
This is the RPM server where target packages exist, including the generated metadata.
|
|
3
|
The directory on the RPM server where the packages and generated metadata exist.
|
Once the job completes the new Channel is displayed in the Manage RPM Repository view.

Note the Custom reference outlined in red denoting this is a Custom channel rather than a ULN Channel.
A Custom Channel is a point in time copy and not updated. Therefore, once updated and made compliant, further compliance will not be reported. If the channel needs to be updated in the future, the following options are available:
· Manually copy in the new RPM’s and run the two utility commands
· Use the Copy Package feature from an existing Live or Custom channel which will automatically generate the new metadata
Host Linux Patching
The Oracle Enterprise Manager Linux patching framework offers two methods of patching operation: Compliance or Advisory-based patching; both are explained in detail in the coming sections. The Configuration Files feature for deploying configuration files and the ability to run pre- and post-scripts is also explained in detail. For general patching (not configuration file operation) once the framework has been setup, it is recommended that a user with the EM_PATCH_DESIGNER role and Operator Any Target privilege be created.
Compliance-based patching
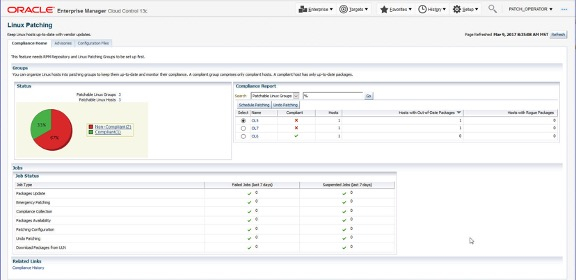
This method is based upon the Linux patching framework reporting that RPM packages existing on hosts within a defined patching group are different from those present in the patching group patching channels. This situation is deemed non-compliant.
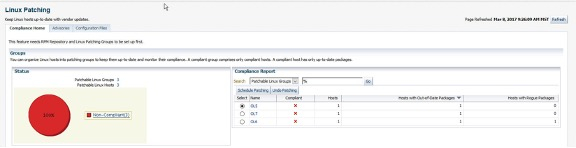
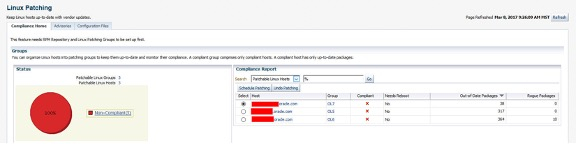
The above view is the default which shows the Linux patching groups and their compliance. It is also possible to view compliance based upon individual hosts within the patching groups.
To schedule patching or undo patching, select the target group or host and then click on the corresponding button. This invokes the patching wizard.
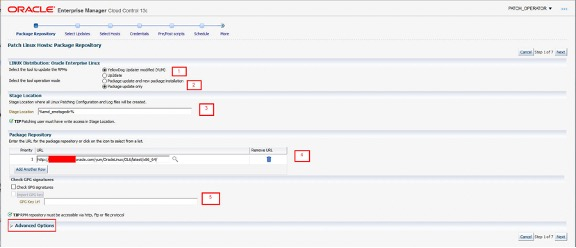
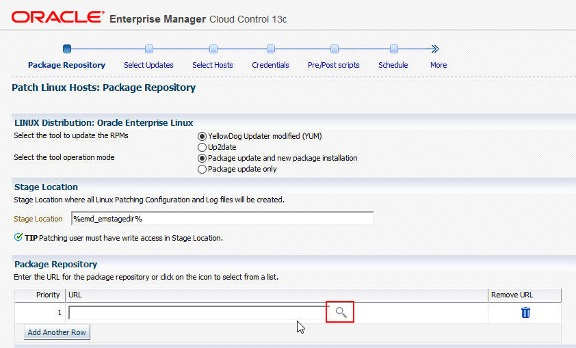
Using the numbered items below complete the fields and click Next:
|
1
|
The default choice is YUM which is relevant for OL6 and above. Up2date is relevant only for OL5.
|
|
2
|
Package update only is the default which only updates the existing packages and does not install any new ones. Package update and new package installation updates existing packages and installs new packages.
|
|
3
|
This value can be changed with respect to the Stage Location
|
|
4
|
This denotes the required RPM repositories to patch from (the defaults are set within the patching group)
|
|
|
In the Check GPG Signatures section it is possible to select Check GPG signatures to ensure that yum performs a GPG signature check on the packages obtained from the specified repositories. In some cases yum may require a public GPG key to verify the packages obtained from the repositories. This key may not be previously imported into the RPM database. To ensure that this key is imported, select Import GPG key, then specify the GPG key URL.
Note Advanced Options is outlined in red. This field is not exposed by default and is only relevant to the use of YUM and is not relevant to Up2date operation. It is exposed by clicking on the arrow next to Advanced Options.

This section has the Most suitable architecture and Hide obsolete updates options selected by default.
Most suitable architecture
This default option is for yum to install the latest version of the selected package, or update the existing version of the package to the latest version. This action applies for suitable architectures that are installed on the Linux hosts that are being patched.
If this option is selected, the Oracle Enterprise Manager Linux patching framework runs the following yum command:
yum install | update packagename
Specific architecture
This option is for yum to install the latest version of the selected package, or update the existing version of the package to the latest version, on only those Linux hosts that have the RPM architecture of the selected package.
If this option is selected, Oracle Enterprise Manager runs the following yum command:
yum install | update packagename.arch
Specific version and architecture
If the requirement is for yum to install only the specific version of the package selected on the Select Updates page, or update the existing version of the package to this specific version, on only those Linux hosts that have the RPM architecture of the selected package.
If this option is selected, the Oracle Enterprise Manager Linux patching framework runs the following yum command:
yum install | update epoch:packagename-ver-rel.arch
Hide obsolete updates
The Hide obsolete updates option is selected be default and simply excludes obsolete packages from the patching framework. For example, if we have the following packages in the patching channel:
|
Name
|
Version
|
Release
|
Architecture
|
|
|
Web-browser
|
17.0.10
|
1.0.1._ol6_10
|
i386
|
|
|
Web-browser
|
17.0.9
|
1.0.1._ol6_9
|
i386
|
OBSELETE
|
|
Web-browser
|
17.0.10
|
1.0.1._ol6_10
|
x86_64
|
|
|
Web-browser
|
17.0.9
|
1.0.1._ol6_9
|
X86_64
|
OBSELETE
|
The versions in italic text are obsolete as they are older versions of the package and with the default option selected, these updates are excluded from the list of packages to be updated/installed.
The select updates page of the wizard provides an opportunity to search through the updates and de-select any that are not required.
|
1
|
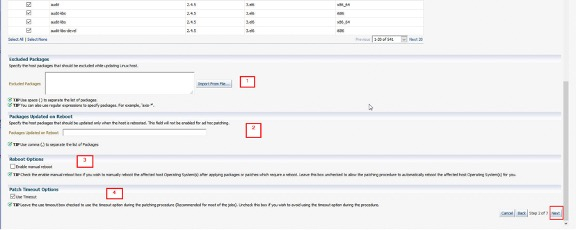
Explanations:
Define any packages to be excluded from updating within the Patching Group. Examples of excluded packages could be server-specific device driver packages which must remain at the same level. It is possible to import a large list of excluded packages from a file.
|
|
2
|
Specify any packages that need to be updated only when the target host is rebooted.
|
|
3
|
If this box is checked the target host is required to be rebooted manually. By default it is left un-ticked to enable the patching framework to initiate a reboot, if required following patching.
|
|
4
|
This is a default timeout setting for the patching procedure which is recommended for most patching jobs. However, it is possible to disable this setting.
|
Next select the Patching Group for the patch run.
Next, if required, override the Host Preferred Credentials.
Next, if required, select any scripts to be run before or after patching. These scripts must exist on the target host and can be uploaded using the Configuration Files feature, which will be explained in a later section.
Next, select the schedule for the patching process.

The patching framework schedules and then runs the patching job.

Following the patch job, the framework runs another set of compliance jobs and reports this on the main Compliance Home page. The screenshot below shows the OL6 patching group now in a green or compliant state.
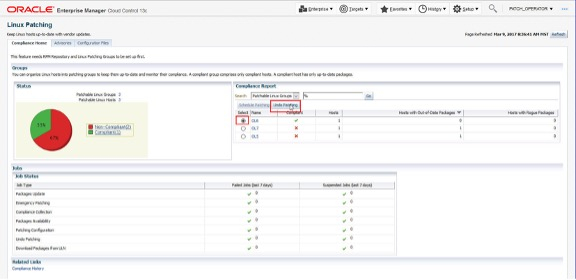
Undo Patching
To undo or rollback any patching, select the Patching Group or Host and then select Undo Patching.
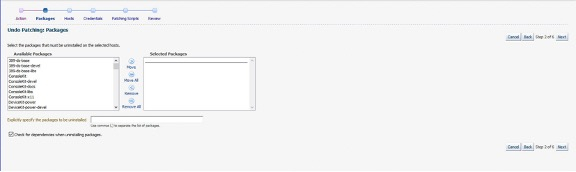
The Undo Patching wizard runs and displays the Action page. The user has a choice to uninstall individual packages or rollback (undo or uninstall) the last update or patch job.

If Uninstall Packages is chosen then the Packages screen displays the available packages to be uninstalled which can be selected or, in the box below, the user can explicitly specify the packages to be uninstalled.
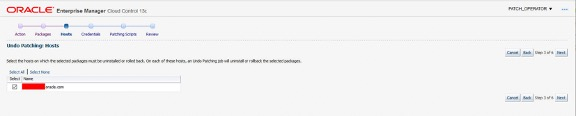
If Rollback Last Update Session is chosen, the Packages page is skipped to display the Hosts page where the target hosts for the Rollback Last Update job is to be run.
The Credentials, Patching Scripts and Review pages are the same pages seen during the Compliance patching wizard flow.
Both job types will run and either un-install the selected packages or rollback the last update session. In both cases, Compliance jobs will run and a new status will be displayed on the Compliance Home page.
Advisory-based patching
Advisories or Errata are available through subscribed channels from the ULN. The Oracle Enterprise Manager Linux patching framework captures these advisories and makes them available through the Advisories tab.
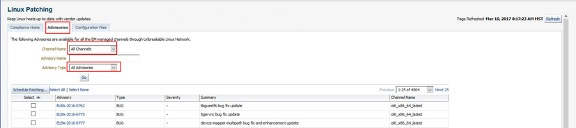
It is possible to view all advisories from all channels, as depicted in the screenshot. It is possible using the Channel Name and Advisory Type drop down menus to filter for certain channels and advisory types.
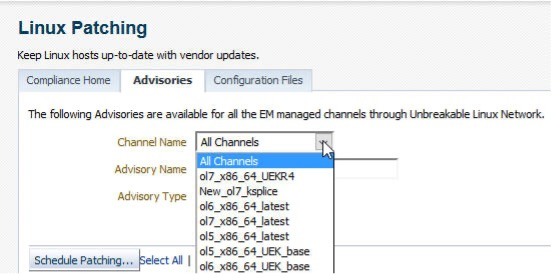
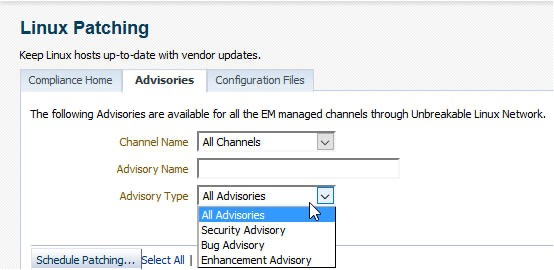
For example, choosing the ol7_x86_64_latest channel and Security Advisory the user can search and then choose one or many advisories to deploy.

Once the advisories are selected the user clicks on Schedule Patching. This will launch the patching wizard which has been explained in previous sections. The Select Host page requires the user to select the target type which can be an individual Host or Patching Group and the Platform (Linux x86-64 or Linux x86). Once these choices are made, the user clicks on the Go button and selects the relevant targets on which to deploy the advisories.
Emergency or ad-hoc patching
If there is a situation where a patch is required quickly or in an ad-hoc manner for a single host, without using a patching group, the following procedure can be followed:
Select Enterprise > Provisioning and Patching > Procedure Library
Within the Search Text Fields box enter “Patch Linux Hosts” and then click the Go button. This will list the Patch Linux Hosts procedure. From here click the Launch button.

This will launch the patching wizard which has been explained in previous sections. As this is not based upon a Patching Group, the Package Repository area will be empty. To choose a single or multiple repositories click the radio button.
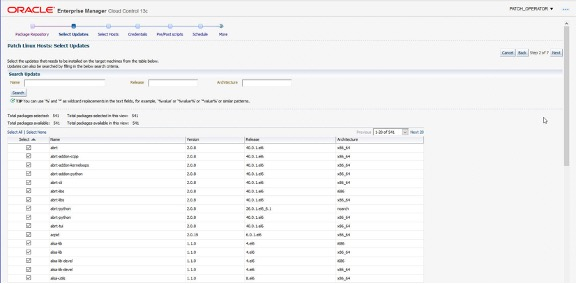
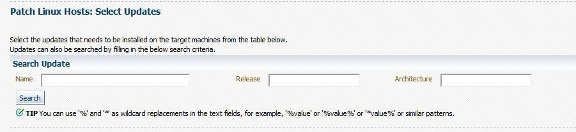
At the Select Updates page, all packages from the chosen channel(s) will be unselected. Therefore, it is necessary to choose the required packages to install. It is possible to search for updates using the Name, Release and Architecture fields.
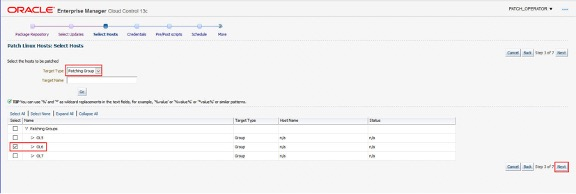
The Select Hosts page functionality is as described earlier in the Advisory patching and patching wizard sections.
Configuration Files
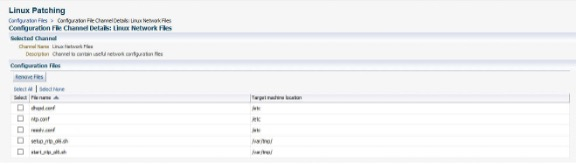
To use the Configuration Files feature the user requires the EM_LINUX_PATCHING_ADMIN role. This feature is accessed via the main Linux Patching page via the Configuration Files tab.

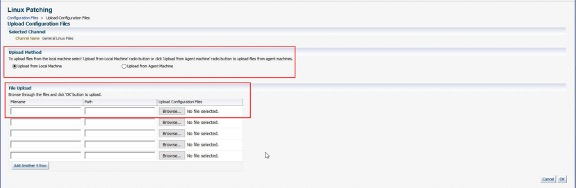
The two entries depicted in the screenshot (General Linux Files & Linux Network Files) are Config File Channels which hold multiple configuration files for deployment. These are created by using the Create Config File Channel button. By selecting the required channel, this exposes the files present within the channel. Files from this view can also be removed.
By selecting the Upload Configuration Files button from the Configuration Files view, in the above screenshot, files can be uploaded, either from the user’s local machine or from a host which has the Oracle Enterprise Manager agent installed and running.
By selecting the Import Files button from the Configuration Files view, in the above screenshot, it is possible to import or copy files between Configuration File Channels. The user can select the source and target channels as well as individual files to copy.

By selecting the Delete button from the Configuration Files view, in the above screenshot, Configuration File Channels can be deleted.
Configuration Files are deployed by selecting the Config File Channel, then clicking the Deploy Files button which starts the Deploy Config Files wizard. The Config Files page is where the user can select files to deploy.

The user can add target hosts from the Hosts page using the Add button.

From here to deployment the wizard has a similar flow to that of the patching wizard, offering the user the choice to set credentials and choosing to deploy pre/post scripts.
A good use case is to deploy, for example, setup and start ntp scripts to target hosts. If a new NTP configuration file is required, this new file can be deployed using the pre/post scripts already deployed to setup and restart the NTP service.
RESOURCES
Download Oracle Linux from edelivery.oracle.com.
Oracle Basic and Premium Support comes with Oracle Enterprise Manager 13_c,_ for more information visit Oracle Linux Support website..
|