This blog will demonstrate how to a build and run a WebSocket based microservice. Here is what the blog will cover at a high level
- Overview of WebSocket and the sample Java application
- Continuous Integration setup: from source code in the IDE to a build artifact in Oracle Developer Cloud
- Continuous Deployment setup: from a build artifact in Developer Cloud Service to an application running in Oracle Application Container Cloud
- Testing the application

Overview
WebSocket: the standard
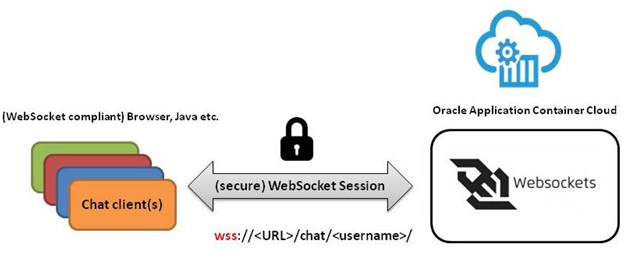
WebSocket is an IETF standard recognized by RFC 6455 and has the following key characteristics which make it great fit for real time applications
- Bi-directional: both server and client an initiate a communication
- Full duplex: once the WebSocket session is established, both server and client can communicate independent of each other
- Less verbose (compared to HTTP)
A deep dive into the protocol is out of scope of this blog. Please refer to the RFC for further details
Java Websocket API
A standard Java equivalent (API) for this technology is defined by JSR 356. It is backed by a specification which makes it possible to have multiple implementations of the same. JSR 356 is also included as a part of the Java Enterprise Edition 7 (Java EE 7) Platform. This includes a pre-packaged (default) implementation of this API as well as integration with other Java EE technologies like EJB, CDI etc.
Tyrus
Tyrus is the reference implementation of the Java Websocket API. It is the default implementation which is packaged with Java EE 7 containers like Weblogic 12.2.1 (and above) and Glassfish (4.x). It provides both server and client side API for building web socket applications.
Tyrus grizzly module
Tyrus has a modular architecture i.e. it has different modules for server, client implementations, a SPI etc. It supports the notion of containers (you can think of them as connectors) for specific runtime support (these build on the modular setup). Grizzly is one of the supported containers which can be used for server or client (or both) modes as per your requirements (the sample application leverages the same)
About the sample application
The sample is a chat application – a canonical use case for WebSockets (this by no means a full-blown chat service). Users can
- Join the chat room (duplicate usernames not allowed)
- Get notified about new users joining
- Send public messages
- Send private messages
- Leave the chat room (other users get notified)
The application is quite simple
- It has a server side component which is a (fat) JAR based Java application deployed to Application Container Cloud
- The client can be any component which has support for the WebSocket API e.g. your browser . The unit tests use the Java client API implementation of Tyrus
Code
Here is a summary of the various classes and their roles
|
Class(es)
|
Category
|
Description
|
|
|
|
|
|
ChatServer
|
Core
|
It contains the core business logic of the application
|
|
WebSocketServerManager
|
Bootstrap
|
Manages bootstrap and shutdown process of the WebSocket container
|
|
ChatMessage,
DuplicateUserNotification, LogOutNotification,
NewJoineeNotification,
Reply,
WelcomeMessage
|
Domain objects
|
Simple POJOs to model the application level entities
|
|
ChatMessageDecoder
|
Decoder
|
Converts chats sent by users into Java (domain) object which can be used within the application
|
|
DuplicateUserMessageEncoder, LogOutMessageEncoder,
NewJoineeMessageEncoder,
ReplyEncoder,
WelcomeMessageEncoder
|
Encoder(s)
|
Converts Java (domain) objects into native (text) payloads which can be sent over the wire using the WebSocket protocol
|
Here is the WebSocket endpoint implementation (ChatServer.java)
@ServerEndpoint(
    value = "/chat/{user}/",

    encoders = {ReplyEncoder.class,

                WelcomeMessageEncoder.class,

                NewJoineeMessageEncoder.class,

                LogOutMessageEncoder.class,

                DuplicateUserMessageEncoder.class},

    decoders = {ChatMessageDecoder.class}
)
public class ChatServer {
private static final Set\<String> USERS = new ConcurrentSkipListSet\<>();

private String user;

private Session s;

private boolean dupUserDetected;

@OnOpen

public void userConnectedCallback(@PathParam("user") String user, Session s) {

    if (USERS.contains(user)) {

        try {

            dupUserDetected = true;

            s.getBasicRemote().sendText("Username " + user + " has been taken. Retry with a different name");

            s.close();

            return;

        } catch (IOException ex) {

            Logger.getLogger(ChatServer.class.getName()).log(Level.SEVERE, null, ex);

        }

    }

    this.s = s;

    s.getUserProperties().put("user", user);

    this.user = user;

    USERS.add(user);

    welcomeNewJoinee();

    announceNewJoinee();

}

private void welcomeNewJoinee() {

    try {

        s.getBasicRemote().sendObject(new WelcomeMessage(this.user));

    } catch (Exception ex) {

        Logger.getLogger(ChatServer.class.getName()).log(Level.SEVERE, null, ex);

    }

}

private void announceNewJoinee() {

    s.getOpenSessions().stream()

            .filter((sn) -> !sn.getUserProperties().get("user").equals(this.user))

            //.filter((s) -> s.isOpen())

            .forEach((sn) -> sn.getAsyncRemote().sendObject(new NewJoineeNotification(user, USERS)));

}

public static final String LOGOUT\_MSG = "\[logout\]";

@OnMessage

public void msgReceived(ChatMessage msg, Session s) {

    if (msg.getMsg().equals(LOGOUT\_MSG)) {

        try {

            s.close();

            return;

        } catch (IOException ex) {

            Logger.getLogger(ChatServer.class.getName()).log(Level.SEVERE, null, ex);

        }

    }

    Predicate\<Session> filterCriteria = null;

    if (!msg.isPrivate()) {

        //for ALL (except self)

        filterCriteria = (session) -> !session.getUserProperties().get("user").equals(user);

    } else {

        String privateRecepient = msg.getRecepient();

        //private IM

        filterCriteria = (session) -> privateRecepient.equals(session.getUserProperties().get("user"));

    }

    s.getOpenSessions().stream()

            .filter(filterCriteria)

            //.forEach((session) -> session.getAsyncRemote().sendText(msgContent));

            .forEach((session) -> session.getAsyncRemote().sendObject(new Reply(msg.getMsg(), user, msg.isPrivate())));

}

@OnClose

public void onCloseCallback() {

    if(!dupUserDetected){

        processLogout();

    }

}

private void processLogout() {

    try {

        USERS.remove(this.user);

        s.getOpenSessions().stream()

                .filter((sn) -> sn.isOpen())

                .forEach((session) -> session.getAsyncRemote().sendObject(new LogOutNotification(user)));

    } catch (Exception ex) {

        Logger.getLogger(ChatServer.class.getName()).log(Level.SEVERE, null, ex);

    }

}
}
Setting up Continuous Integration & Deployment
The below sections deal with the configurations to made within the Oracle Developer Cloud service
Project & code repository creation
Please refer to the Project & code repository creation section in the Tracking JUnit test results in Developer Cloud service blog or check the product documentation for more details
Configure source code in Git repository
Push the project from your local system to your Developer Cloud Git repo you just created. We will do this via command line and all you need is Git client installed on your local machine. You can use Git or any other tool of your choice
cd <project_folder>
git init
git remote add origin <developer_cloud_git_repo>
//e.g. https://john.doe@developer.us.oraclecloud.com/developer007-foodomain/s/developer007-foodomain-project_2009/scm/acc-websocket-sample.git//john.doe@developer.us.oraclecloud.com/developer007-foodomain/s/developer007-foodomain-project_2009/scm/acc-websocket-sample.git
git add .
git commit -m "first commit"
git push -u origin master //Please enter the password for your Oracle Developer Cloud account when prompted
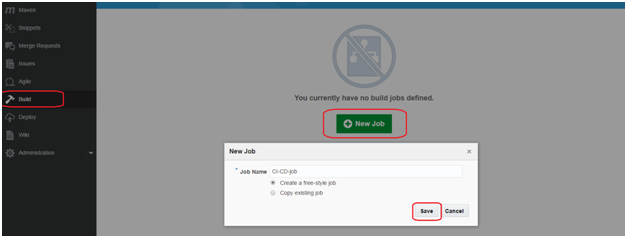
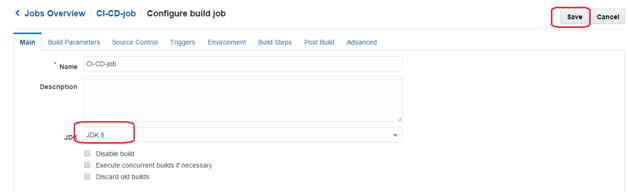
Configure build
Create a New Job
Select JDK
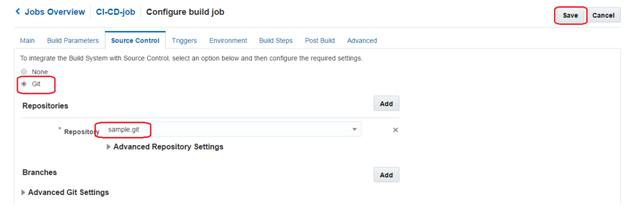
Continuous Integration (CI)
Choose Git repo
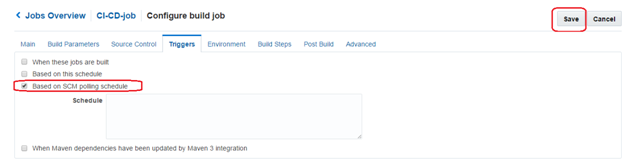
Set build trigger - this build job will be triggered in response to updated within the Git repository (e.g. via git push)
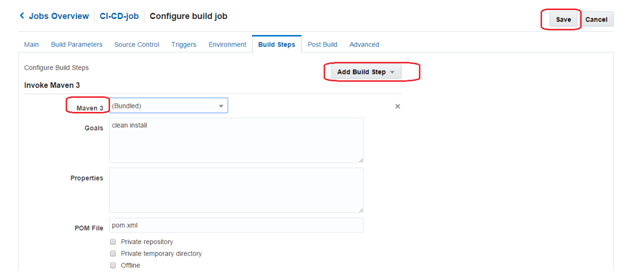
Add Maven Build Step
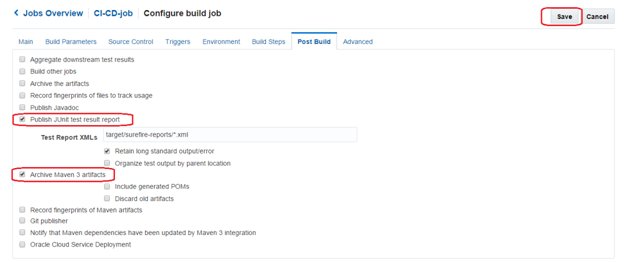
Activate the following post build actions
- Archive the Maven artifacts (contains deployable zip file)
- Publish JUnit test result reports
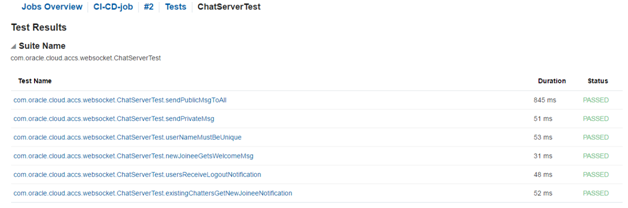
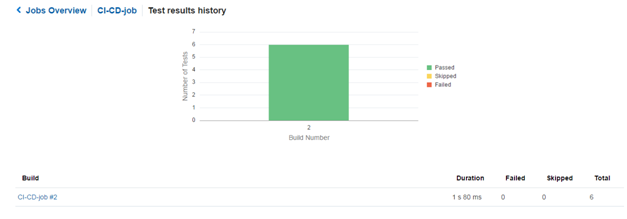
Execute Build & check JUnit test results
Before configuring deployment, we need to trigger the build in order to produce the artifacts which can be referenced by the deployment configuration

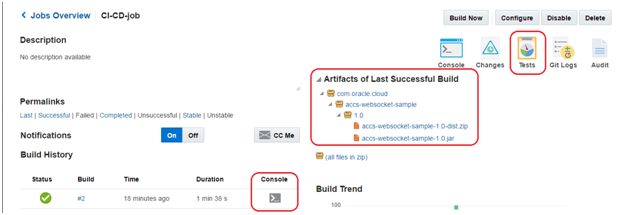
After the build is complete, you can
- Check the build logs
- Check JUnit test results
- Confirm archived Maven artifacts
Test results
Build logs

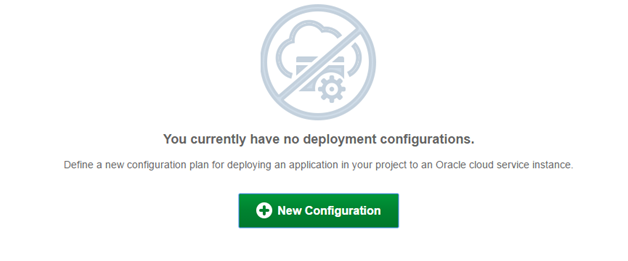
Continuous Deployment (CD) to Application Container Cloud
Create a New Confguration for deployment
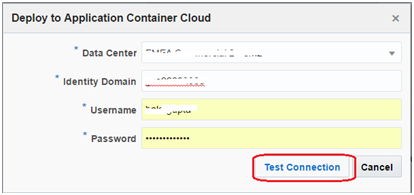
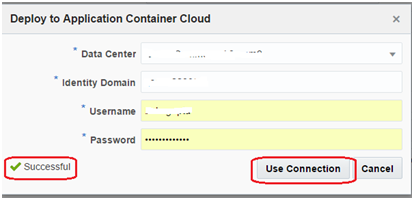
Enter the required details and configure the Deployment Target
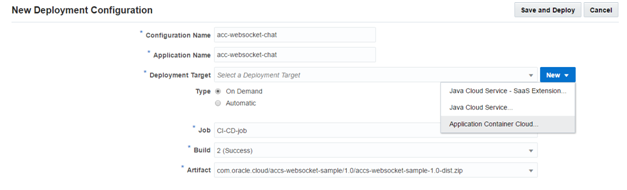
Configure the Application Container Cloud instance
Configure Automatic deployment option on the final confirmation page
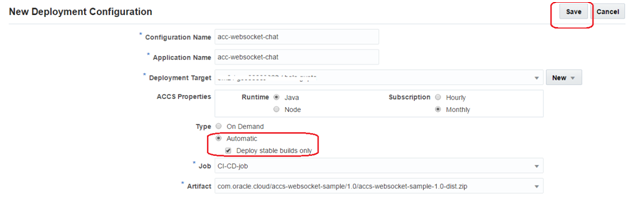
Confirmation screen

Test the CI/CD flow
Make some code changes and push them to the Developer Cloud service Git repo. This should
- Automatically trigger the build, which once successful will
- Automatically trigger the deployment process

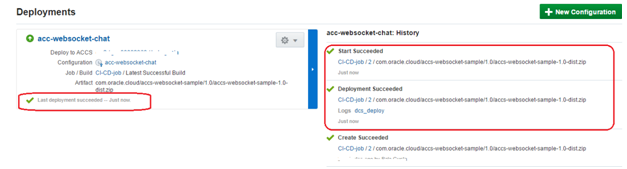
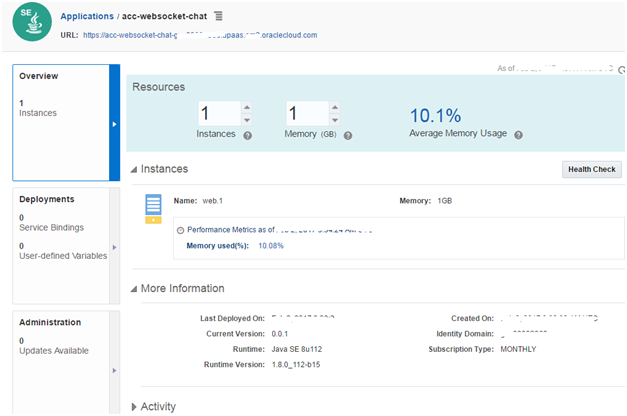
Check your application in Application Container Cloud
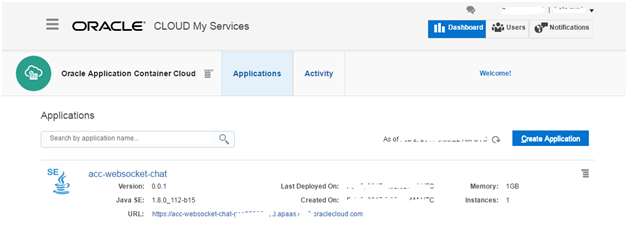
Here is the detailed view
Test
You would need a WebSocket client for this example. I would personally recommend using the client which can be installed into Chrome browser as a plugin – Simple WebSocket Client. See below snapshot for a general usage template of this client
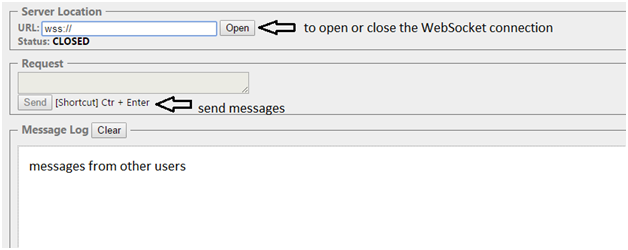
The following is a template for the URL of the WebSocket endpoint
wss://<acc-app-url>/chat/<user-handle>/
e.g. wss://acc-websocket-chat-domain007.apaas.em2.oraclecloud.com/chat/abhi/
Test transcript
Here is a sequence of events which you can execute to test things out
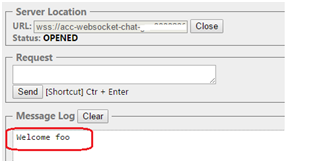
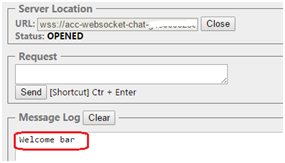
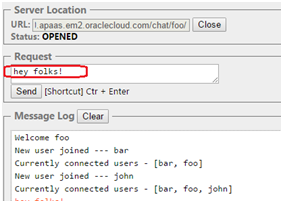
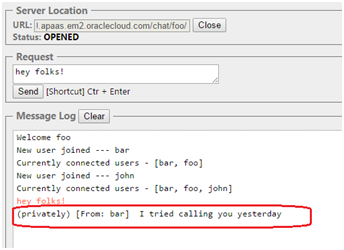
Users foo and bar join the chatroom
wss://acc-websocket-chat-domain007.apaas.em2.oraclecloud.com/chat/foo/
wss://acc-websocket-chat-domain007.apaas.em2.oraclecloud.com/chat/bar/
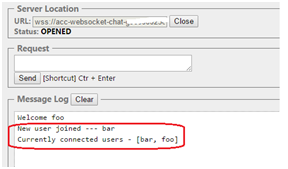
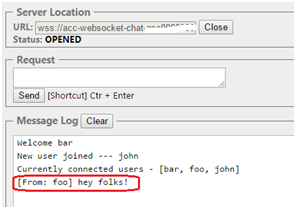
foo gets notified about bar
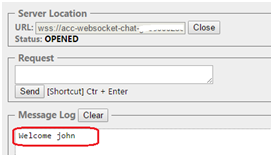
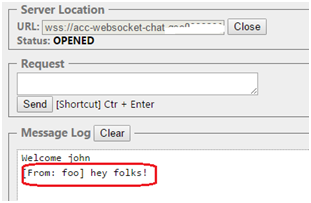
User john joins
wss://acc-websocket-chat-domain007.apaas.em2.oraclecloud.com/chat/john/
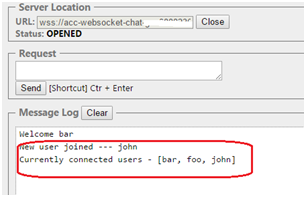
foo and bar are notified

foo sends a message to everyone (public__)
Both bar and john get the message
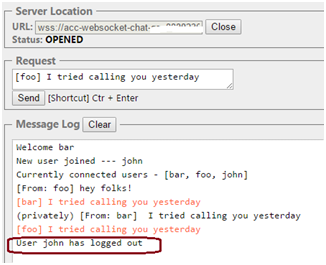
bar sends a private message to foo
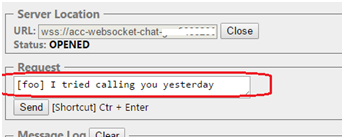
Only foo gets it
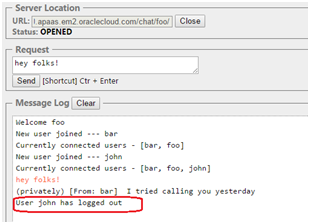
In the meanwhile, john gets bored and decides to leave the chat room
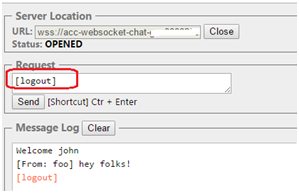
Both foo and bar get notified
That's all folks !
**The views expressed in this post are my own and do not necessarily reflect the views of Oracle.